Checklist: Month-end close
The month-end close is the process through which you make sure every accounting operation of the period is complete, correct and balanced. This checklist covers all the necessary steps — from checking the documents to locking the accounting period.
The month-end close is usually done in the first 5 days of the following month. That window lets you receive the last invoices and bank statements belonging to the month that ended.
Currency revaluation, depreciation of fixed assets, amortization of intangible assets, allocation of indirect costs and closing the period are not separate screens — they are the steps of a closing wizard you start from Sidebar → Accounting → the Accounting Periods tab, with the Start Closing button. The wizard has six steps: Checks · Currency Revaluation · Depreciation · Costs · Financial Result · Confirmation. The last button, the one that actually closes the month, is called Close Period.
Under SNC Moldova, classes 6 and 7 accumulate over the whole year and are closed once, in December, through the balance-sheet reform. The Financial Result step in the wizard is strictly informative — it shows you the month's turnover and the year-to-date total, but it posts nothing. See Year-end close.
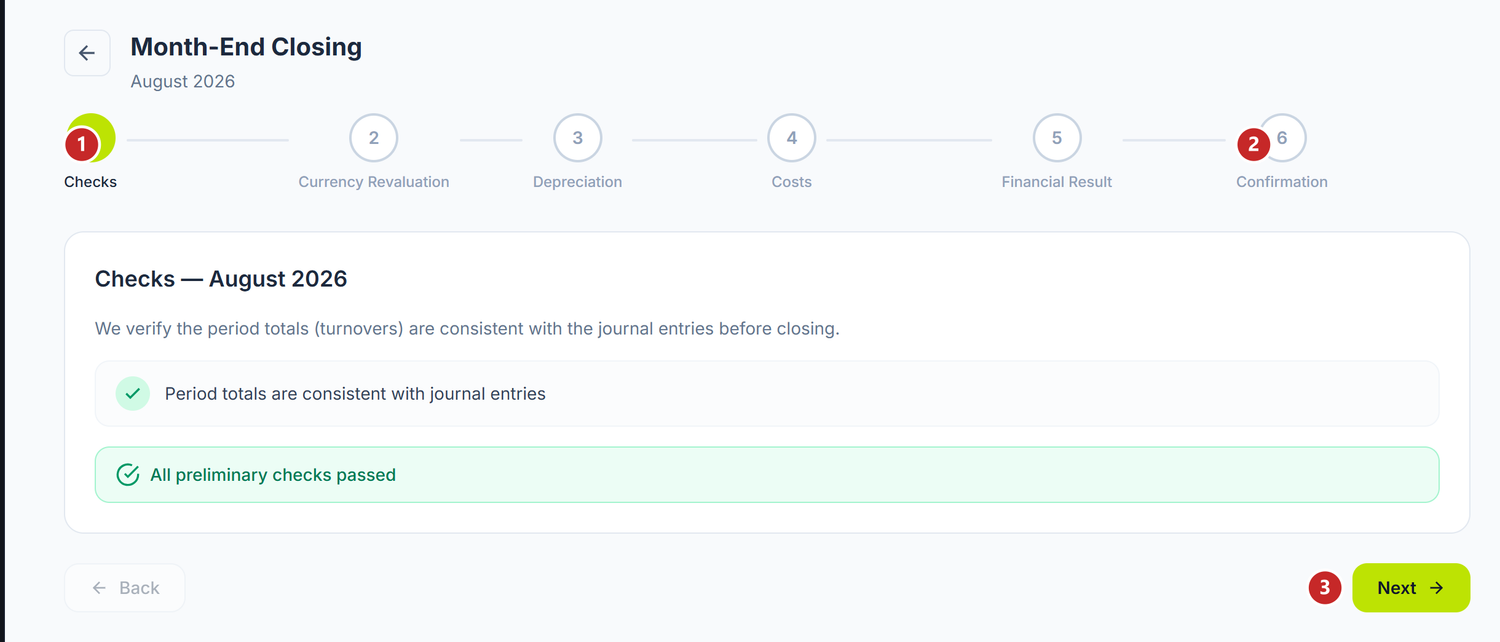
1 the current step · 2 the last step, the one that actually closes the month · 3 move on
The wizard has six steps and you walk them in order. Each step first shows you a preview of the journal entries it will generate.
Currency Revaluation has the Execute button, Depreciation has Calculate and post depreciation, and Costs has Allocate. All three write the entry immediately, not at the end — they are not preview buttons. If you want to leave them all to the last step, move on with the navigation, without pressing them.
You can leave the wizard at any time. The month then goes into the Closing status and its card offers you Continue closing or Cancel closing.
The complete checklist
Walk each step in order. Tick only after you have actually checked.
Step 1: Check that the documents are complete
☐ All supplier invoices are recorded
Where to find it: Sidebar → Purchases → the Supplier Invoices tab
- Filter on the current month
- Check that you have the invoices from every supplier you worked with
- Check the physical desk — no paper invoice has been left unposted
- Check the email — no PDF invoices have arrived unrecorded
Red flag: If a regular supplier is missing from the list, call them — the invoice may have been lost.
Step 2: Check the received e-Invoices
☐ All e-Invoices from SFS are posted
Where to find it: Sidebar → Purchases → the E-Factura tab
- Check the list of received e-Invoices
- Every e-Invoice must be turned into a supplier invoice or explicitly marked "not applicable"
- Compare the number of e-Invoices with the number of supplier invoices for that month
Under RM legislation, e-Invoices received through SFS are official documents. Not posting them can generate differences at a tax audit.
Step 3: Check the sales documents
☐ All the month's sales are recorded
Where to find it: Sidebar → Sales → the Sales Invoices tab
- Filter on the current month
- Check that every delivery has a sales document attached
- Check that every document is in the Posted status (not Draft)
Step 4: Import the last bank statement
☐ The month's final bank statement is imported
Where to find it: Sidebar → Money → the Bank Statements tab
- Import the bank statement for the last day of the month (or the first day of the following month, which includes the operations of the last working day)
- Repeat for each of the company's bank accounts
Step 5: Reconcile the bank operations
☐ Bank balance in POSfix = balance on the bank statement
Where to find it: Sidebar → Money → the Bank Operations tab
Quick check:
- Open Sidebar → Accounting → the Account Card tab → account
242.1(or the relevant bank account) - Select the period: first day of the month → last day of the month
- The closing balance on the account card must match the bank statement balance to the leu
| What you check | Where | Expected value |
|---|---|---|
Balance of account 242.1 — cash at bank accounts in MDL | Account card | = bank statement balance in MDL |
Balance of account 243.1 — cash at foreign-currency accounts held in the country | Account card | = bank statement balance in foreign currency |
Balance of account 243.2 — cash at accounts abroad | Account card | = balance on the foreign account statement |
242Group 242 is "Current accounts in national currency" (242.1 unrestricted, 242.2 restricted). Foreign-currency accounts sit on group 243.
If it doesn't match:
- Check the bank operations left in Draft
- Check for duplicate operations
- Check operations with the wrong date (from the previous or a future month)
Step 6: Check the cash desk
☐ Cash desk balance in POSfix = physical cash
Where to find it: Sidebar → Money → the Cash Desks tab
- Check the balance of account
241.1(Cash desk in national currency) - Compare it with the physical count of the cash
- If it differs, check the month's cash receipts and cash payments
Step 7: Check unposted documents
☐ No documents are left in Draft
Check in every register:
- Supplier invoices — filter status = Draft
- Sales invoices — filter status = Draft
- Bank operations — filter status = Draft
Every document in Draft must be either posted or deleted.
Documents left in Draft don't affect the trial balance. If you leave them unposted, you lose accounting operations and the trial balance won't reflect reality. On top of that, the closing wizard refuses to lock the period while draft journal entries still exist — its first step, Checks, tells you exactly how many are left.
Step 8: Process the returns
☐ The month's returns are recorded (if any)
Where to find it: Sidebar → Sales → the Return Documents tab (returns from customers) and Sidebar → Purchases → the Return Documents tab (returns to suppliers)
- Check the goods returns received from customers
- Check the goods returns sent to suppliers
- Every return must be Posted; the amounts are recorded with the opposite sign, through the red-storno convention
On a posted sales invoice you have the Create Return button — it picks up the partner, the lines and the quantities, so you don't retype the document.
Step 9: Process the offsets
☐ Mutual offsets are recorded (if any)
Where to find it: Sidebar → Purchases → the Debt Adjustments tab (the same register also exists in Sales)
The Type field has four values: Offset, Transfer, Write-off and Advance Settlement. If you have partners who are both suppliers and customers, check whether there are balances to offset.
The form explicitly asks you for Debit Account and Credit Account — it doesn't derive them from the type you picked. You fill them in yourself, along with the partner, the amount and, for an offset, the counter-partner.
Step 10: Confirm the timesheet
☐ The month's timesheet is filled in and confirmed
Where to find it: Sidebar → Team → the Timesheets tab
- Check that every working day is filled in for each employee
- Mark the holidays, the sick leaves, the absences
- Confirm the timesheet — after confirmation it can no longer be modified
Step 11: Check the leave requests
☐ Approved leave requests are reflected in the timesheet
Where to find it: Sidebar → Team → the Leave Requests tab
The screen has three inner tabs: Leave Requests, Sick Leaves and Leave Balances.
- In Leave Requests check the requests with the "Approved" status for the current month and confirm that the days also appear in the timesheet
- In Sick Leaves enter the certificates with New Sick Leave, then confirm each row — only once confirmed does it enter the salary calculation
- In Leave Balances you see how many days each employee has left
Step 12: Run the salary calculation
☐ The salary calculation is done
Where to find it: Sidebar → Team → the Salary Calculation tab
- Select the calculation month
- Check the list of employees included
- Press Calculate
- Check the results: gross salary, AOAM withheld, income tax withheld, CAS owed by the employer
The rates and exemptions are platform reference data, the same for every organization — you don't change them from your own panel. The details for each employee, with the exemptions applied, open in a panel if you press their row.
While the document is Draft you can intervene on the lines: the tick on the left takes an employee out of the calculation, and the amount can be rewritten directly in the cell. A manually corrected amount gets a frame and a recalculation keeps it — you bring it back to automatic with the arrow next to it.
Step 13: Post the salary calculation
☐ The salary calculation is posted
Between the calculation and the posting comes a block of analytics, with six fields: Product Group, Cost article — wages, Cost article — contributions, Tax type — income tax, Tax type — health insurance and Tax type — social insurance.
They are not optional: they reach the journal entry as subconto on the posting accounts, and without them the posting is refused. POSfix proposes them from the nomenclature; you can change them while the document is a draft.
Then press Post. If you got it wrong, Unpost brings the document back to Draft and deletes the entry.
POSfix takes the expense account from the employee's department, and the department form has no field for it — in practice everything is posted to 713.1. If you have commercial or production staff, move the amounts to 712.1 or 811.1 with a manual operation. See Payroll flow.
Step 14: Generate the payroll orders
☐ The payroll orders are created
Where to find it: Sidebar → Team → the Payroll Orders tab
- Generate the payroll order by department or in total
- Check the net amounts payable
- Print it for signature (if the payment is in cash)
Step 15: Generate the payment orders for salaries
☐ The payment orders are prepared
Where to find it: Sidebar → Money → the Payment Orders tab
Prepare the orders for:
- Net salaries → each employee's bank account
- CAS → the state social insurance budget
- AOAM → the compulsory health insurance funds
- Income tax withheld → the state budget
The payment order has the cycle Draft → Approved → Sent → Confirmed (or Rejected) and it does not generate accounting entries itself — those appear on the bank operation. From the list you can export the orders in the format your bank requires.
Step 16: Check the depreciation of fixed assets
☐ The month's depreciation is checked in the wizard's Depreciation step
Where to find it: Sidebar → Accounting → the Accounting Periods tab → Start Closing → the Depreciation step
- The wizard shows you each fixed asset, its book value, the month's depreciation and the accounts it will post to
- Check the list and the total
- You can leave the entry to the Confirmation step, or record it on the spot with the Calculate and post depreciation button
Which month depreciation starts in is not a fixed rule: it is decided by your accounting policy, which has a switch for from the following month or from the commissioning date, separately for fixed assets and for intangible assets. The default value is from the following month.
While the depreciation document is Draft, you can change its amount per asset, the accounts on the line, take an asset out of the month or add one you missed. The remaining schedule rebalances automatically, so the asset's total depreciable value doesn't change because you corrected one month. You can see the documents in Sidebar → Accounting → Assets → the Depreciation & Amortization tab.
The tax column on the screen is depreciation for tax purposes — straight-line, with no residual value. It serves the income tax return, not the accounting, and doesn't have to match the accounting column.
Step 17: Currency revaluation
☐ Foreign-currency balances are revalued at the BNM rate of the month end
Where to find it: Sidebar → Accounting → the Accounting Periods tab → Start Closing → the Currency Revaluation step
This step is necessary only if you have balances in foreign currency (EUR, USD):
- Foreign-currency bank accounts (
243.1,243.2) - Foreign-currency receivables (
221.2— trade receivables from abroad) - Foreign-currency payables (
521.2— foreign trade payables)
POSfix recomputes the balances at the BNM rate of the last day of the month and shows you the entries before writing them. The Execute button posts them on the spot.
For contracts expressed in a foreign currency but settled in MDL between residents, the differences are "amount" differences, not "rate" differences, and they go to other accounts. The switch that declares them as such is Settled in MDL (conventional unit), on the invoice.
Step 17b: Allocate the indirect costs
☐ The month's indirect costs are allocated
Where to find it: Sidebar → Accounting → the Accounting Periods tab → Start Closing → the Costs step
The step allocates the indirect costs (class 8) to the expense and production accounts. You first see exactly the entries that will be generated, then you press Allocate; after execution the step displays Allocated.
If the month has nothing to allocate, the step tells you so and you move on.
Step 18: Generate the trial balance
☐ The trial balance is balanced
Where to find it: Sidebar → Accounting → the Trial Balance tab
- Select the period: the full month
- Critical check: Total Debit = Total Credit
- If they are not equal, you have an error — don't go on until you find it
If the trial balance is not balanced, don't close the month. Find and correct the error. Frequent causes: a partially posted document, a wrong opening balance, a manual operation with only one side. If the turnover no longer matches the accounting entries, the wizard's first step — Checks — offers you the Recalculate Totals button, which rebuilds them from the entries.
Step 19: Check the main accounts on the account card
☐ The balances of the main accounts make sense
Where to find it: Sidebar → Accounting → the Account Card tab
Check at least these accounts:
| Account | What you check |
|---|---|
242.1 Cash at bank accounts in MDL | Balance = bank statement |
241.1 Cash desk in national currency | Balance = physical cash |
521.1 Trade payables in the country | Balance = total unpaid invoices |
221.1 Trade receivables in the country | Balance = total uncollected invoices |
531.1 Payroll payables | Balance = net salaries payable (if not yet paid) |
225.2 VAT receivable (input VAT) | The month's turnover, compared with the purchases register |
534.4 VAT payable (output VAT) | The month's turnover, compared with the sales register |
The tax period for VAT is the calendar month, so the balances are compared by month, not by year.
225.2, not on 534.2VAT to be recovered is a receivable from the budget and belongs to group 225. 534.2 is the income tax withheld from salaries.
The account card groups the rows by subconto, so on 221.1 and 521.1 you see each partner's balance directly. From the Trial Balance you can enter an account with the subconto breakdown, and the card opens already filtered.
Step 20: File the personnel declarations (IRM and IPC)
☐ IRM and IPC are filed
Where to find it: Sidebar → Team → the IRM tab and Sidebar → Reports → the IPC tab
IRM — Information on Employment Relations reports only the changes in employment relations of that month: permanent hires, terminations, suspensions, resumptions of activity, temporary hires. It contains no salaries, contributions or tax.
The calculated salaries, the contributions and the income tax withheld are reported through IPC.
For IRM:
- Create the document for the month that ended
- Press the auto-fill button — POSfix proposes the lines from the month's hires and terminations, skipping the events already declared
- Fill in the insurance category and the reason for termination — they are mandatory when filing
- Send the document: it goes from Draft to Submitted
- File the declaration on the SFS portal
The document has no rejected status. If the declaration is not accepted, you press Cancel on the document — it goes to Cancelled and you can bring it back any time with Restore.
For IPC: generate the report, download the XML file conforming to the SFS XSD and file it through the electronic cabinet.
The filing deadlines for the current month are in Sidebar → Fiscal Calendar.
You use it as a record and as a printable form; the actual filing you do on the SFS portal. XML export conforming to the SFS XSD exists on the VAT declaration, IPC, IALS, INR14, IRV14, IVAO15, 5-CI, SERV-TS and ISAPTI.
Step 21: File the VAT declaration (if applicable)
☐ The VAT declaration is filed (for VAT payers)
Where to find it: Sidebar → Reports → the VAT Declaration tab (the supporting register is in Reports → the Sales and purchases register tab)
The tax period for VAT is the calendar month. You see the current month's deadline in Sidebar → Fiscal Calendar.
- Check the sales and purchases register
- Generate the VAT declaration — it reads only Posted journal entries, so leave nothing in Draft
- Download the XML file conforming to the SFS XSD and file it through the SFS electronic cabinet
Settle the VAT at the end of the month
The input and output VAT balances are not left to accumulate from one month to the next. Once the declaration is ready, you offset them against each other with an entry made from Sidebar → Accounting → the Manual Operations tab — POSfix does not generate it by itself.
What remains after the offset shows exactly what you have to do: a balance on the liability side means an amount payable to the budget, a balance on the receivable side means VAT to be carried forward in the following months or to be refunded.
Step 22: Close the accounting period
☐ The accounting period is closed
Where to find it: Sidebar → Accounting → the Accounting Periods tab → Start Closing → the Confirmation step → Close Period
The Confirmation step shows you the list of operations that will be executed. When you press Close Period, the wizard runs them sequentially, in this order:
| # | Operation | When it runs |
|---|---|---|
| 1 | Currency revaluation | monthly |
| 2 | Depreciation of fixed assets | monthly |
| 3 | Amortization of intangible assets | monthly |
| 4 | Allocation of indirect costs | monthly |
| 5 | Income tax calculation | December only |
| 6 | Balance Reform | December only |
| 7 | Closing of the period | monthly |
All the operations are idempotent: if you rerun a month that has already been processed, nothing is doubled.
After the close, the period goes into the Closed status:
- No document can be added any more with a date in the closed month
- Existing documents can no longer be modified
- The month's trial balance becomes final
You can see the entries the wizard issued at any time, with Closing Documents — the button on the card of every month that already has a period.
The statuses of a month and the button each one gives you
| Status | What you see on the card |
|---|---|
| Not Created | Open the period — the month doesn't exist in the records yet |
| Open | Start Closing, plus the padlock icon (Lock) |
| Closing | Continue closing and Cancel closing — you left the wizard halfway |
| Closed | Reopen |
| Locked | nothing — it only says Locked for good |
A Closed period is reopened by a user with administrator rights, with the Reopen button. Locking is something else: the padlock icon, available only on an Open month, asks you for a lock date and an inline confirmation. There is no way out of the Locked status, through no action and by no role.
Does the order of the steps matter?
Yes, partly. Here are the dependencies:
Steps 1-9 (documents) → can be in any order
Step 10 (timesheet) → before step 12 (salary calculation)
Step 12 (salary calculation) → before step 13 (posting)
Step 13 (posting) → before steps 14-15 (payroll orders, payment orders)
Steps 16-17b → steps in the wizard; you run them there or leave them to step 22
Step 18 (trial balance) → after all the previous steps
Step 22 (Close Period) → last, always
The internal order of the operations in step 22 is imposed by the wizard and cannot be changed: the cost allocation reads the balances left by the depreciation, and the income tax reads the result after the allocation.
Frequently asked questions
Can I reopen a closed period?
Yes, if the period is Closed and you have administrator rights: Sidebar → Accounting → the Accounting Periods tab → select the month → Reopen. Reopening allows documents to be modified again, but use it with care — especially if you have already filed reports with SFS based on that month's figures. The existing closing documents remain; you correct them manually.
A Locked period can no longer be reopened, by anyone.
What do I do if I forgot an invoice from last month?
If the month is not closed, enter the invoice with the document's real date. If the month is already closed:
- Reopen the period (requires administrator rights)
- Enter the invoice with the original date
- Recheck that month's trial balance
- Close the period again
Alternatively, if the difference is insignificant, you can record the invoice in the current month with an explanatory note.
How long does the month-end close take?
| Complexity | Estimated time |
|---|---|
| Small company (under 50 documents/month) | 2-3 hours |
| Medium company (50-200 documents/month) | 4-6 hours |
| Large company (200+ documents/month) | 1-2 days |
With experience and automated flows (e-Factura, bank statement import), the time drops significantly after the first 3 months.