First steps after setup
You have the account and the company. Before the first document there are a few things to sort out — not many, and the platform shows you the important ones itself.
The list inside the app
The first time you land on Home, a panel greets you with the setup steps, grouped into three stages. You can work through it or close it and go on your own.
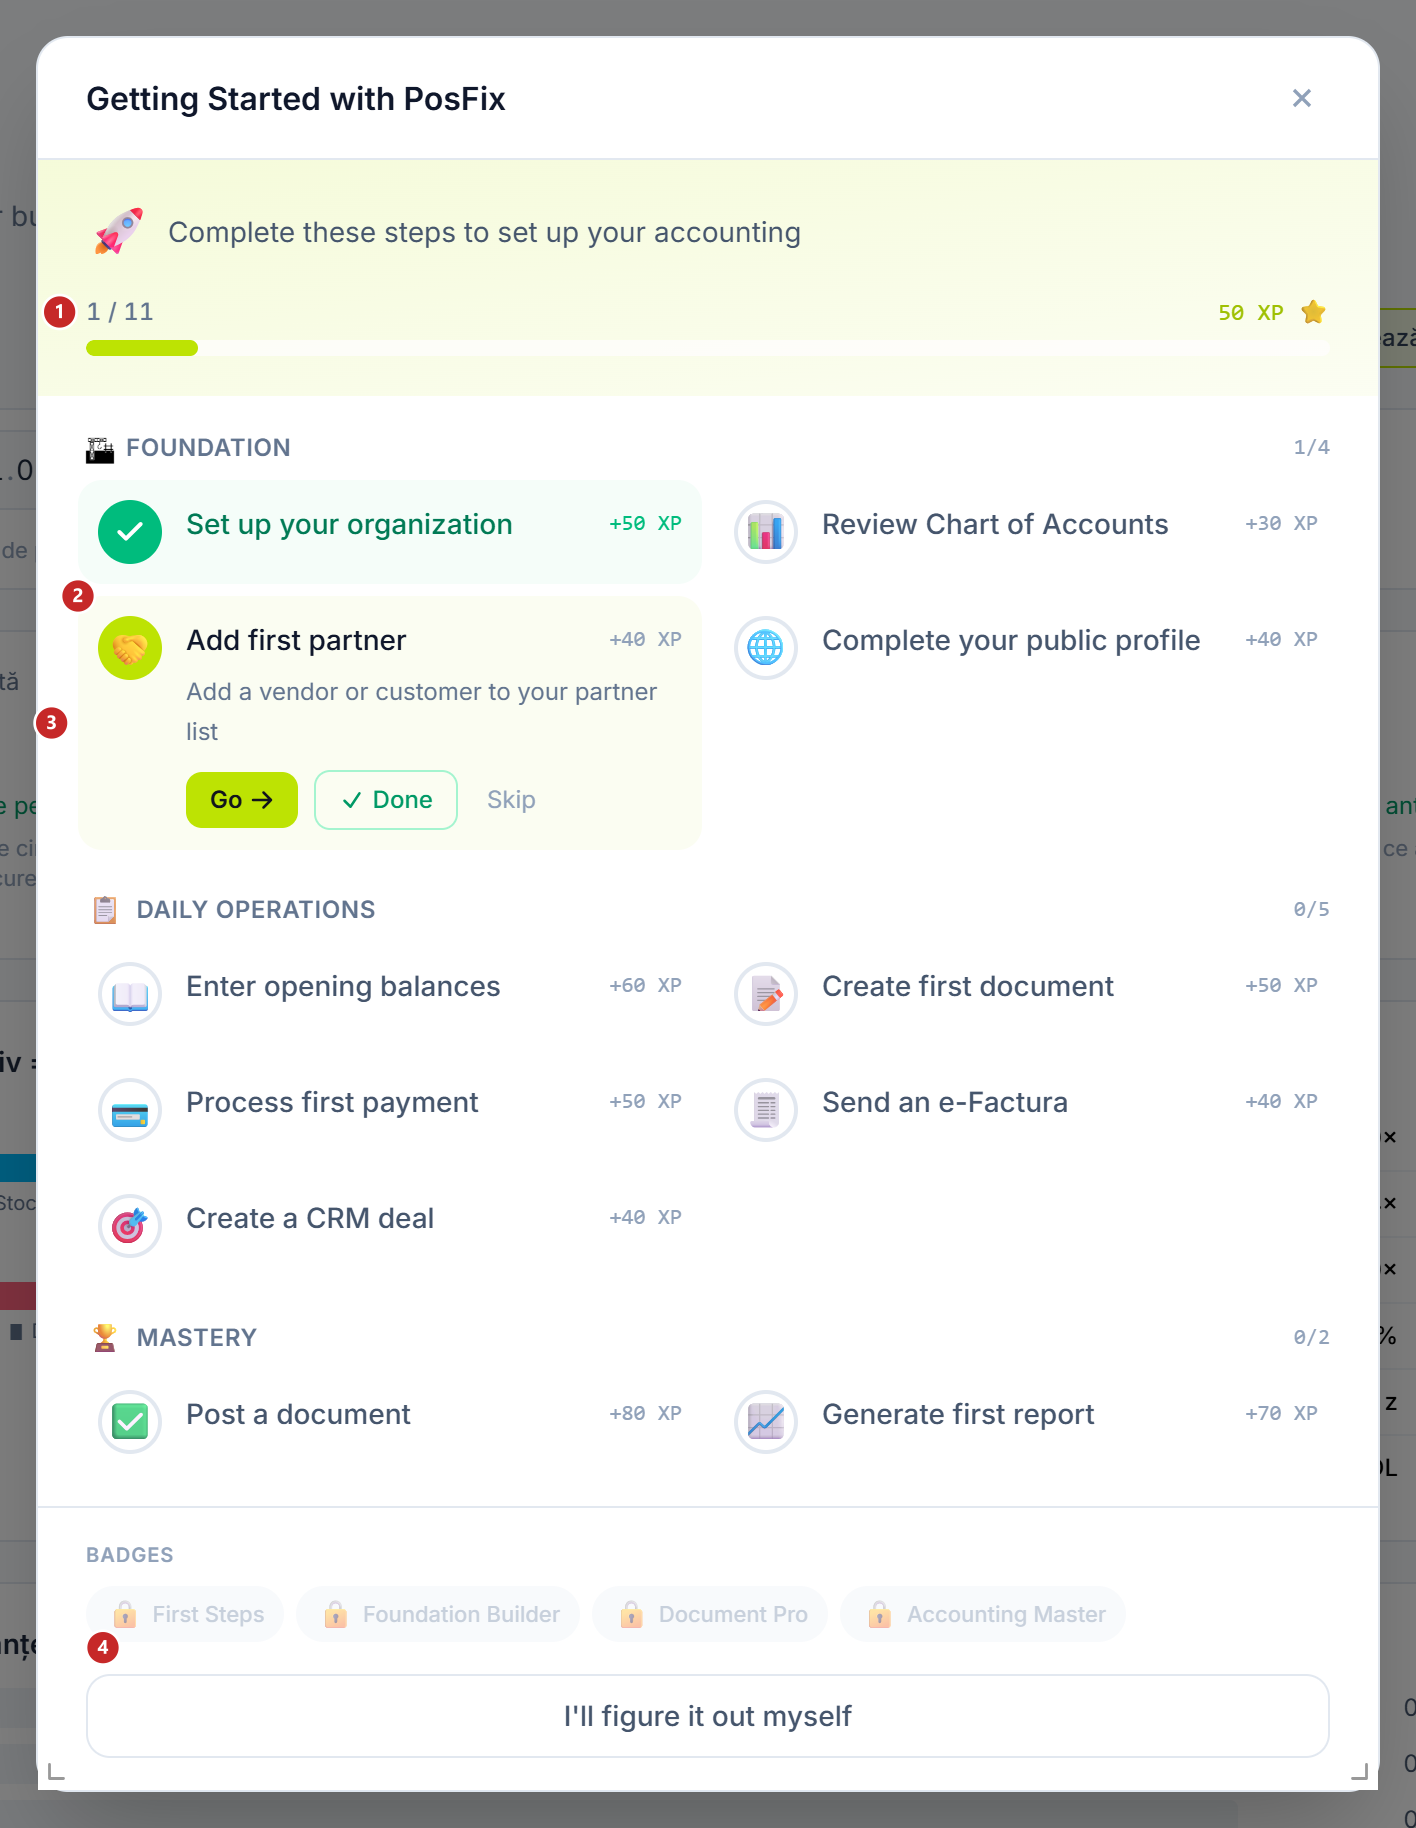
1 how many steps you have done out of how many · 2 takes you to that step's screen · 3 you mark it done yourself · 4 closes the panel
Clicking a step expands it and shows its description. The Go button takes you to its screen, Done marks it as finished, and Skip takes it out of the count.
The progress bar is a checklist you keep yourself: apart from the first step, which is ticked automatically, the others are marked with Done when you consider them finished. That way you can skip what doesn't concern you — a shop with no employees has nothing to set up in payroll.
I'll figure it out myself, the X in the corner and a click on the background all do the same thing: they close the panel. You don't lose it, though — a question-mark icon appears in the header and brings it back whenever you want.
Check the chart of accounts
Where to find it: Sidebar → Accounting → the Classifiers tab → Chart of Accounts
The chart is already there, complete, from the day you activated accounting. There is nothing to build — one look is enough to know what you have.
The list is shown as a tree: click the arrow next to an account to see its sub-accounts, or use Expand all / Collapse all. You filter by class, by account type and by the Active only tick; the search box at the top filters as you type.
You can add your own accounts with New Account, but the form only accepts codes of the form NNN, NNN.N or NNN.NN. A third level (521.1.1) exists in the delivered chart, but cannot be extended from here.
The rest of the form is not a formality: Account Type (Active / Passive / Active-Passive), Account Class and, further down, the three Dimension Types — the analytics that every document touching this account will then ask you for. The Multi-currency, Quantity tracking and Department tracking switches open the matching columns in the registers, and Tax deductibility decides which fiscal column the amount goes to when it is posted.
More on this — in Chart of accounts.
Open the months you work with
Where to find it: Sidebar → Accounting → the Accounting Periods tab
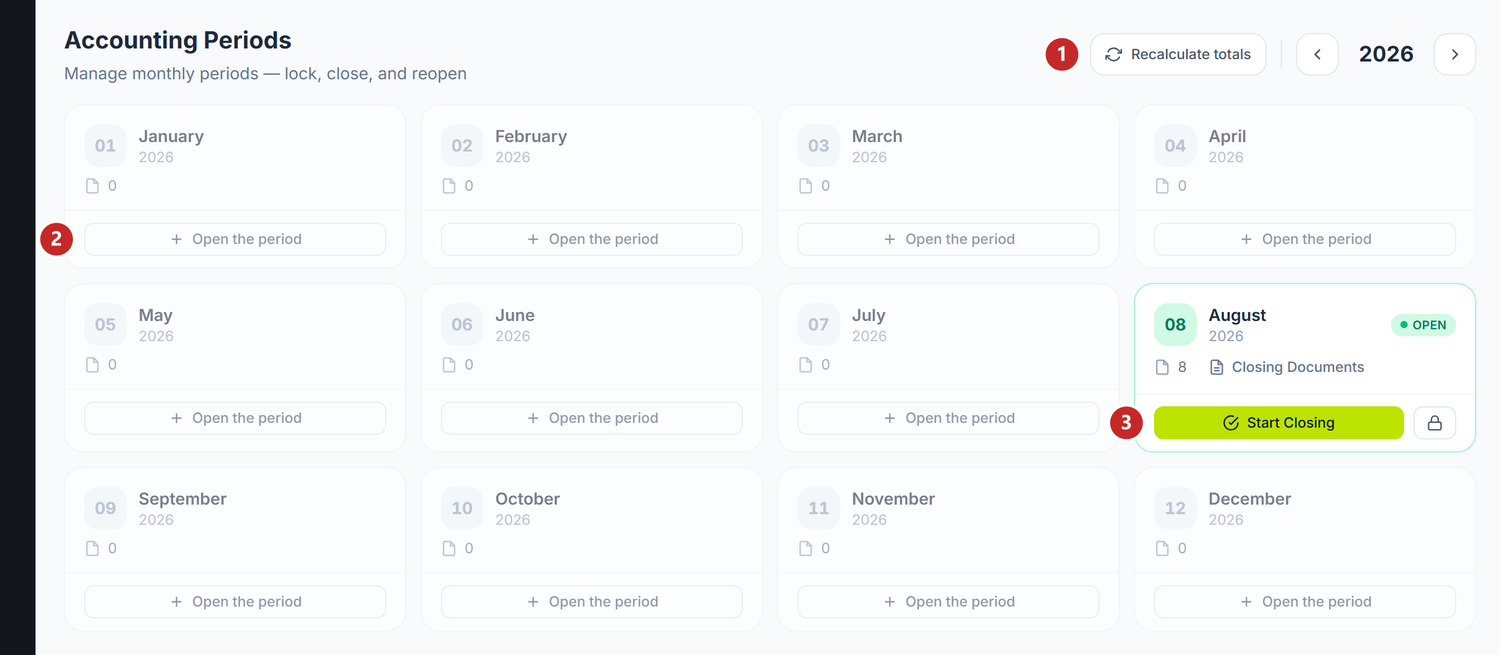
1 recalculates the balances · 2 creates the month in advance · 3 starts the closing wizard
Recalculate totals rebuilds the period balances from the posted entries, deleting the existing ones first. It's a repair tool, for after a migration — in everyday work you have no reason to press it, and the operation cannot be undone.
The screen shows the twelve months of the year; you move between years with the arrows on the right. The grey ones, with the Open the period button, are not closed months — they are months that don't have a row yet. You can record documents in them without worry: the month creates itself, open, at the first posted entry. The button is only useful if you want to prepare it in advance, so you can close it later.
The card of an open month shows how many documents it has, a link to Closing Documents and the Start Closing button.
| State | What it means |
|---|---|
| No period (the Open the period button) | There is no row for that month yet. Documents go in normally and the month appears on its own |
| Open | You can create and change documents dated in that month |
| Closing | The wizard was started and did not finish. The card has Continue closing, and the X button next to it, Cancel closing, brings the month back to Open |
| Closed | The month is closed, but can be Reopened |
| Locked | A red badge and the text "Locked for good". The state you never come back from |
Closing is not a switch: Start Closing launches a wizard with six steps — Checks → Currency Revaluation → Depreciation → Costs → Financial Result → Confirmation. At Confirmation the platform runs, in order, the currency revaluation, the depreciation of fixed assets, the amortization of intangible assets, the allocation of indirect costs and — only in December — the income tax and the balance reform. The last step closes the month.
A Closed month can be reopened, with the Reopen button on its card.
The padlock button next to Start Closing is supposed to lock the month for good. Pressed, it locks nothing on the spot: a small form appears on the card, with a date and the Confirm / Cancel buttons. For now Confirm ends in an error, because the padlock is only shown on open months while locking requires a month that is already closed. Until that is fixed, the protection you can rely on is closing the month.
The fiscal calendar is a different thing. In Sidebar → Fiscal Calendar you don't find accounting periods but your SFS filing deadlines, with the states Planned, Pending, Submitted and Overdue. The Sync from SFS button reloads the official calendar.
Add the first partners
Where to find it: Sidebar → Partners
To add a partner:
- Press New Partner.
- Pick the Partner Type. The rest of the form depends on it, so it goes first.
- Type the IDNO. The platform looks the company up in the state register, and Sync from Registry brings the official details. For foreign companies you tick Non-resident and type the foreign fiscal code plus the country.
- Tick the roles: Customer, Supplier or both.
- Fill in the address and the contact details.
- Save.
Partner Type has three values. With Individual, the fiscal code field is relabelled IDNP, and the VAT Code field, the VAT Payer tick and the contact person disappear from the form. With Company and Sole Proprietor everything stays. The fiscal code is required in all three cases.
The VAT Payer tick checks itself against SFS once you type the fiscal code — while it runs, "Checking VAT status..." shows under the field, and if the answer comes from there, a green SFS badge appears next to the tick. You can also set it by hand.
Two fields further down change things on documents: Folder places the partner in the folder tree of the list, and Price list decides which prices fill themselves in on their sales documents.
After the first save you get the Bank Accounts (their IBANs, needed for payment orders), Contracts, Contacts and POS sales tabs.
You don't have to enter them all now. A new partner can be created straight from any document, with the + button next to the selector. Start with the main suppliers and the active customers.
Don't look for a "default account" on the partner card — there isn't one. The account comes from the document's rules, and the partner goes in as an analytic on the entry line.
Enter the opening balances
This step is only for those migrating from another program. A new company with no history — skip it.
Where to find it: Sidebar → Accounting → the Opening Balances tab
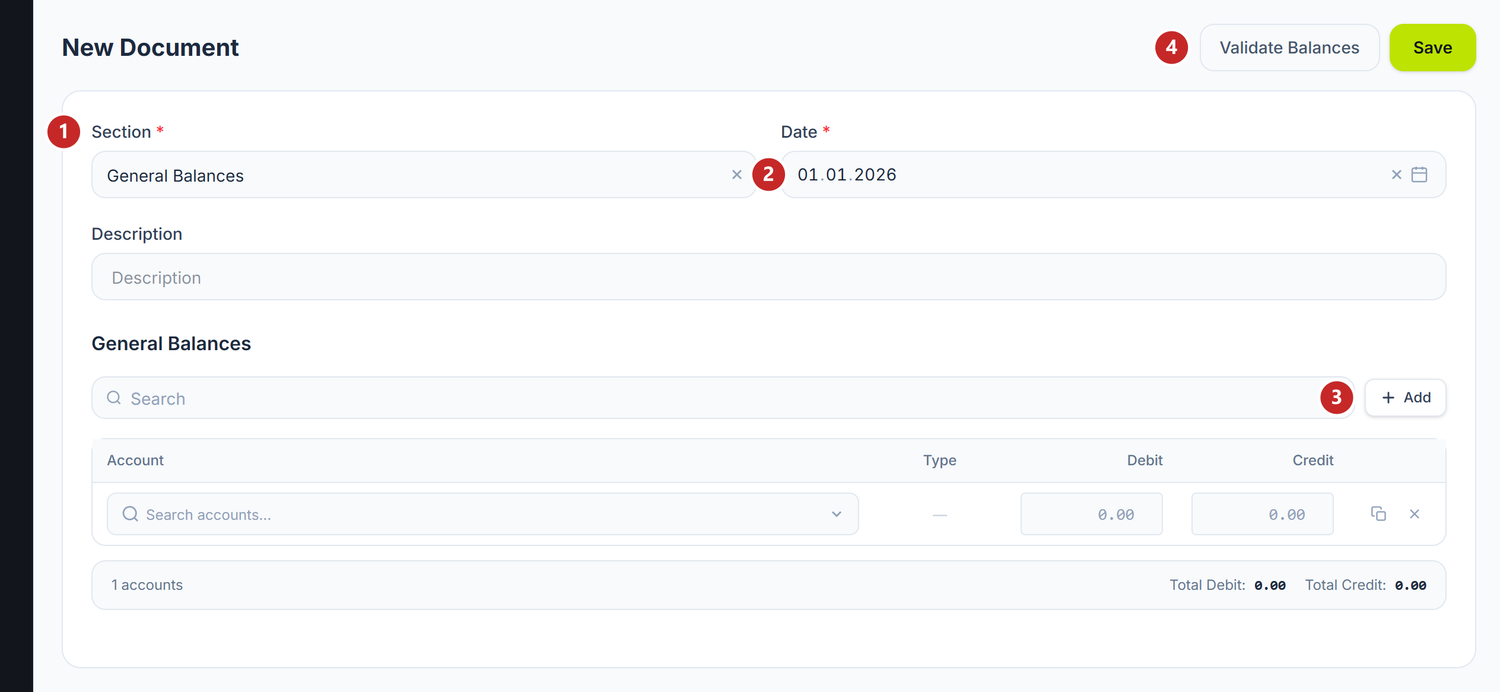
1 the document's section · 2 the balance date · 3 adds a line · 4 checks that it balances
Balances are entered on the last day before the period you start working in, not on today's date. Migrating from 1 January? The date is 31 December of last year. Migrating from July? The date is 30 June.
The document has three sections, which you pick at the top: General Balances for ordinary accounts, Fixed Assets and Intangible Assets. The last two don't ask only for an amount but for the asset's data — entry value, accumulated depreciation, useful life, method and commissioning date — and they create the asset cards along with the balance.
The section is chosen once. After the first save the selector becomes a label: the document stays on the section you chose, and the other two you see in the tabs above the lines, read-only. To cover all three you need three documents.
To enter the balances:
- Press New Document and pick the section and the date.
- Add the lines, with the amounts from the old system's trial balance.
- Check that total debit equals total credit — the screen shows you the difference.
- Post it.
An account with dimensions is not filled in with a single line. Sub-lines appear under it, one for each analytic the account requires — partner, nomenclature item, warehouse — each with its own selector. This is where the time goes in a migration: the balance of 221 or 521 cannot be entered without saying which partner it sits on.
Import from 1C
If you are coming from 1C, the Import from 1C button reads your file instead of you typing the lines. It's a three-step wizard — File Selection, Account Mapping, Preview — and there is something to choose in each step.
.contfix files are encrypted, so the first step asks for the File password. In the second you match the accounts from the export with the ones in your chart; whatever stays unmatched shows up in step three, in the Unmatched accounts warning — those accounts will be skipped on import, they will not raise an error.
At Preview you also get three switches — Create new partners, Create new products, Create new employees — each with the number of new entries next to it. Left on, they bring everything missing into the catalogues. In the same place you pick the year and month the balances enter with.
If you migrate mid-year, bring over the revenue and expense turnover up to that point as well: without it, the profit and loss statement starts from zero and the year's result comes out wrong.
Prepare the default accounts
Where to find it: Sidebar → Accounting → the Entry Templates tab
The screen has two tabs with different jobs, and it's worth knowing which is which before you change anything. Entry Templates holds recipes that pre-fill the entries you write by hand, from Manual Operations. Default Accounts holds the account the platform proposes for each kind of operation: stock, expense, revenue, cost, receivable, payable, VAT.
Both come filled in with the accounts of the Moldovan chart. For most companies they are never touched.
The tab that changes how documents are posted is Default Accounts. Each row carries the operation key (TRADE_SUPPLIER_INVENTORY_GOODS, for instance), the current account and the account the platform proposes. Pick a different account and from then on every new document starts with it; empty the field and you are back to the platform's proposal.
The neighbouring tab, Entry Templates, works differently: it fills in the accounts in the header of a few documents when they open — a supplier invoice takes its debit account, credit account and advance account from there. Whatever is in the header at posting time is what gets posted. In detail, with what each tab does: Posting templates.
Start working
From here on it's no longer setup, it's ordinary work. The natural order:
- An incoming document — a supplier invoice, from Purchases.
- Its payment — a bank operation or a cash disbursement, from Money.
- A sale — a customer invoice, from Sales.
- Its receipt, from Money again.
- A check — the trial balance, from Accounting.
Every document is first saved as a Draft and moves nothing until you press Post. The draft is where you can change your mind in peace.
What can trip you up
The document is refused because of its date. The month is closed or in the middle of closing. You reopen it from Accounting Periods, on its card. If the month only shows grey, with no state, it isn't the problem — documents go into it normally.
The opening balances don't balance. The screen shows you the difference. Usually the capital account or the retained result is missing — check both in the old trial balance.
I entered the balances on today's date. The current month's documents pile on top of them and the figures come out doubled. Correct the date on the balances document and post it again.
The partner doesn't show up in the selection lists. Check the role ticks: a partner without Supplier doesn't appear in purchase documents, however complete the rest of the card is.
Related pages
- Account and organization — signing up and the company details
- Navigation — how the panel is organised
- Opening balances — in detail
- Accounting periods — closing the month, step by step