Creating an account and an organization
To start working in POSfix you create your account once. You don't type the company details by hand: you pick your company from the state register and the platform pulls them from there — the official name, the legal form, the IDNO and the address. It takes a few minutes.
Where to find it: cp.posfix.md → Don't have an account? → Sign Up
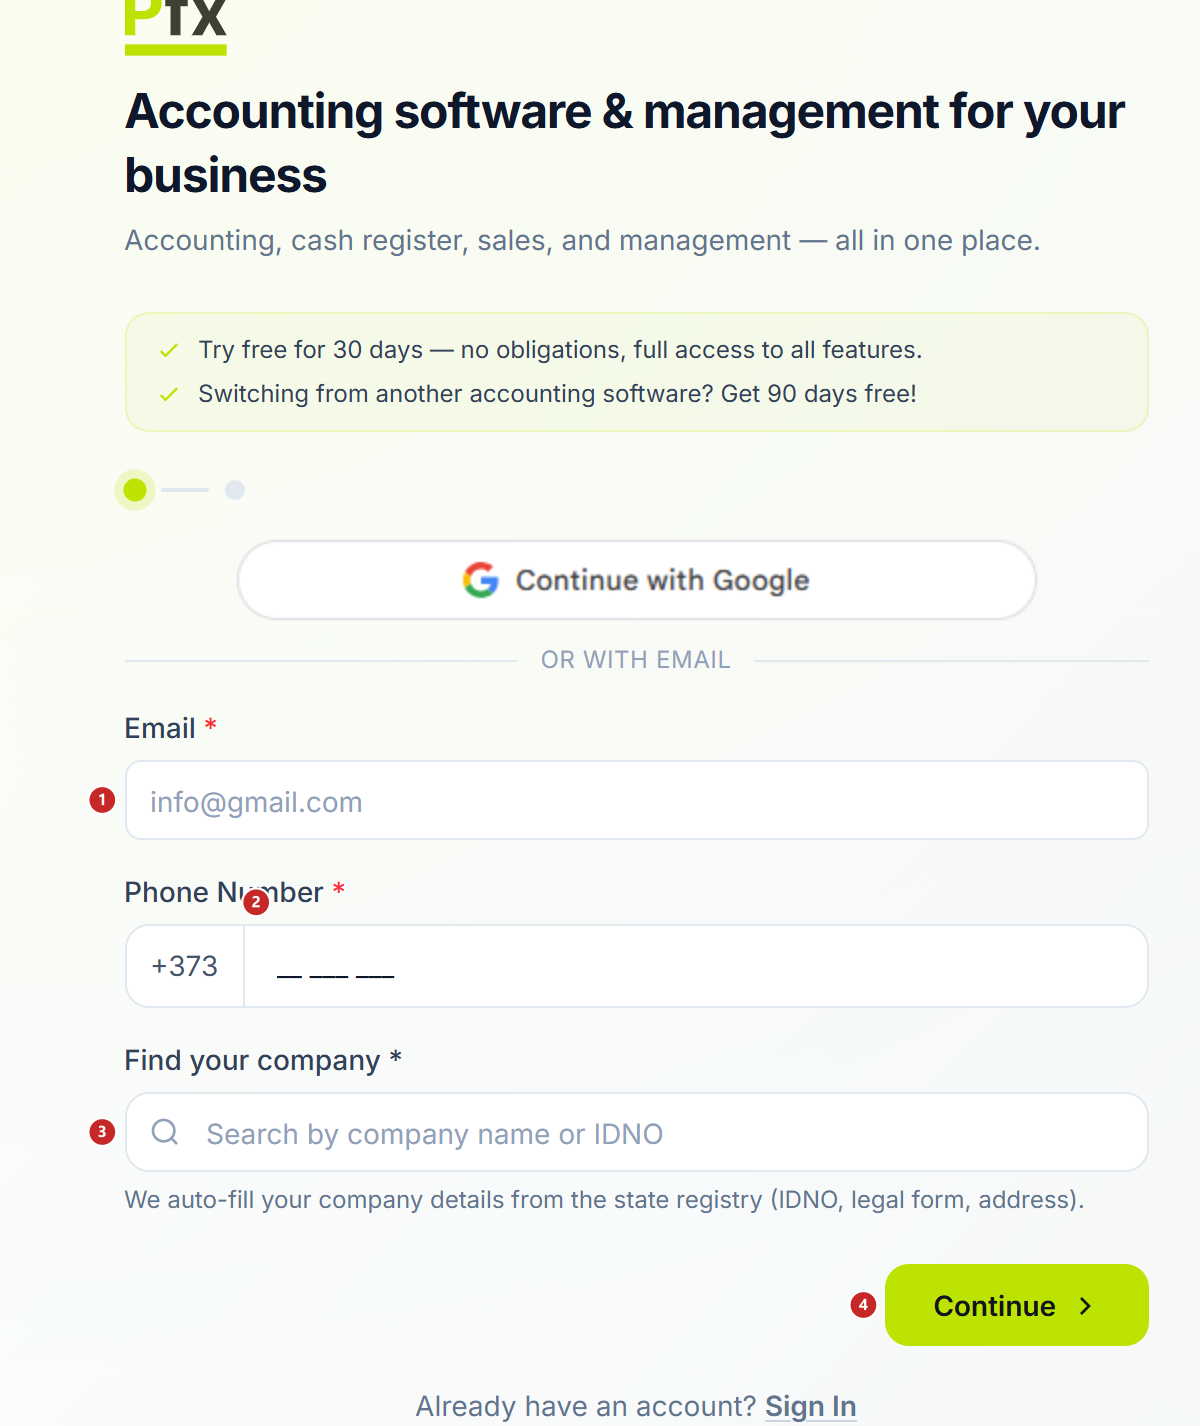
1 the email address · 2 the phone number · 3 the company search in the register · 4 the button that takes you further
To create your account
- Open cp.posfix.md and press Sign Up.
- Type your email. It becomes your identifier in the system, so use an address you will always have access to.
- Type your phone number. The verification code comes there, and without it you cannot go further.
- Under Find your company, type the name or the IDNO and pick the company from the list. The rest of the details fill themselves in.
- Press Continue. On the next screen you set your password, repeat it and accept the terms.
- Press Create Account, enter the code you received by SMS and press Verify Phone.
- Open your email and click the confirmation link. If you can't find it, look in Spam or Promotions — or ask for a new one with Resend verification email.
You can also sign up with Google, from the button above the email field. The address is already confirmed, so you skip the email verification; the phone and the company still have to be filled in.
If the results show the company as already registered with POSfix, don't create a second account. Ask the owner to invite you as a user — see Inviting your colleagues below.
The trial period
When you sign up you get all the modules on trial for 14 days, followed by a 7-day grace period. You tick nothing at creation and you pick no modules — every module is switched on.
Once the trial expires, your access is whatever your contract says. A module you don't have doesn't disappear from the menu: it stays there, greyed out, with a padlock, and pressing it takes you to its presentation page.
Where to find it: Sidebar → Settings → the Billing tab
There you see every module with its state — Trial and the days left, Active, Disabled, Trial ended — still active, Trial expired — and its monthly price. Nothing is switched on or off from here: the modules come from the contract.
On active modules you also get the usage. Each resource shows how much of your allowance you have used, with a progress bar, and See tiers expands all the tiers of that resource, each with its limit and price — your tier is the circled one. It's a price list, not a selector: the tier is negotiated in the contract. Further down, Terminal Billing shows how many terminals you have, how many receipts were printed and the Current month estimate.
The platform grants 14. The same page says that migrating from another program brings 90 days free — that bonus doesn't exist in the platform either. Both are errors in the text of the public page, not in your account. The real days left are in the badge at the bottom of the sidebar and in Settings → Billing.
What comes with accounting
When the accounting module is activated, the organization gets the Moldovan chart of accounts already set up — 654 accounts, with the usual analytical sub-accounts.
At the same time you get the fiscal classifiers: types of taxes and contributions, cash-flow articles, cost articles. There is nothing to set up, they are there from day one. The accounting periods exist too, but only the current month is open — you open the others yourself, when you need them (how).
Check the company details
Here is a surprise worth knowing on day one: the company you picked at sign-up is not copied by itself into the accounting settings. The form starts out empty, and the name and IDNO from here are the ones that end up on printed documents and in returns. Press Sync from Registry and they all arrive; or type them by hand.
Where to find it: Sidebar → Settings → the Organization Settings tab
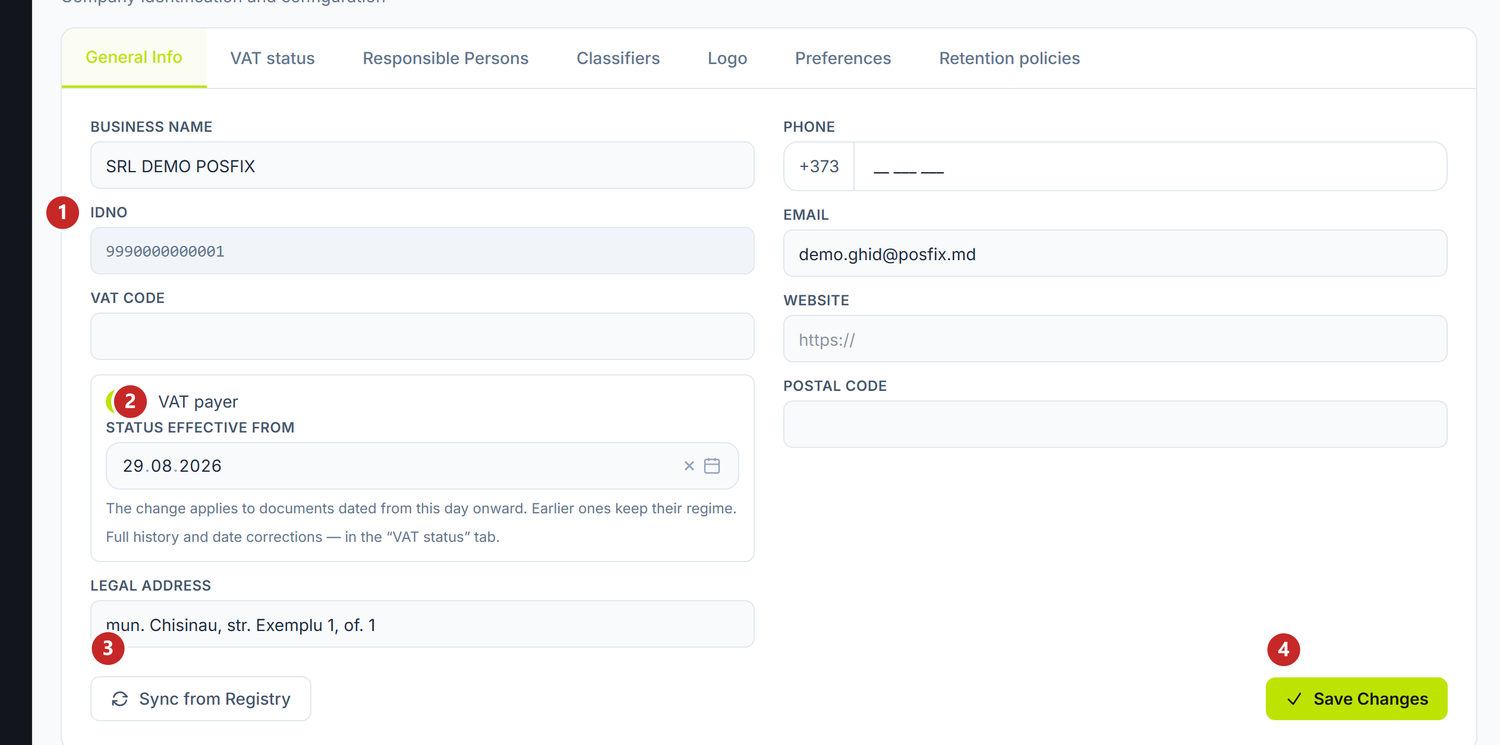
1 the IDNO, empty until you fetch it · 2 the VAT payer switch, with the date it applies from · 3 fetches the details from the state register · 4 saves
The screen has seven sub-tabs. General Info holds the name, the IDNO, the legal address and the contact details. The Sync from Registry button brings them from the public register — the second time, though, it writes over whatever you corrected, so use it at the start and afterwards only when something really has changed at the company.
Also in General Info you set the VAT payer switch and the date it applies from. All VAT calculation on documents starts from there, so it's worth setting before you issue the first one. The next sub-tab, VAT status, is something else: it holds the history of the VAT-payer status and its corrections.
In Responsible Persons you list the people who sign for the company: name, position, ownership share and which one is the main one. Their names end up on printed documents and on returns.
Classifiers is the sub-tab you remember only when a return won't go out. It has three collapsible blocks. Under State Tax Service (SFS) you put the SFS Code, the code of your tax subdivision. Under National Social Insurance Fund (CNAS) you put the Social Insurance Code and the District / Sector. Under Statistics Codes go CFOJ, CFP, CAEM, CUIIO, COCM, CUATM and the registration date. Without them, the payroll and statistical returns go out incomplete.
The last two sub-tabs are short. Logo holds the company logo (you drag it onto the dotted area) and the header text of printed documents. Retention policies holds the rules for keeping documents: name, document type, mode, how many years and whether they start with a legal hold.
The currency is not a choice: the books are kept in Moldovan lei — that's a legal requirement. The currencies you work with you add separately, from Sidebar → Accounting → the Classifiers tab → Currencies, and the rates come from BNM.
The preferences that change how you work
The Preferences sub-tab gathers the settings that change how the interface behaves. The ones that matter most often:
| Setting | What changes when you turn it on | If you leave it as it is |
|---|---|---|
| VAT payer (in General Info) | Documents start calculating VAT, from the date next to it | Documents come out without VAT |
| Date Format | Every date in the app is shown in the chosen form | Stays dd.MM.yyyy, the standard in the Republic of Moldova |
| Decimal Separator | Amounts are written with a comma or with a dot, everywhere | Stays the comma |
| Typed price includes VAT | The price you type on a document line is read as VAT-inclusive | The price is read as net and VAT is added on top |
| Ask for confirmation on destructive actions | A question appears before every deletion | Deletions go through straight away |
| Payment purpose suffix | The text is appended by itself to the payment purpose, on payment orders | The purpose stays the one composed from the document |
| Word export for proforma | Downloading a proforma also offers .docx, editable | PDF only |
| Price label printing | The label-printing buttons appear on receipts, invoices and the product card | The label feature disappears from the whole panel |
| Table pagination in the header too | The pagination controls appear above tables as well, not only below | They stay below the table only |
| Low-stock alerts | You get a notification when an item falls below its threshold | You are not told |
Under Price label printing, while it is on, Default label model opens up: the model the print dialog opens with, for every employee. You pick a Label model — Classic, Centred price, Price only, Discount, Warehouse or Text sticker — and a Name size (Automatic, Small, Medium, Large). The operator can deviate from them for one particular print run.
The last row of the tab is not a switch but a number: Expiry alert lead time, between 1 and 365 days. That many days before expiry you get a notification about the stock batches running out, and the Expiring soon list looks at the same figure.
Inviting your colleagues
Where to find it: Sidebar → Settings → the Invitations tab
To bring a colleague into the company:
- Press Invite user. A form opens right above the list.
- Fill in Email, Phone and Role — all three are required. You can add a Message too, which goes into the invitation email.
- Press Send. Your colleague gets an email with a link, and either creates an account or signs in with the one they have.
The phone really is required. The Send button stays disabled until you fill it in — that is the most common reason people think the invitation never went out.
Role has four values: Manager, Accountant, Cashier and Employee. The owner role is not invited — it belongs to the account holder. What each role can do is in Access policies.
The list below shows what you have sent, with the states Pending, Accepted, Expired and Revoked. In the Invitation URL column there is a button that copies the link, in case you want to send it to your colleague another way. While an invitation is pending, at the end of the row you have Edit — it reopens the form with its data — and Revoke, which moves it to Revoked and makes the link useless.
If the person already has an account on the platform, go to the Users tab and use Assign user — you link them straight to the company, with no invitation email. The form asks for the email and the role, and the Is Primary Merchant switch decides whether your company becomes the one they land in by default.
Related pages
- First steps — what you set up before the first document
- Navigation — how the panel is organised
- Access policies — who can do what