Moving around the interface
POSfix has an interface built on three levels: the sidebar (the modules), the module tabs (the features inside a module) and the document tabs (the documents you have open at the same time). Once you understand these three levels, you reach any screen in at most two clicks.
To sign in
Where to find it: cp.posfix.md
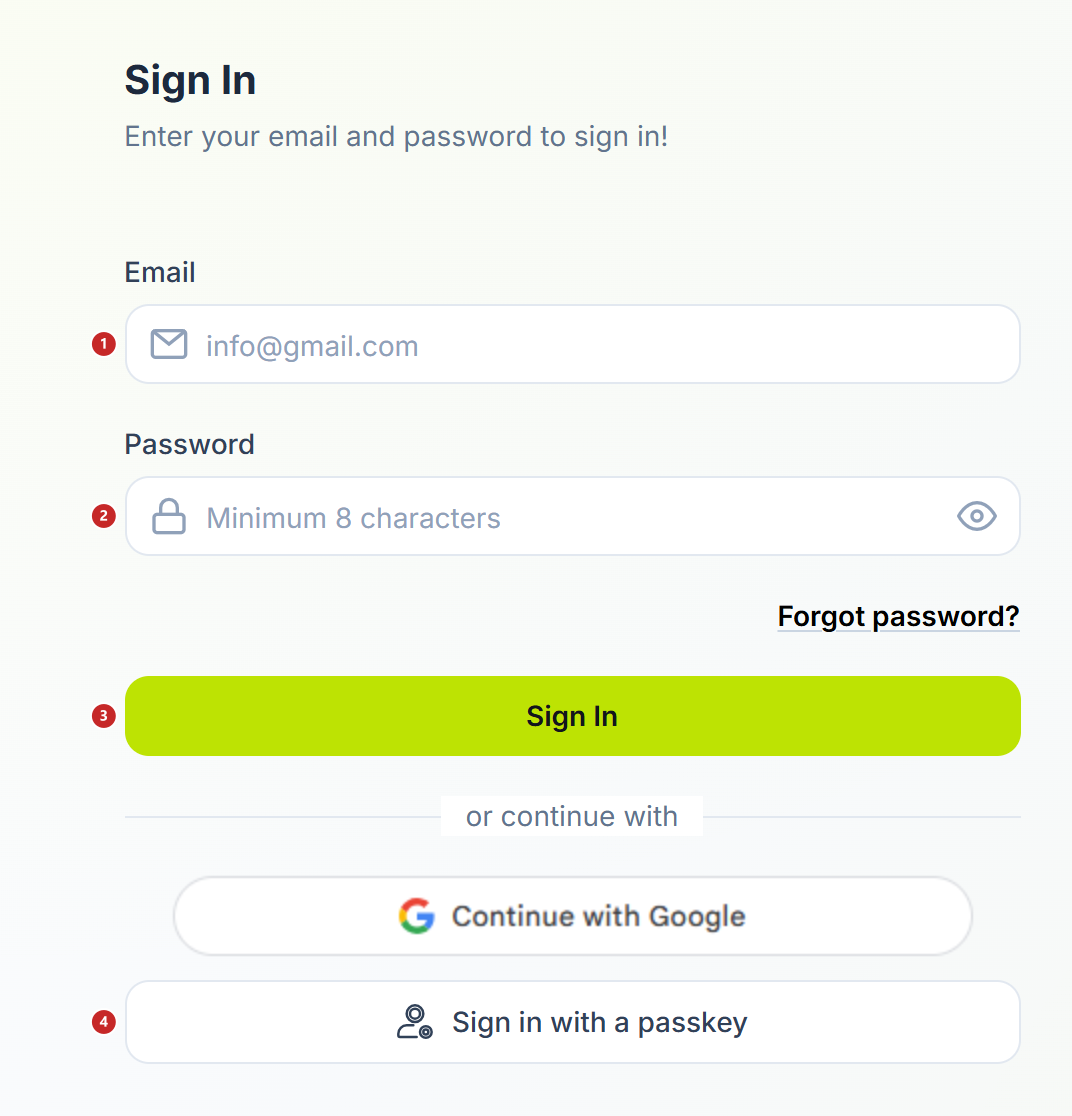
1 the email you signed up with · 2 the password · 3 the sign-in button · 4 signing in with a passkey
Type the email and the password, then press Sign In. If you have forgotten the password, the link is right above the button.
Below the sign-in button, after the or continue with divider, you have two alternatives without a password. Continue with Google lets you in with your Google account, if that is what you signed up with.
Sign in with a passkey signs you in with the device's fingerprint or face recognition. Passkeys are registered from the user menu → Security, one for each device you work from.
The start screen
After signing in you land on Home — the company dashboard.
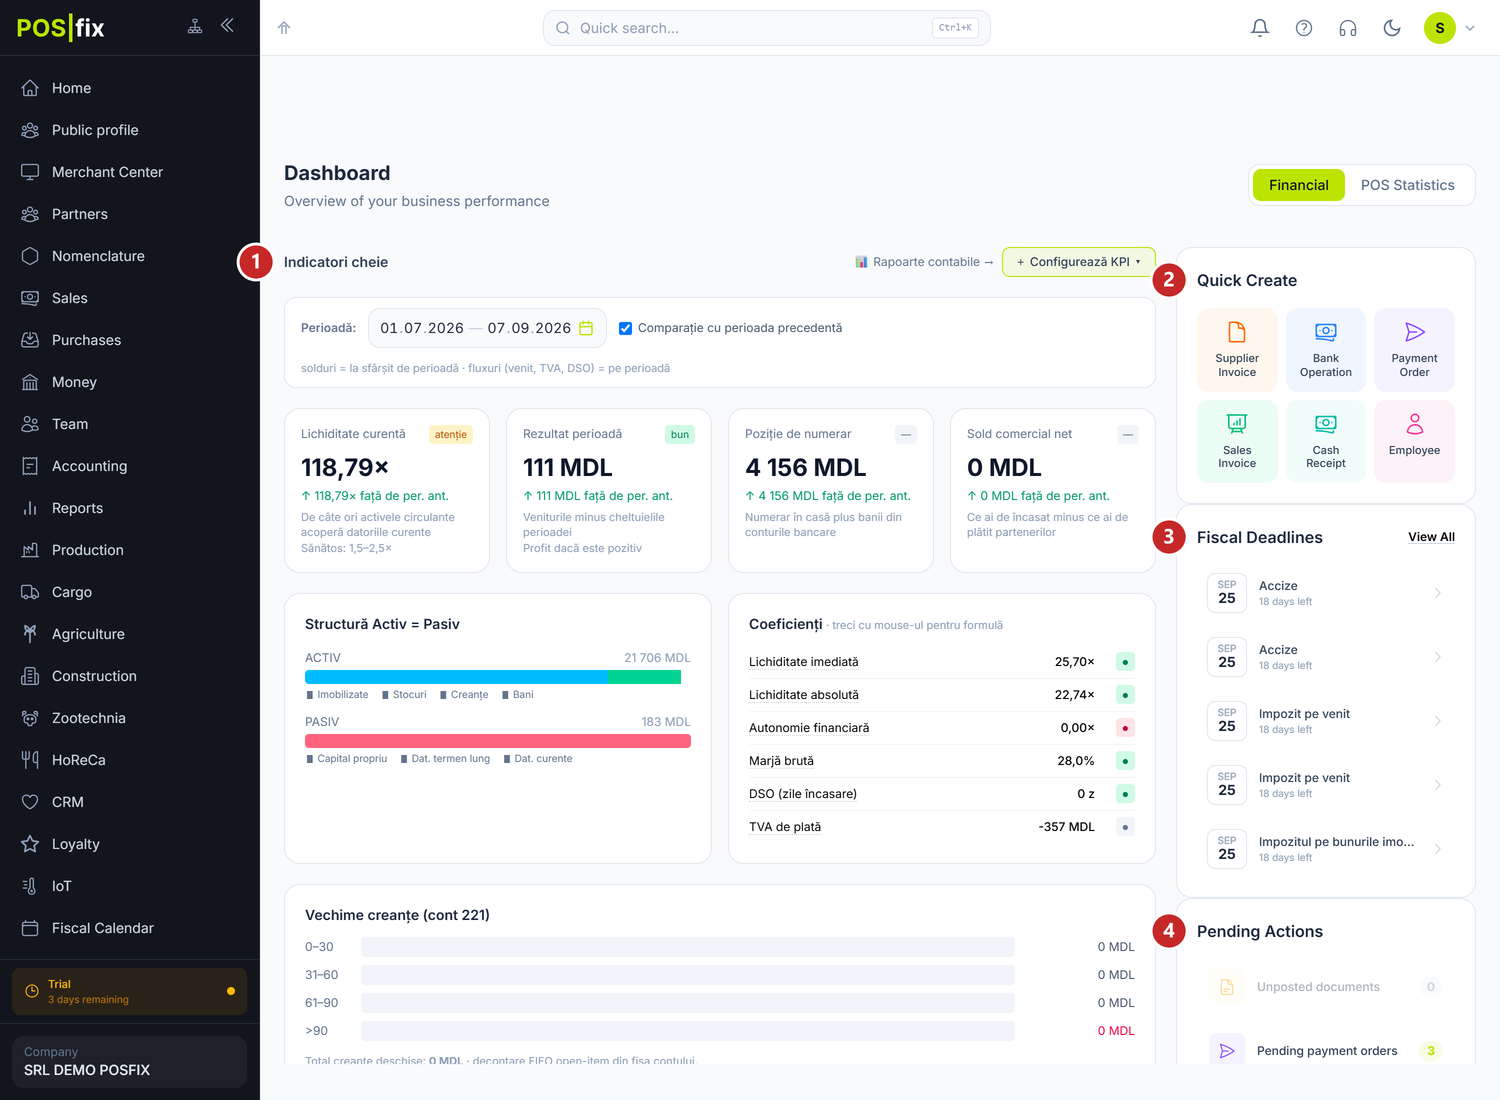
1 the period indicators · 2 the quick-create buttons · 3 the tax deadlines coming up · 4 what is waiting on you
The indicators are calculated over the period chosen at the top, and the tick next to it compares them with the previous period. On a company with no posted documents they have nothing to work from, so the health badges on the cards mean nothing until the first documents are posted. Quick Create opens the form of a frequently used document straight away, without going through the menu. Fiscal Deadlines counts the days to each filing, and Pending Actions gathers what you left unfinished: unposted documents, payment orders not sent, deadlines missed.
You switch between Financial and POS Statistics with the buttons to the right of the title.
Which indicators you see on Financial is your choice, from + Configurează KPI ▾, to the right of the "Indicatori cheie" title. A list of tickboxes grouped by category opens; whatever you untick leaves the screen.
POS Statistics is a dashboard you rearrange. Edit Dashboard turns on edit mode: you drag the cards by the handle in the corner, remove them with the red X, add others from Add Widget and go back to the factory layout with Reset to Default. Done turns it off. This view also has the period buttons, the Compare tick and the refresh button.
The sidebar
The sidebar is the column on the left of the screen. It holds the modules, in workflow order:
| Menu entry | What you find here |
|---|---|
| Home | The organization dashboard, with indicators and quick actions |
| Public profile | The company's public page on posfix.md |
| Merchant Center | The till area: POS products, VAT Rates, Cashiers, POS rights, Discounts, Terminals, Reports, Voids & Refunds, ECC Register |
| Partners | The register of suppliers and customers |
| Nomenclature | Nomenclature, Nomenclature Types, Product Attributes, Content blocks, Price Lists, Warehouses & Stores, Expiring stock batches, Stock, Stock Movements, Opening Stock, Inventory Counts |
| Sales | Sales hub, Sales Invoices, Retail Sales, Customer Orders, Delivery Lots, Payment Requests, Return Documents, Debt Adjustments, Contracts, Reconciliation, E-Factura |
| Purchases | Purchases hub, Supplier Invoices, Goods Receipts, Delivery labels, Additional costs, Customs Declarations, Invoice Requests, Received Requests, Payment requests, Return Documents, Debt Adjustments, E-Factura |
| Invoice recognition | Supplier documents read automatically, and your list of item matches |
| Money | Bank Accounts, Bank Statements, Bank Operations, Payment Orders, Cash Receipts, Cash Disbursements, Advance reports, Cash Desks |
| Team | Employees, Departments, Work Schedules, Timesheets, Leave Requests, Salary Calculation, Payroll Orders, Bonuses, IRM, Withholding ledger |
| Accounting | General Ledger, Manual Operations, Trial Balance, Account Card, Partner statement, Entry Templates, Opening Balances, Assets, Classifiers, Finance, Accounting Periods, Production Calendar, Report Builder, Repost documents |
| Reports | The report catalogue, operational reports, financial statements, Balance Sheet, VAT Declaration, the unified declaration, the income tax declaration and the statistical and payroll returns |
| Production | Board, Specifications, Production Orders, Production Reports, Material Requirements, Tolling Acts, Indirect Cost Allocations, Work in Progress, Variance Analysis, Costing & Analytics, My approvals |
| Cargo | Transport orders, Trips, Vehicles, Drivers, Documents, Document types |
| Agriculture | Land Parcels, Crop Campaigns, Agricultural Operations, AIPA Subsidies |
| Construction | Construction Projects, Cost Estimates, Work Progress, Reception Reports, Hidden Works Acts |
| Zootechnia | Livestock Herds, Livestock Animals, Livestock Movements, Feeding Operations, Livestock Production, Veterinary Treatments, Livestock Weighings |
| HoReCa | Recipes, Menu, Combos, Menu engineering, Kitchen |
| CRM | CRM Dashboard, Pipeline, Deals, Leads, Activities, Reminders, CRM Reports |
| Loyalty | Programs, Members, Transactions, Rewards, Analytics |
| IoT | The sensors and the compliance reports |
| Fiscal Calendar | The filing deadlines towards SFS |
| Integrations | The links with e-Factura, the maib bank and the Nova Post courier |
| Settings | Organization Settings, Companies, Users, Invitations, Role permissions, Access Policies, Accounting policy, Approval routes, Sessions, Audit Log, CRM Pipeline, CRM Tags, Email Preferences, Billing, SMS log, Bills to pay |
| Help | The documentation inside the app |
Supplier invoices are in Purchases, not in Sales. Payment orders are in Money, not in Purchases. Fixed assets are in Accounting → Assets, and payroll in Team, not in a menu of its own.
How the sidebar works
- Collapse/expand — the double-arrow button in the menu header, to the right of the logo. Collapsed, you see only the icons; hovering over the menu expands it temporarily and shows the names.
- Sitemap — the button next to the collapse one switches the menu into a tree of every screen, on three levels (module → tab → sub-tab). It is the fastest way to a screen whose name you know but whose place you don't remember.
- Right-click on a menu entry — opens a small context menu with Open and, where possible, Add to current tabs (see "Tab groups" below).
- Modules without a subscription — stay in the menu. They stay grey, with a padlock and a label: Discover (you never had it), Trial expired or Inactive. Press them and you land on the module's presentation page.
- Switching companies — at the bottom of the menu, under the "Company" label. A click on the current company name opens the list of all your organizations, with the IDNO and your role on each, plus Add Company.
- On mobile — the menu opens as a side panel, from the menu button in the header.
When a new version of the app appears, Update available lights up at the bottom of the menu. Nothing reloads on its own — the reload happens only when you press it, precisely so you don't lose a half-filled form.
The application header
The top bar holds, from left to right: the menu button (on small screens), the breadcrumb of the current page, the Quick search... field (Ctrl+K), the notification bell, the question-mark Show guide button, the support contact button, the theme switch, the name of the current organization and the user menu.
The question-mark button only appears while you still have unfinished steps in the Getting Started with PosFix panel, and it brings the panel back onto the Home screen — but only at the next browser session, not on the spot.
From the user menu you reach Profile, Settings, Security (password and passkeys), the Language switch, Cookie settings and Logout.
Module tabs
When you press a module in the menu (Sales, say), a work area opens with horizontal tabs at the top. Each tab is a feature of that module; some have sub-tabs too (for example Accounting → Assets → Fixed Assets or Accounting → Classifiers → Chart of Accounts).
You switch tabs with a single click — the page does not reload. If the tabs don't fit on the screen, the bar scrolls: there are arrows at the ends and you can drag the bar with the mouse. Tabs of modules you are not subscribed to stay visible, faded and with a padlock.
The last active tab of a module is saved in the browser. If you are working in Supplier Invoices and go off to Partners, when you come back to Purchases you find Supplier Invoices again, not the first tab in the list.
Tab groups
You can bring one module's tabs next to another's: right-click the module in the sidebar → Add to current tabs. The groups you bring in appear separated by a vertical divider and you can remove them at any time. A module hosts at most three groups brought in from elsewhere.
Document tabs
When you open a document (a click on a row in the list, or on the create button), it appears as a document tab, on a bar of its own, below the module tabs. The bar starts with the List tab, which takes you back to the list you came from, and each document has its own close button.
There is no limit on how many documents you can have open. The tabs are tied to the module tab you opened them in, though: documents opened from Sales → Sales Invoices stay on that tab's bar, and when you move to another module tab you see its documents.
The same document does not open twice — if you press one that is already open, the system switches to the existing tab.
If you close a tab with unsaved data, the Unsaved changes dialog appears, telling you which document is concerned and offering three options: save, discard the changes, or cancel the close. There is no visual mark on the tab to warn you beforehand — the dialog is the safety net.
The actions on a form
The buttons sit grouped on the right of the form header, always in the same order: Save, Post, the square button with the letter J and, at the end, the remaining actions.
What you see depends on the document's state, though, and this is where a lot of people stumble. On a Draft you have Save, Post and Delete. After posting all three disappear — the document becomes read-only — and Unpost takes their place.
The square button with the letter J opens the accounting entry the document generated. It has no text on it — hover over it and the tooltip says "Show Accounting Entries". You only see the button on posted documents.
When the form has actions of its own — printing a deed, for example — they all gather into a single Actions ▾ button, and Unpost moves in there.
The data table: working with lists
Every register (documents, partners, products) uses the same table component. Not every screen turns it on whole, though: the recycle bin, the column picker and the export are enabled list by list, so on some you won't find them.
| What you want to do | How you do it |
|---|---|
| Search | Type in the search field on the left of the top bar; the × button clears the search |
| Filter quickly by state | Press the filter tabs next to the search (each also shows the number of records) |
| Filter on a column | Press the filter icon in the column header. In the panel you pick the operator first, then the value: a text, a From / To range for numbers and dates, or a list of tickable values. Apply sets the filter, Clear removes it |
| Sort | Click the column header — first click ascending, second descending |
| See deleted documents | Press the bin icon on the right of the top bar; the badge tells you how many there are. From the bin, right-click a row → Restore |
| Choose which columns you see | The columns button on the right of the top bar |
| Export the list | The Export button — produces an Excel file with the visible columns and the filtered rows |
| Open a document | A single click on the row (double-click works the same) |
| Quick actions on a row | Right-click — the context menu has View, Copy, Delete and, where links exist, direct jumps to the partner, the bank account or another related document |
| Work on several rows | Tick the rows in the first column; a bar appears with the bulk actions available and Clear selection |
| Move between pages | The Previous / Next buttons and the page numbers, in the pagination bar |
| Change how many rows you see | From the Per page: selector — 10, 20, 50 or 100 rows |
| Resize a column | Drag the edge of the header; double-clicking it restores the default width |
The filters you set stay in sight, as chips above the table. Each has an × that removes it, and at the end of the row there is Clear all filters — handy when you no longer understand why the list looks empty.
The up/down arrows move the selection, Enter opens the selected row, Home and End jump to the first and the last row. In tree lists (the chart of accounts, the categories), the right arrow expands the node, the left arrow collapses it or goes up to the parent, and * and - expand or collapse everything.
If you work a lot with long lists, turn on Table pagination in the header too from Sidebar → Settings → the Organization Settings tab → the Preferences sub-tab.
The period selector
Document lists carry a period selector, with presets:
Today · This Week · Last 30 days · This Month · Last Month · This Quarter · Last Quarter · This Year · Last Year
A click on a preset applies the range; alternatively, you pick the start and end date by hand from the calendar. When you change the period, the table refreshes on its own.
A practical tip: at the start of a month, set the period to Last Month to check that you recorded everything you had to.
Quick search (Ctrl+K)
Press Ctrl+K (or click the search field in the header) and a box opens that searches Nomenclatures (partners, products) and Documents at the same time. You move through the results with the arrows, open them with Enter and close with Esc. When the box is empty, it shows your recent searches.
Dark mode
POSfix has a light theme and a dark theme; you switch from the theme button in the header, and the preference is saved in the browser. The lime-green accent marks the primary buttons, the active tab and the state indicators.
Shortcuts and tricks
Keyboard shortcuts
| Shortcut | What it does |
|---|---|
Ctrl+K | Opens quick search |
Ctrl+S | Saves the open document |
Ctrl+D | Posts the open document (or unposts it, if it is already posted) |
Enter in a table | Opens the selected row |
Esc | Closes the search box or the open dialog |
Tab in a form | Moves to the next field |
Tricks that save time
- Add a partner from a document — you don't have to go to Partners separately. Press + next to the partner selector in any document and add them without leaving the form; after saving you come back to exactly the document you left.
- Type-to-search in any selector — partner, account, bank, product: type the first letters and the list filters.
- Copying a document — right-click a row in the list → Copy. A new document opens, pre-filled with the copied one's data; you change the date and the amounts.
- Documents side by side — open two documents in different tabs and switch between them to compare; neither loses its data.
- Pinned Items — on the Home page you have a widget with the pinned items, so you reach what you use daily in one step.
Common mistakes
Looking for the document in the wrong module
Incoming invoices are in Purchases, outgoing ones in Sales, and everything to do with bank and cash desk in Money. If you still can't find a screen, switch the menu to Sitemap and look for it in the tree.
The wrong period selected
If you can't see documents you entered recently, check the period selector — it may have stayed on an earlier month. Set it to This Year or to the right month.
The document seems gone, but it's in the bin
A deleted document no longer appears in the list. Press the bin icon in the table bar to see what was deleted and, if need be, Restore it from the context menu.
A collapsed menu mistaken for missing features
Collapsed, you see only icons. Hover over the menu or press the double-arrow button to expand it.
A grey module mistaken for an error
A module shown grey, with a padlock, is not broken — it simply isn't in your subscription. You see the state of each module in Sidebar → Settings → the Billing tab.
Frequently asked questions
How many documents can I have open?
As many as you want — there is no limit. The tabs are grouped by the module tab you opened them from, so each work area keeps its own documents.
How do I get back to the list from a form?
Press the List tab, the first one on the document tab bar. Don't use the browser's "Back" button — it takes you out of the module's context.
How do I copy an existing document?
Right-click the row in the list and choose Copy. A new document opens with the data pre-filled; you change what you need and save.
How do I find an old document?
Go to the right tab (Sales → Sales Invoices, for instance), set the period selector to the range you want and use the table's search field. Or press Ctrl+K and search directly by number or partner.
Can I open the same document in two tabs?
No. If you press a document that is already open, the system switches to the existing tab.
Can I change the order of a module's tabs?
The tab order is fixed. You can, however, bring another module's tabs next to them: right-click the module in the sidebar → Add to current tabs.
Does it work on a phone or a tablet?
Yes, the interface is responsive: the sidebar becomes a sliding panel, tables scroll horizontally, and forms reflow vertically. If you enter a lot of documents, we recommend a laptop or desktop screen.
How do I switch between the light and dark theme?
From the theme button in the header. The preference is saved and applies to every future session in the same browser.
How do I change the interface language?
From the user menu, in the top right corner, the Language section.
Further reading:
- Creating an account and an organization — if you haven't set the organization up yet.
- First steps after setup — chart of accounts, periods, opening balances.
- Double entry and the chart of accounts — the basic concepts of accounting in POSfix.