The timesheet
The timesheet is the monthly table where you record each employee's attendance: worked days, leave, sick leave, absences. The days marked L are the ones the salary calculation uses as the numerator — the salary is prorated against the month's norm.
Where to find it: Sidebar → Team → the Timesheets tab
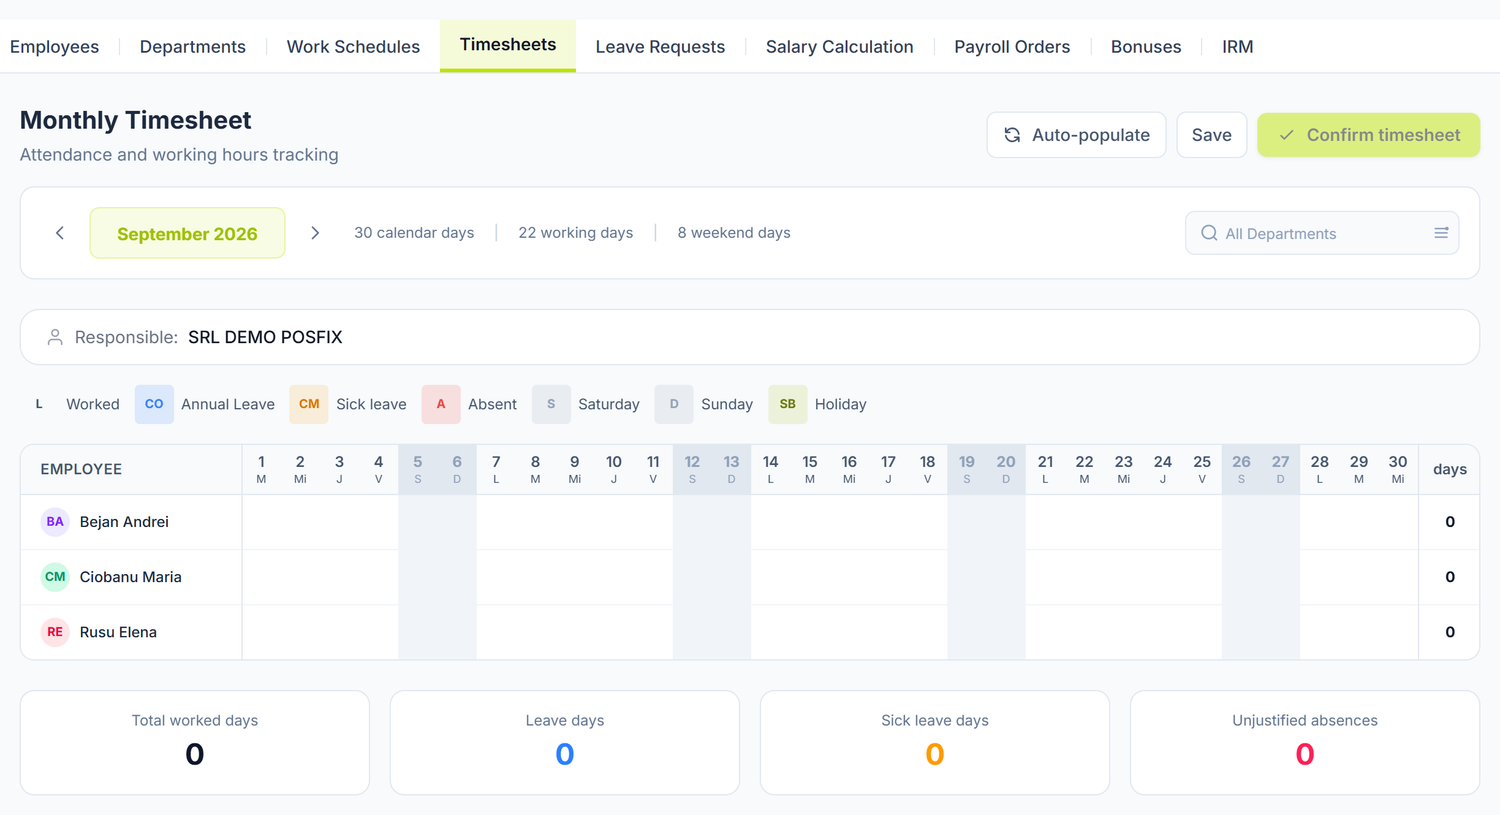
Every row is an employee, every column a day. The legend above explains the letters: L worked, CO annual leave, CM sick leave, A absent; days off show grey. Auto-populate fills the month from the work schedule, and you only correct the exceptions.
The structure of the table
The timesheet is kept per calendar month — you pick the month from the selector in the header. The table has:
- One row per active employee; inactive employees show only if they already have entries in that month
- One column per day of the month (28–31 columns)
- Two total columns at the end of the row: days (the worked days) and Hours
Above the table you see how many calendar days, working days and weekend days the month has, plus a department filter.
The table does not generate itself. When you open a new month the grid is empty, and the Confirm timesheet button stays grey until the month has at least one entry. Press Auto-populate first.
The attendance codes
The legend under the header shows the codes in use. The letters are the same in every interface language — only the labels next to them are translated:
| Code | Name | Description |
|---|---|---|
| L | Worked | Normal working day, with the hours from the employee's work schedule |
| CO | Annual Leave | Rest leave |
| CM | Sick leave | Days covered by a medical certificate |
| A | Absent | Unexcused absence |
| S | Saturday | Day off per the schedule |
| D | Sunday | Day off per the schedule |
| SB | Holiday | Public holiday falling on a working day |
Filling in the timesheet
Auto-populating
The Auto-populate button walks through the active employees and puts, for every day:
- L with the hours from the work schedule assigned to the employee (multiplied by their norm), on the working days of the pattern
- SB, with 0 hours, if a working day falls on a public holiday and the schedule accounts for holidays
- S or D, with 0 hours, on the non-working days of the pattern
Auto-populating is cautious: it does not touch cells that are already filled (so it does not wipe your manual corrections) and it generates nothing before the hire date or after the termination date. You can run it several times — for example after adding a new employee mid-month.
Without an assigned work schedule, auto-populating assumes 5 days × 8 hours. The salary does not suffer — it is prorated by days — but the hours come out wrong for part-time employees. Assign them a schedule in Team → Work Schedules.
Manual correction
Click a cell to change its code. Each click walks the cycle L → CO → CM → A → L, and the cell's hours change together with the code: L brings the working hours, the other three set them to zero. Weekend cells do not respond to clicks, and in a confirmed timesheet nothing can be changed any more.
Only these four codes are set by hand. S, D and SB are placed by auto-populating and are not part of the cycle.
After your changes press Save.
Auto-populate puts the type's code (CO or CM) on the working days of every posted leave. It only fills days that are still empty: if you filled the month before posting the leave, the grid keeps L — move them to CO yourself so the grid looks right. The salary isn't paid twice even then: the calculation doesn't count a day of a posted leave as worked.
The totals
On each row, at the end:
| Indicator | Description |
|---|---|
| days | The number of days marked as worked |
| Hours | The sum of the hours in all the cells of the row |
Below the table, four indicators over the whole displayed set (they respect the department filter):
- Total worked days
- Leave days (CO)
- Sick leave days (CM)
- Unjustified absences (A)
The month's norm is not shown in the timesheet — it comes from the employee's work schedule and applies in the salary calculation, as the denominator of the proportion. The production calendar is used only for those without a schedule.
The production calendar
Auto-populating and the salary calculation read the same work schedule of the employee, and the production calendar gives both of them the public holidays. That the source is shared matters — if the numerator (the days on the timesheet) and the denominator (the norm) came from different places, the salary would come out wrong. The calendar's working days and hours become the norm only for employees without a schedule.
Where to find it: Sidebar → Accounting → the Production Calendar tab
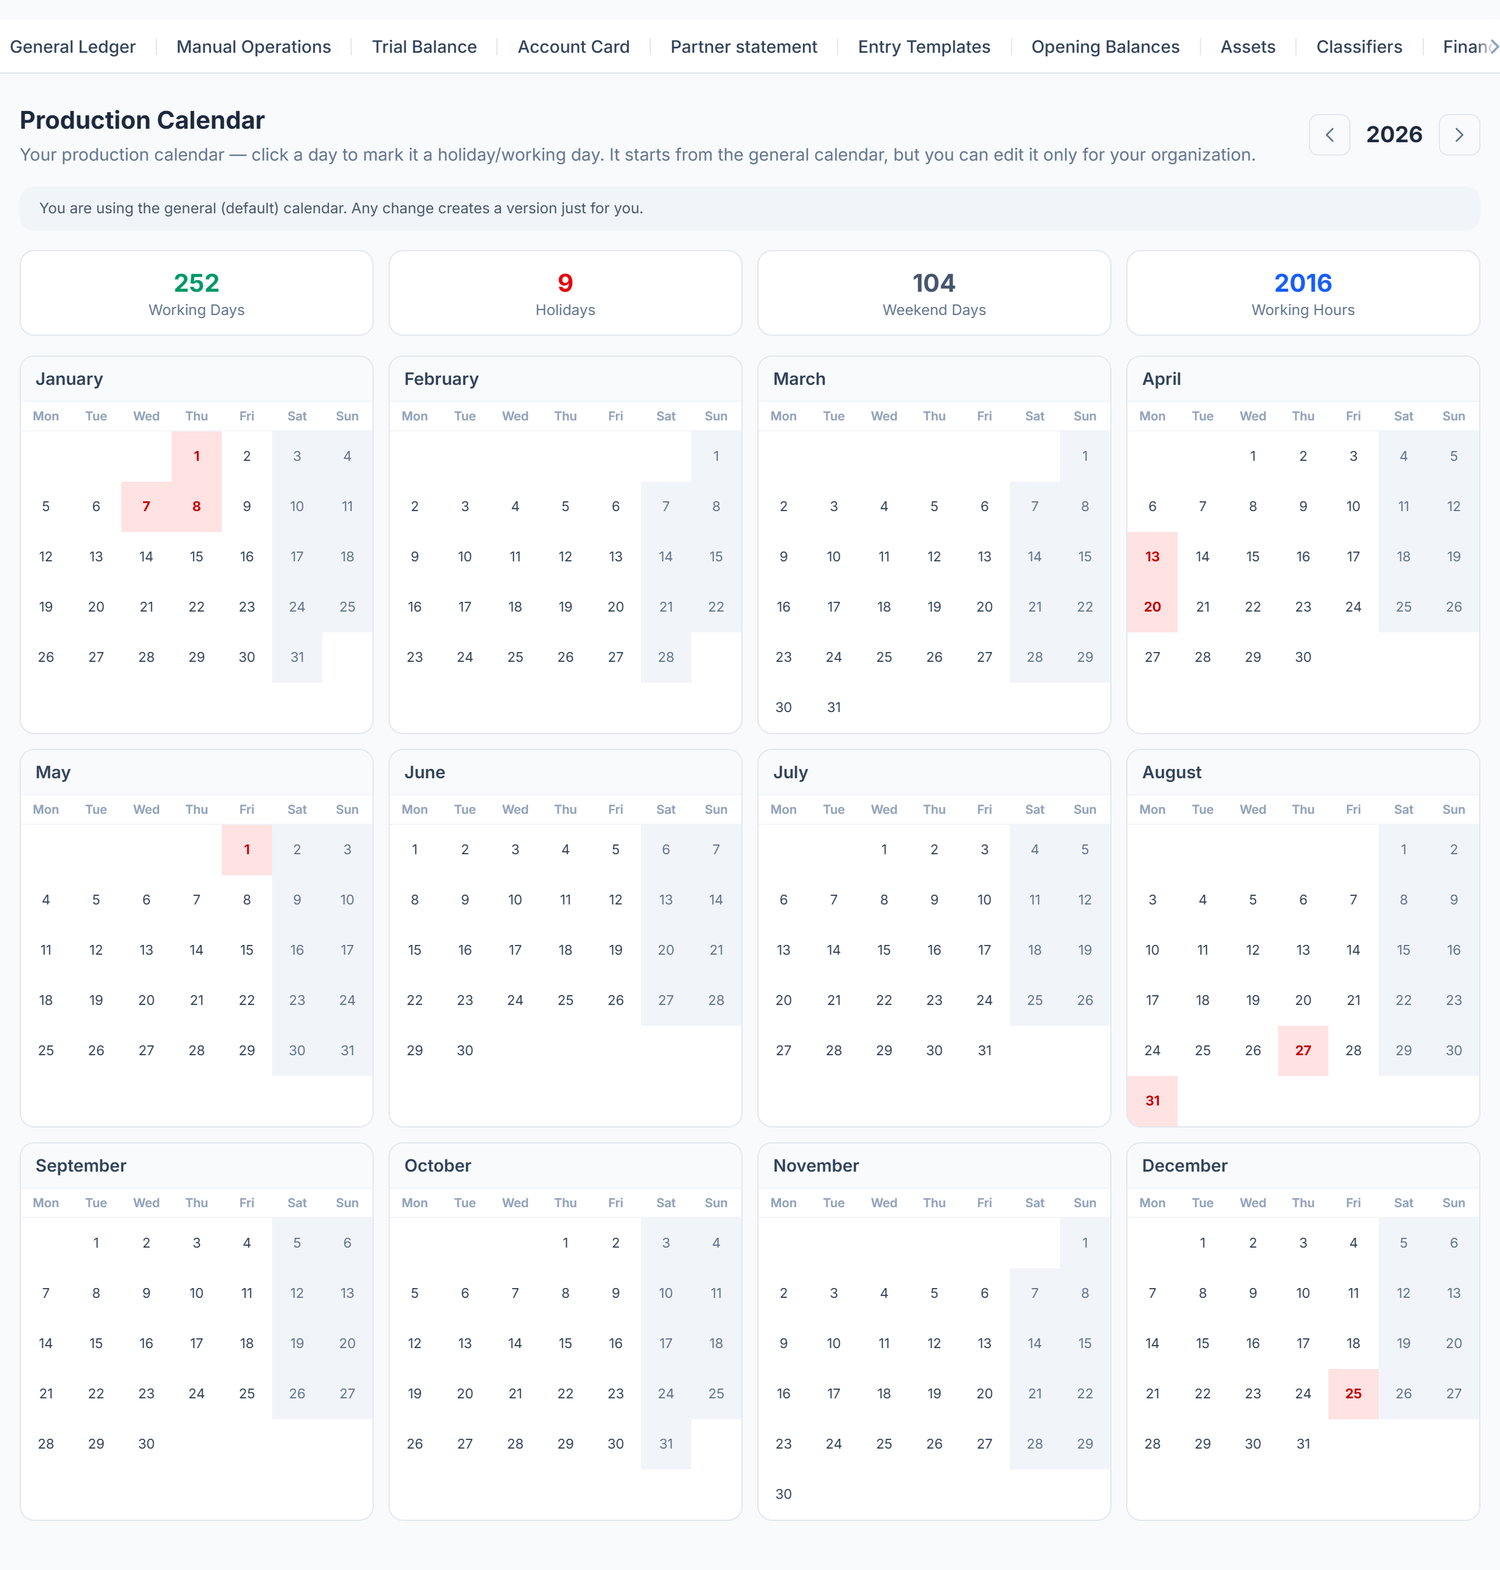
You see the year in full. Of the four figures at the top, the working days and the hours are the norm the salary calculation uses for employees without a schedule. The arrows at the top right move the year.
A day changes with one click on it: it flips from working to holiday and back. Red days are the holidays, grey ones the weekend. Nothing is written until you press Save. The button sits below the calendar, past the bottom edge of the image — scroll down to it, because if you change days and leave the tab, you lose all of them.
The strip under the title tells you which calendar you are on. In the screenshot it says you are using the general calendar, shared by everyone. Saving creates, for that year, a version that is yours alone, and from then on updates to the general calendar no longer reach you — the strip changes colour and text so you know where you stand. It is not a one-way door: once you have your own version, the same strip shows the link that brings you back to the general calendar. It is worth touching only if you really have a schedule different from the official one.
The timesheet status
Confirming visibly changes the action bar in the header, not just a label.
| State | What you get in the header | What you can do in the grid |
|---|---|---|
| Draft | Auto-populate, Save, Confirm timesheet | Edit any cell |
| Confirmed | The green Confirmed badge and the Unconfirm button — the other three disappear | Nothing; the cells no longer respond to clicks |
Confirm timesheet stays grey until the month has at least one entry. If the button won't press, the grid is empty: run auto-populate first.
You cannot unconfirm the timesheet of a month whose salary calculation is already posted. Unpost the calculation first (see Salary calculation), then unconfirm the timesheet.
The monthly workflow
- At the start of the month — open the month's timesheet and press Auto-populate
- During the month — you post the leave. If the grid is already filled in, you switch their days to CO by hand. Absences without a document you mark with A or CM
- At the end of the month — run auto-populate once more (to catch new employees), check the rows and save
- Confirm the timesheet
- Move on to the salary calculation
Example: March. On 1 March you open the timesheet and press Auto-populate: the working days get L, the weekends S/D, and 8 March becomes SB. On 5 March you post an employee's leave for 10–14 March and move those five cells to CO — the grid had already been filled on 1 March. On 25 March someone is absent without excuse — you change the cell from L to A. On 31 March you save and confirm.
The timesheet for part-time employees
Employees with a fractional norm show with the same codes. The difference is in the hours: auto-populating puts, on every L day, the hours from the schedule multiplied by the norm (a 0,5 norm on an 8-hour schedule = 4 hours/day). The number of days stays the same, and prorating the salary applies the norm fraction separately.
How it connects to other documents
| Document | Its relation to the timesheet |
|---|---|
| Salary calculation | Takes the days marked L, without the days of posted leave and without those before hiring or after termination; if the month has no timesheet, it assumes a full month minus the leave |
| Leave | Auto-populate puts the leave code on the working days of posted leave |
| Employees | The list of active employees, the work schedule and the norm determine the rows and the hours |
| Departments | The department filter narrows the rows shown |
Frequently asked questions
Does the salary calculation require a confirmed timesheet?
No. The calculation runs without a confirmed timesheet, and even with no timesheet at all — in that case it assumes the full month worked, minus the working days of the posted leave. Confirming is still the right step: it locks the data before the calculation.
Can I fill in the timesheet for a past month?
Yes. You pick the month from the period selector and work normally.
If I hire someone mid-month, do they appear in the timesheet?
Yes, their row appears as soon as the record is active. Run auto-populate again: cells are generated only from the hire date onwards, and the earlier days stay empty.
How do I enter overtime?
The timesheet records days and hours per day, and the selectable codes are L, CO, CM and A. There is no separate overtime code you can set from the grid. You enter the extra as an allowance on the employee record, or by correcting the calculated amount on the employee's line by hand.
Can I export or print the timesheet?
No. The timesheet screen has no export and no formatted printout.
What happens to the timesheet if I unpost a leave?
The codes already written in the grid stay. If the person came to work after all, you bring the cells back to L yourself.
How do I enter a business trip?
There is no business-trip code in the timesheet. The day stays marked L, and you handle the pay difference as an allowance or as an amount corrected by hand in the salary calculation.
Does the timesheet account for night shifts?
No. The timesheet records attendance per day and the total hours of the day. The night-work allowance is configured as a percentage allowance on the employee record.
How are public holidays treated?
Auto-populating marks them SB with 0 hours, if the day would have been a working day and the employee's work schedule accounts for holidays. The cell stays editable: someone who actually worked on the holiday is marked L by hand.
Can I confirm the timesheet for a single department?
No. The department filter only affects what you see on screen; the confirmation applies to the whole month, for all employees.
What do I do if I confirmed the timesheet with a mistake?
You press Unconfirm, correct the cells, save and confirm again. If you have posted the month's salary calculation in the meantime, unpost it first — otherwise unconfirming is refused.
Related pages
- Leave — the days of posted leave are marked in the timesheet
- Salary calculation — takes the worked days from the timesheet
- Departments — the department filter
- Guide: The full payroll flow — from timesheet to paying the salaries, step by step