Cash receipts and payments
So there is a written trace for every leu that comes into or goes out of the cash desk, you use the cash order. It covers only the money that physically passes through your hands — what moves through the bank account is recorded on another screen, and the two don't mix.
Where to find it: Sidebar → Money → the Cash Receipts or Cash Disbursements tab
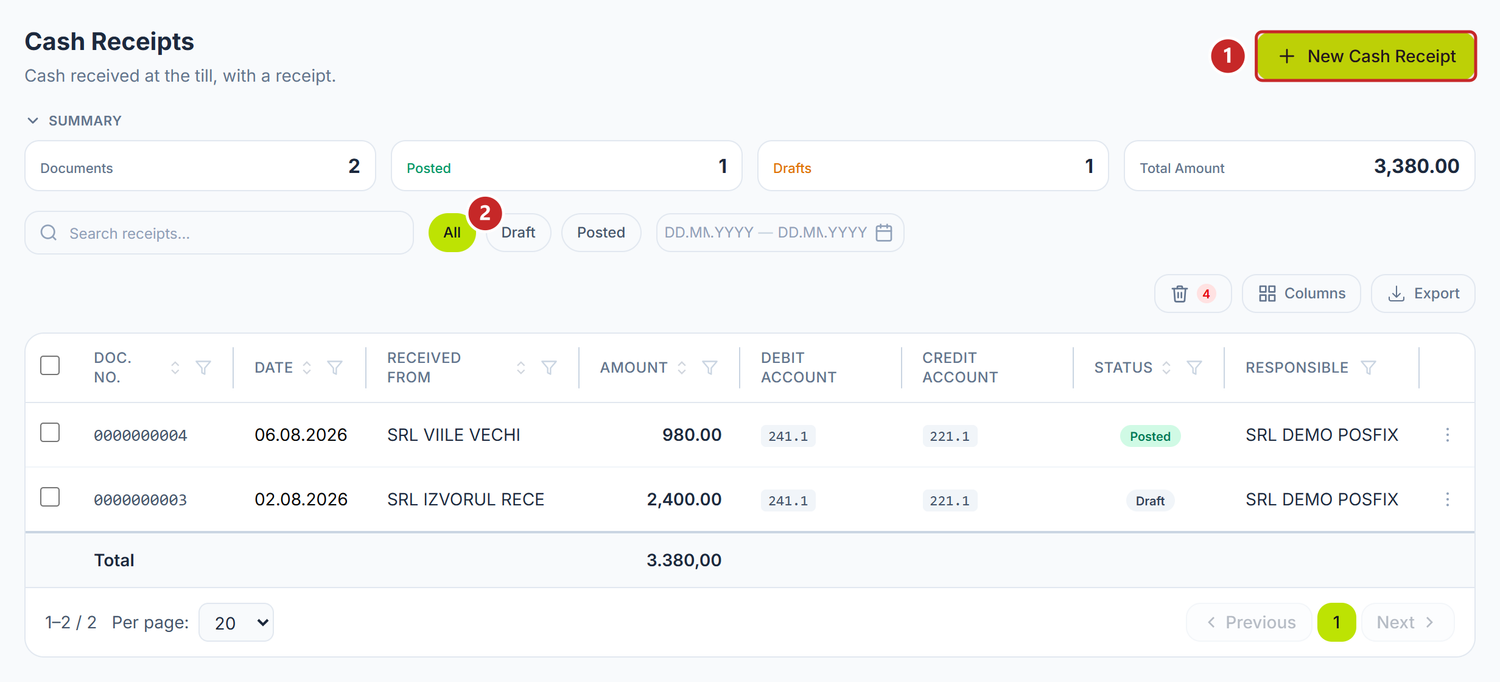
1 the create button · 2 the status filter
Receipts and payments sit on two tabs, and most of the screen is the same, so what you learn on one serves you directly on the other. One reservation, though: the bar above the table isn't identical — on Cash Disbursements you have neither Export nor the Columns selector.
One thing that startles you the first time: the figures in Summary and the Total row in the footer are computed on the whole set left after the filters, not on the page in front of you. You see 20 rows, but the total is that of the entire selection.
The search looks in the document number and in Received From, and on payments in Paid To — so you can search by person, not only by number.
A click on a row opens the document in a tab. With a right click you have View, Post, Unpost and Delete at hand, each active only on the status that allows it.
To record a receipt
- Money → Cash Receipts → New Cash Receipt.
- Set the Date. The field asks for the time too, not just the day.
- Choose the Operation Type — it decides what sections appear below.
- Choose the Cash Desk. If you leave it empty, the server takes the default desk.
- Type the Amount.
- On Customer Receipt choose the Partner and spread the amount in the grid.
- On the other types check the Debit Account and the Credit Account.
- Write the Description, then Save and Post.
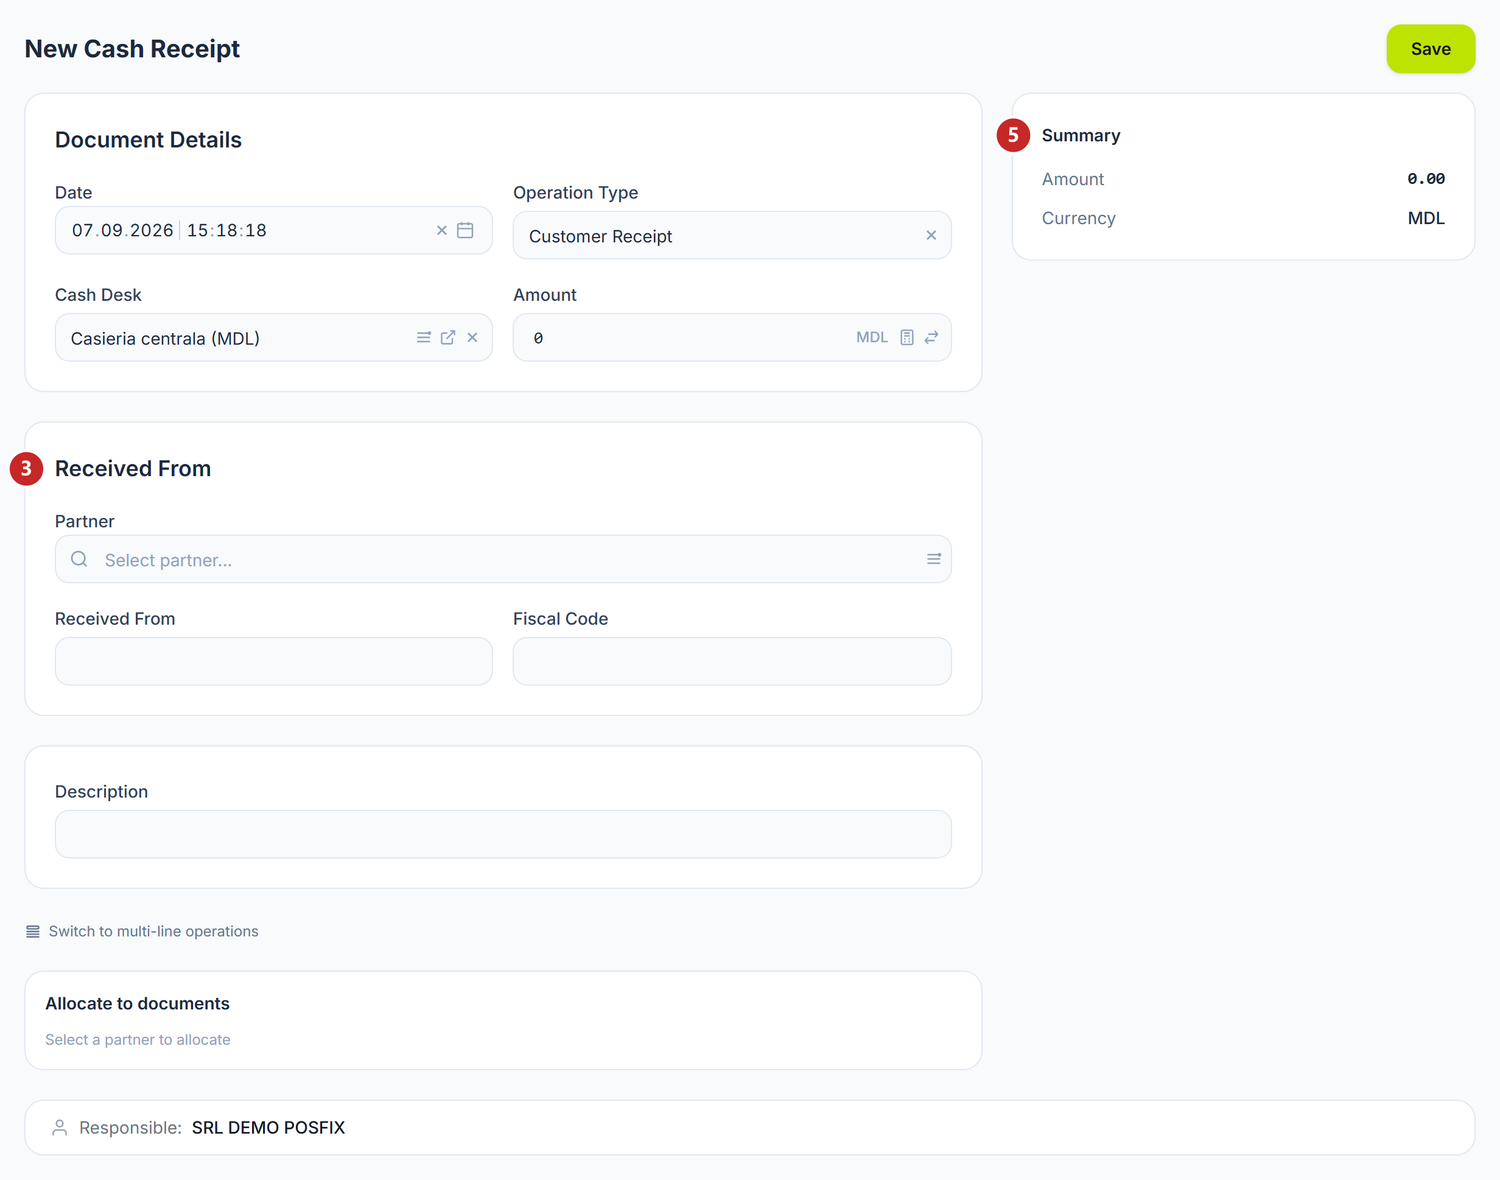
1 the operation type · 2 the cash desk · 3 the Received From section · 4 the partner · 5 the summary
There are six receipt types: Customer Receipt, Return from accountable person, Bank to Cash Withdrawal, Service Receipt, Loan Receipt and Other Operations. Choose the type first, not at the end — when you change it, the panel rewrites the proposed account and clears the partner along with the allocations made on them.
Partner appears only on Customer Receipt, and more than a name comes from there: it fills in Received From and Fiscal Code, then opens the grid where you tie the money to invoices. On Bank to Cash Withdrawal the whole Received From section disappears, because the money comes from your own account. On the rest of the types the field stays free text and is printed on the document exactly as you write it.
If you haven't configured a cash desk yet, the panel makes you one by itself, "Casa Principală", so as not to block you. To the right of the Amount field you also have two small buttons, a calculator and a currency conversion — more about them below, at the toggles.
The template fills the Credit Account with 611.3, but posting refuses it: the account requires analytical dimensions a cash order does not carry. Put in its place the receivable account you are settling. And if the money comes before the invoice, go with Customer Receipt — there the advance has somewhere to settle.
To record a payment
- Money → Cash Disbursements → New Cash Disbursement.
- Set the Date, choose the Operation Type and the Cash Desk.
- Type the Amount.
- Choose the Partner, in the Paid To section.
- Check the Debit Account and the Credit Account.
- On Supplier Payment spread the amount across the open invoices.
- Write the Description, then Save and Post.
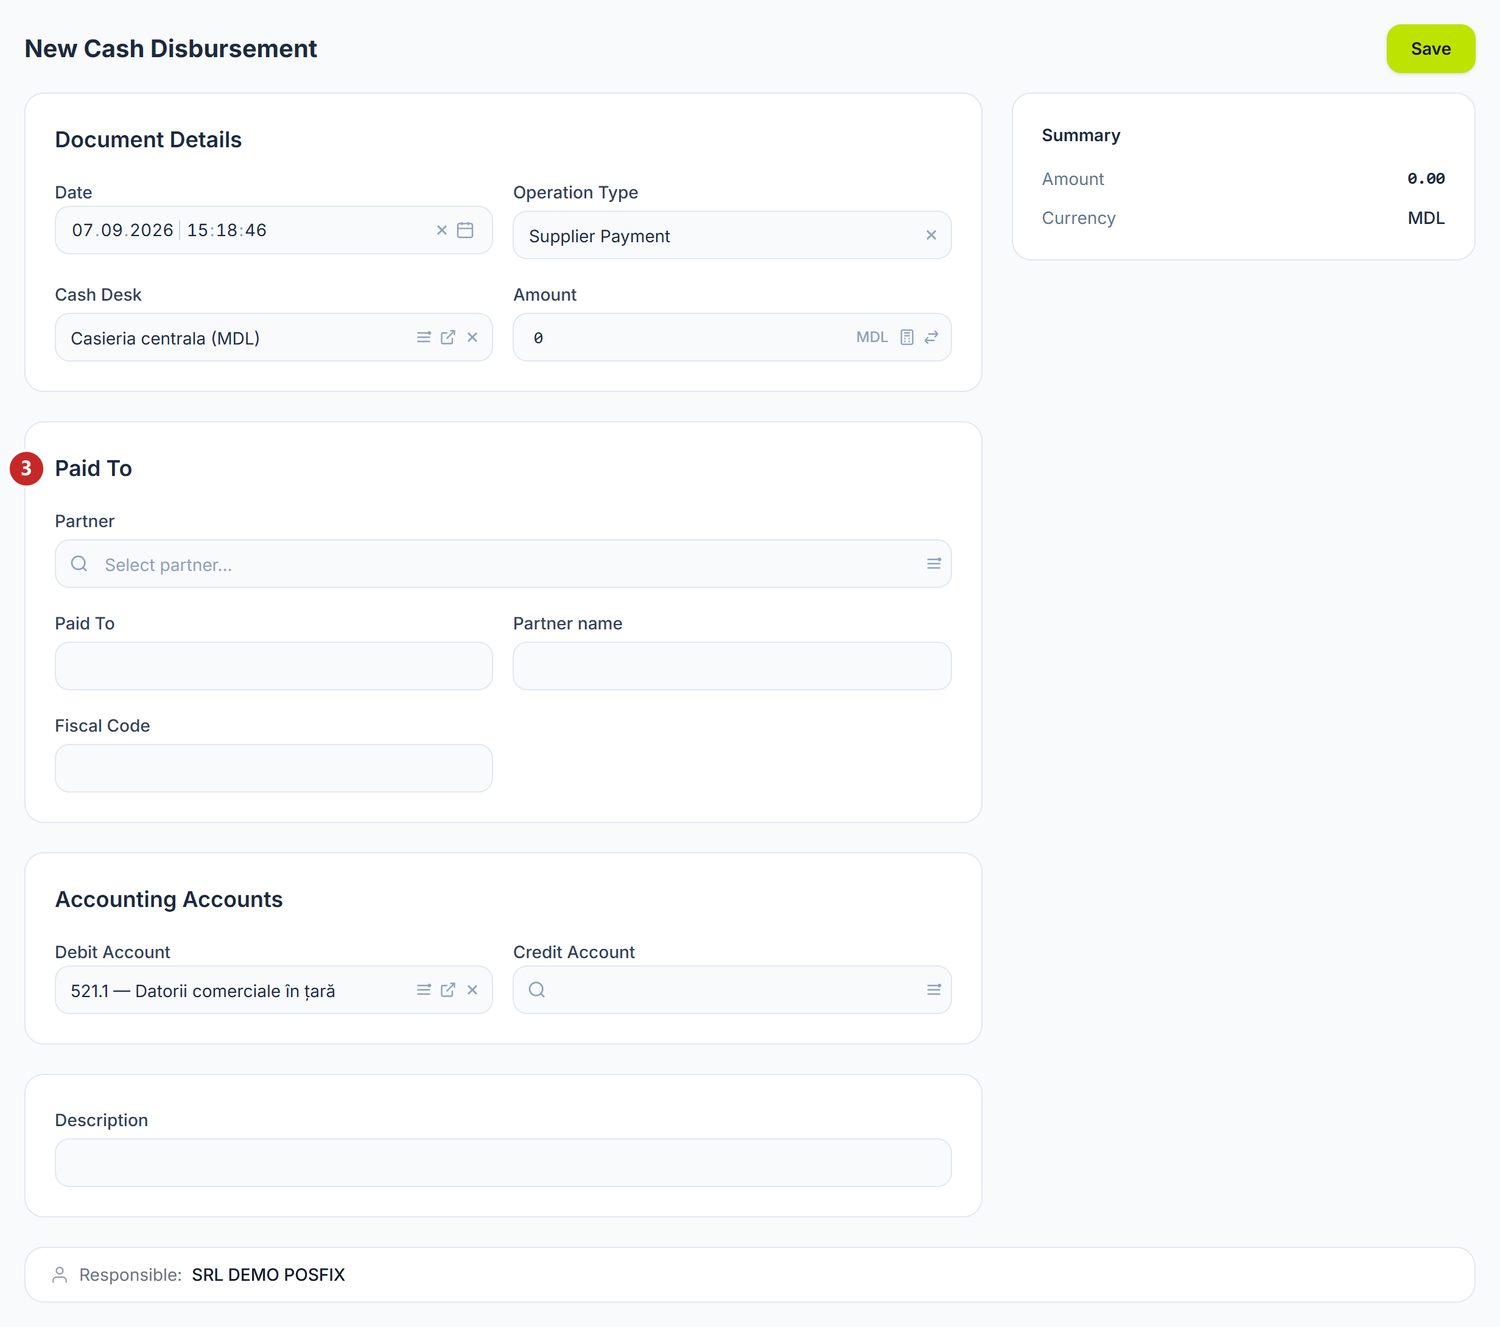
1 the operation type · 2 the cash desk · 3 the Paid To section · 4 the partner
Payments have thirteen types: Supplier Payment, Salary Payment, Tax Payment, Rent Payment, Dividend Payment, Loan Repayment, Social Contribution, Medical Insurance, Advance to accountable person, Bank commission, Cash to Bank Deposit, Internal Transfer and Other Operations. Each one prefills a different Debit Account.
Advance to accountable person needs the Employee — the holder you will settle in the advance report. So does the Return from accountable person receipt.
A single type opens the invoice allocation grid: Supplier Payment. As with receipts, leaving it clears the allocations — so settle the type before you spread the amount.
Compared with the receipts screen, one extra field appears, Partner name. It fills itself in from the chosen partner, but stays editable, if you want different wording on the document.
There is one more difference that only shows at posting: a payment that exceeds the balance of the chosen cash desk doesn't go through.
Allocation to documents
The allocation is how you say which document the money belongs to. The grid shows you the type, the number, the date, the Open balance column and the column where you write the Allocated amount, and at the bottom it keeps the Total allocated row. The Allocate remainder button fills a row with the part still left to spread. Overdue invoices carry the red Overdue badge.
On payments, the grid appears only when two conditions are met: the type is Supplier Payment and the partner is already chosen. If you only choose the type and go looking for the section, you won't find it — it isn't missing, it still needs the partner.
You are not obliged to allocate everything. What stays unallocated settles as an advance on the partner, and the yellow Remaining to advance label is not an error — it only tells you where the money went.
The red Over-allocated label means something else entirely and has to be resolved: you have spread more than the document's amount, and posting will fail.
Who drives the account is different on each screen. On payments, as long as allocations exist, they decide the debited account, and Debit Account has no effect — delete the allocations if you want to choose the account yourself.
On receipts you have nothing to drive: on Customer Receipt the Accounting Accounts section doesn't even appear on screen. The allocation settles the money by itself, each row on its invoice's receivable, and the rest on the partner's advance.
What differs between the two screens
- On receipts the partner appears only on Customer Receipt; on payments, on any type.
- The Received From section disappears on Bank to Cash Withdrawal, while Paid To always stays in place.
- Accounting Accounts disappears on Customer Receipt, but on payments it is always visible.
- Only payments have the Partner name field.
- Only receipts have the Switch to multi-line operations button.
- Only payments check the cash desk balance at posting.
- Only the receipts list has the Export button and the Columns selector.
The toggles
| Toggle | What changes when you turn it on | If you leave it off |
|---|---|---|
| Draft / Posted | The list narrows to the chosen status, and the figures in Summary are recomputed on it | You see both statuses together |
| The trash button | The table switches to the deleted documents, and only Restore is left in the row menu | You see only the active documents |
| Calculator (in Amount) | The field's border changes colour and shows you the result underneath; Enter puts it into the field | You type the figure straight into the field |
| Currency conversion (in Amount) | A panel opens with Currency, Currency amount and Exchange rate, and the day's rate loads by itself | The amount stays in the base currency |
| Switch to multi-line operations (receipts only) | The header collapses and the line table appears, with Add Operation. The allocation grid disappears while you are on lines | The document stays on a single operation |
| Columns (receipts only) | The ticked columns appear or disappear on the spot, and your choice is remembered | The default columns stay |
| The period selector | The list, Summary and Total narrow to the chosen range | The list shows every period |
The line table has six columns: Operation type, Received From, Amount, Debit Account, Credit Account and Description. You add a new line with Add Operation, and from each row you can duplicate or delete it.
The button really does open the operations table, but the lines written there never reach the server: only the header is saved, with the amount in it. Nor is the amount summed from the lines — the document keeps the figure you had in the header, however much you write in the table, and with the header at zero the save is rejected without telling you why. Until this is fixed, make one document per operation.
What can trip you up
“Documentul nu poate fi contabilizat — lipsesc analitice obligatorii." (the document cannot be posted — required analytical dimensions are missing) The account put on the document requires analytics a cash order doesn't carry. The rows under the message tell you exactly which account and which dimension is missing, so change the account for one suited to a cash operation.
“Insufficient cash in register…" The payment exceeds the balance of the chosen cash desk. The message is still in English and shows the desk's identifier instead of its name, so check first which cash desk you put on the document; if it is the right one, post the day's receipts and try the payment again.
“Σ allocations (…) exceeds amount (…)" You have spread more across documents than the order's amount. Lower the figures in the Allocated amount column until they match.
On Cash to Bank Deposit and Bank to Cash Withdrawal the panel proposes the cash desk account on both legs of the operation. Put the bank account on the bank side yourself; if it trips you up every time, change the template once, for the whole organisation.
After the currency conversion, Summary still shows the base currency. The panel converts the amount and keeps the rate, but the document currency doesn't change. On this screen there is no other route.
A posted document won't let itself be edited. It isn't a fault, it is how closed records are kept. Go to Actions → Unpost, correct it and post again.
Related pages
- Cash desks — the cash desks you choose from and the balance checked at posting
- Bank operations — the same flow, through the bank account
- Posting templates — where the accounts proposed on each type come from
- Customer invoices — the documents that appear in the allocation grid