Import bank statements
So you don't have to key in every receipt and every payment, you upload the statement you received from the bank into POSfix and the platform prepares the operations from it. What comes out of the import are documents in Draft — the account balance doesn't budge until you post them yourself.
Where to find it: Sidebar → Money → the Bank Statements tab
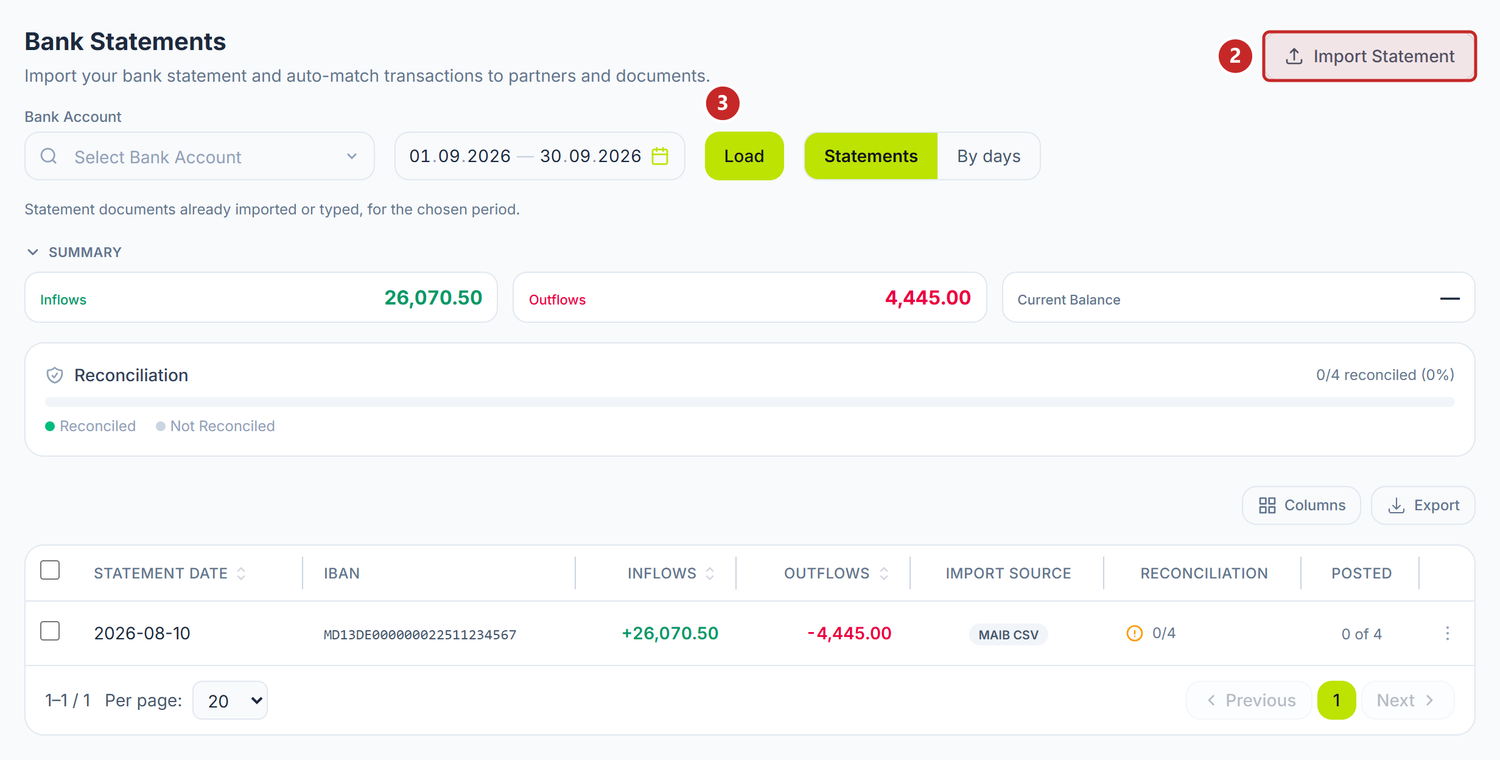
1 the account you are working on · 2 opens the import window · 3 reloads the list for the chosen period
The flow is always the same: choose the account, upload the file, check the lines, confirm. The chosen account doesn't only filter the list on screen — it is carried into the import window too, so it is worth setting right from the start.
The period starts on the current month, but it doesn't reload anything by itself. After you change it, press Load.
Summary adds up the inflows and outflows of the statements shown at that moment, and Current Balance shows the balance of the chosen account — with no account chosen it stays 0.00. The Reconciliation bar counts the lines for which a document has already been generated, that's all; it says nothing about posting, so a line counted there may still be in Draft.
A click on a row opens the statement in its own tab. From the ⋮ menu you delete it, and with it go its lines and the operations left in Draft. With the checkboxes in the table header you delete several statements at once. You can do the same from inside an open statement, with the red bin icon in the header — it asks once, then deletes.
To import a statement
- Export the statement from your internet banking.
- Choose the account in Bank Account, then press Import Statement.
- At the File Selection step, check the Bank Account inside the window — it is carried over from the list, but you can change it here. Then drag the files into the dotted area.
- Press Continue. The files are read in the browser.
- At the Preview step, check the partner and the Operation Type on each line.
- Press Import Statement. The operations are created in Draft.
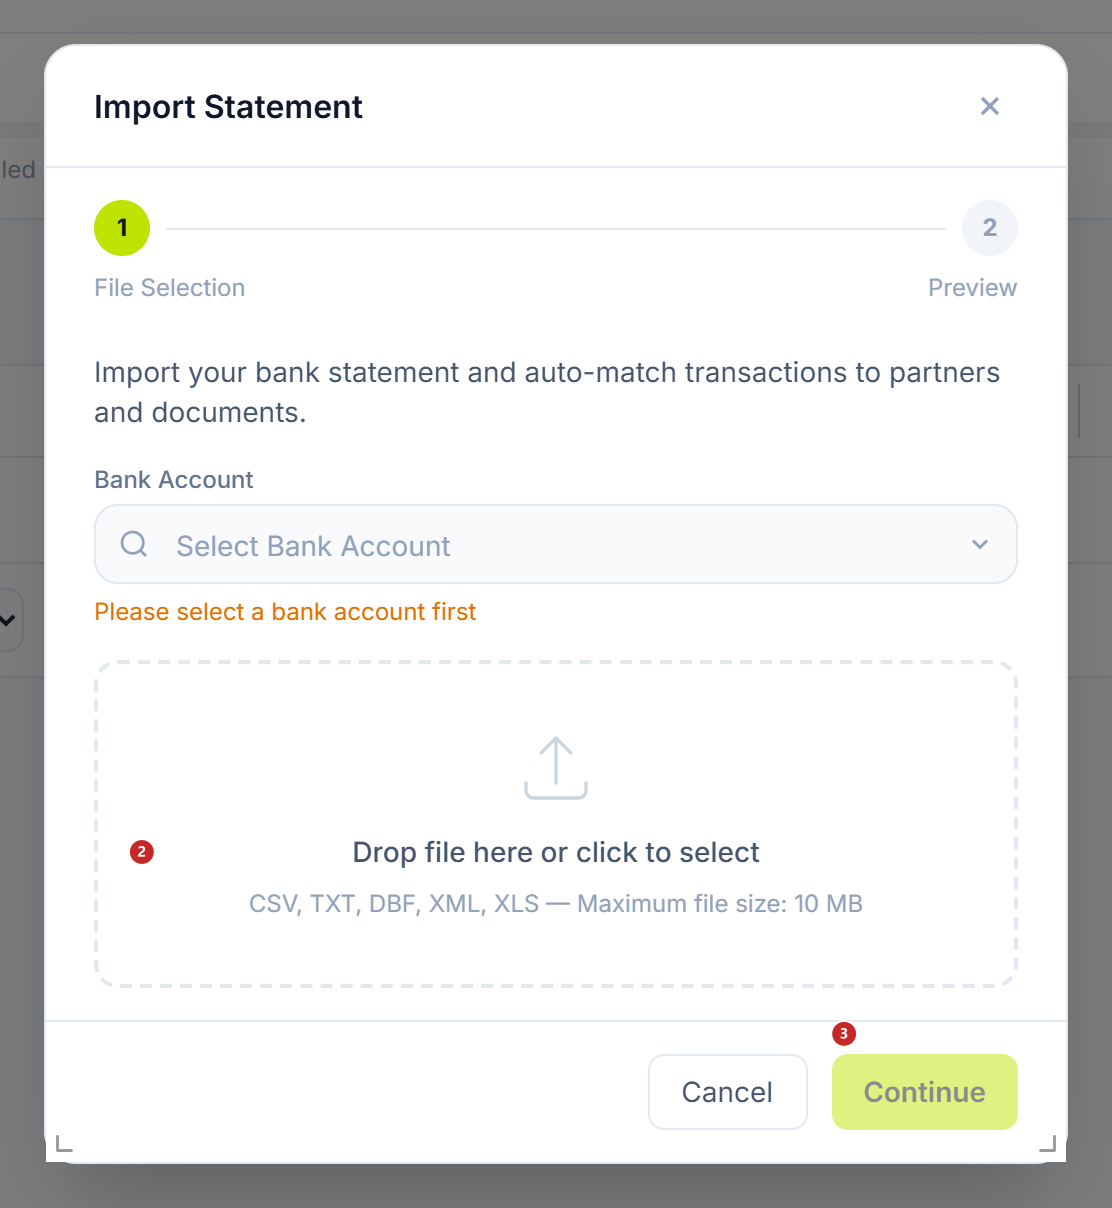
1 the account the statement goes into · 2 the area you drag the files into · 3 moves to the preview
The window has two steps, numbered at the top: File Selection and Preview. As long as you haven't chosen the account, Please select a bank account first sits under the selector, and Continue stays greyed out — you pick it right here, you don't have to close the window.
You can drag several files at once, each up to 10 MB. It reads .csv, .txt, .dbf, .xml, .xls
and .xlsx, and the MAIB and FinComBank exports are recognised out of the box. The text under the
dotted area doesn't mention .xlsx, but the format is read — the label is the incomplete part, not the
list of formats.
If you add the same file twice, the second one is ignored without any message — which is why it is worth a look over the list before Continue. With × you take a file added by mistake out of it.
The red pills: 1 creates the missing partners · 2 creates the missing bank accounts · 3 the type, chosen on each line · 4 the button that finishes the import
At preview, the header is read from the file and cannot be edited. Opening Balance, Statement Date, IBAN, Inflows and Outflows are exactly what the bank wrote.
At the top, next to the number of transactions, it says how many partners were recognised — three out of four in the example; the fourth is the bank commission, which has no partner. The two toggles under the header make an unknown partner or bank account create itself at import. Turn them off if you prefer to add the sheets yourself, with the full details.
With several files, you switch between them from the tabs named after each file. Back takes you to the files step without losing the list.
After the import, don't be surprised if the period in the filter looks different from how you left it: the platform widens it by itself across the dates of the statements you have just imported, otherwise you wouldn't see them in the list.
The operation type
The type is the field that decides whether a line becomes a bank operation or stays just a statement line. You can leave it empty at import and fill it in later — the statement is saved either way, only no document comes out of the lines without a type.
Partner matching
Next to the proposed partner an icon appears that tells you how confident the match is — Exact, Learned or Approximate. Hover over it to see the label.
The Auto-match Partners button fills in, in one go, the lines it recognises — by fiscal code, if the statement brings it, otherwise by name. It doesn't touch the lines already filled in, so you can press it any time without losing what you chose by hand.
The remaining lines are on you: you pick the partner from the list on the line. It is worth going over the automatically filled ones once, especially where the icon says Approximate — two companies with similar names are exactly the case where matching by name can get it wrong.
To turn the remaining lines into operations
The lines left without a type aren't lost — they sit in the statement and wait for you there. You fill them in from the open statement, and each choice is saved on the spot, with no save button.
- Open the statement from the list.
- Choose the Operation Type on the line.
- Choose the Partner (selected) on the line, if it is missing.
- Press + on the line for a single document, or Generate bank operations for all the prepared lines.
- Post the documents from the Bank Operations tab.
At the top, above the table, you have four cards: Opening Balance, Total Inflows, Total Outflows and Closing Balance. The first three come from the file; Closing Balance is computed by the panel, as opening balance plus inflows minus outflows, so a line read wrong shows up here before you post anything.
Under them, the Reconciliation bar counts the lines a document has already come out of — 12/40 (30%),
for instance. It is the same measure as on the list, only on a single statement.
The last column of the table tells you where each line stands. The amber warning sign means the line has no type yet, so nothing comes out of it. A green + appears as soon as you have chosen the type and generates the document on the spot. And the arrow in the corner shows the document already exists — a click on it opens it.
The button works on every line that has a type and no document yet, not on the ticked ones. If you want a single document, use the + on its line. The checkboxes only serve for reading: they show you how many lines you have selected, with their total of inflows and outflows, and Clear selection empties them.
Draft
Everything that comes out of the import stays in Draft, that is, recorded but unposted, and the account balance only moves at posting.
The amber N unconfirmed badge on the account card, in the Bank Accounts tab, counts them. It doesn't mean something is wrong — it is simply the work left to check, and a click on it opens the list filtered on Draft.
The toggles
Both sit at the Preview step and start ticked. Neither changes anything on the spot — at preview you see no difference, the effect shows after the import.
| Toggle | What changes when you turn it on | If you leave it off |
|---|---|---|
| Create new partners | Nothing on the spot. After the import, you find the unknown payers in Partners | Lines with no partner chosen stay without a partner |
| Create bank accounts | Nothing on the spot. After the import, the counterparty's IBAN lands on their sheet | The IBAN stays only on the statement line |
Not every line gives birth to a new partner: it needs a fiscal code in the file and must not be a bank commission. Same for the account — it is only created if the IBAN is valid and its bank is recognised.
What can trip you up
“Please select a bank account first" — it is written in amber under Bank Account, in the import window. Choose the account there and Continue lights up.
“File exceeds 10 MB limit" — export the statement over a shorter period.
“IBAN-ul din fișier (…) nu corespunde contului selectat (…)" (the IBAN in the file doesn't match the selected account) — it appears as a red band at preview. That file isn't imported, the rest go in normally; press Back and choose the right account.
“N file(s) could not be parsed" — the problem files are listed by name, and the others carry on.
Preview with 0 transactions and the warning Format ... is not yet supported — the file isn't
recognised. MT940 isn't read at all, so you enter the operations from it manually, in Bank Operations.
“Extrasul pentru această zi (…) a fost deja importat pe acest cont bancar." (the statement for this day has already been imported on this bank account) — the import is rejected in full, not halfway. Open the existing statement or delete it before re-importing.
“Extrasul nu poate fi șters — N operațiune(i) bancară(e) generate sunt deja contabilizate." (the statement cannot be deleted — N generated bank operations are already posted) — unpost those operations first, then delete the statement.
The balances don't match after the import — most often because the operations are still in Draft. Post them from Bank Operations and the balance falls into line.
The Import Source column shows fincombank_xls — the label isn't translated, that's all. The statement
is imported correctly.
Related pages
- Bank accounts — the account you import onto and the "unconfirmed" badge
- Bank operations — where you check and post the generated documents
- Partners — the fiscal code and the IBAN the recognition works on
- Payment orders — the payments you send to the bank