Manager Features
Accessing Manager Mode
To modify settings, access financial reports, or manage inventory, administrator authentication is required.
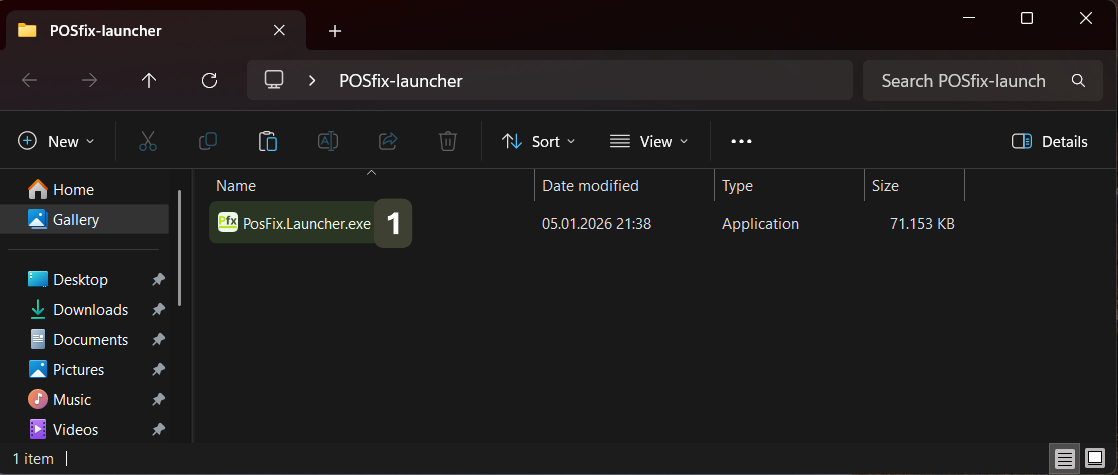
- Launch the
PosFix Launcher.exeapplication
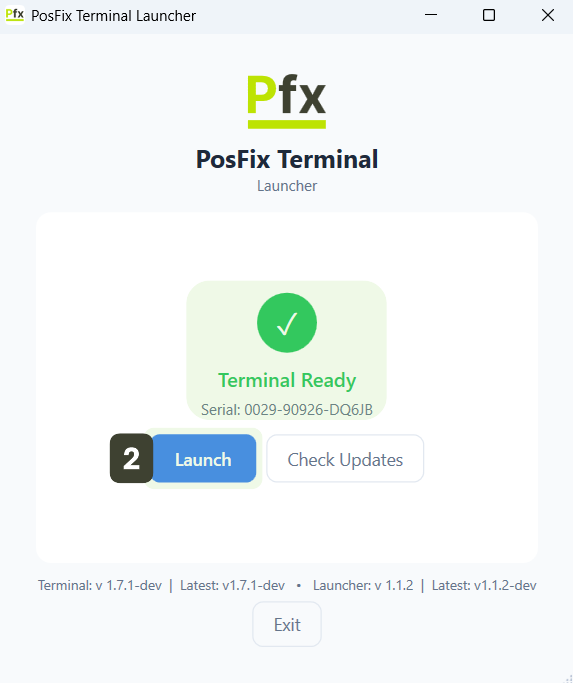
- Make sure the displayed message is Terminal Ready, then press the Launch button to open the identification interface.
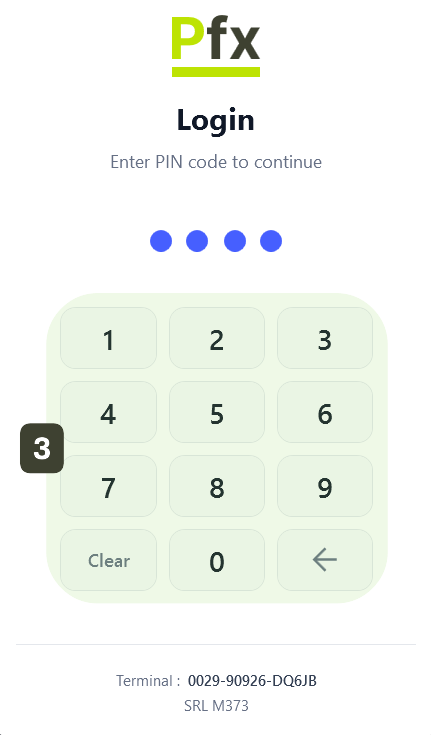
- On the login screen, enter the 4-digit PIN code associated with the Manager account using the numeric keypad.
Access to the system is automatic after entering the last digit, without requiring additional confirmation.
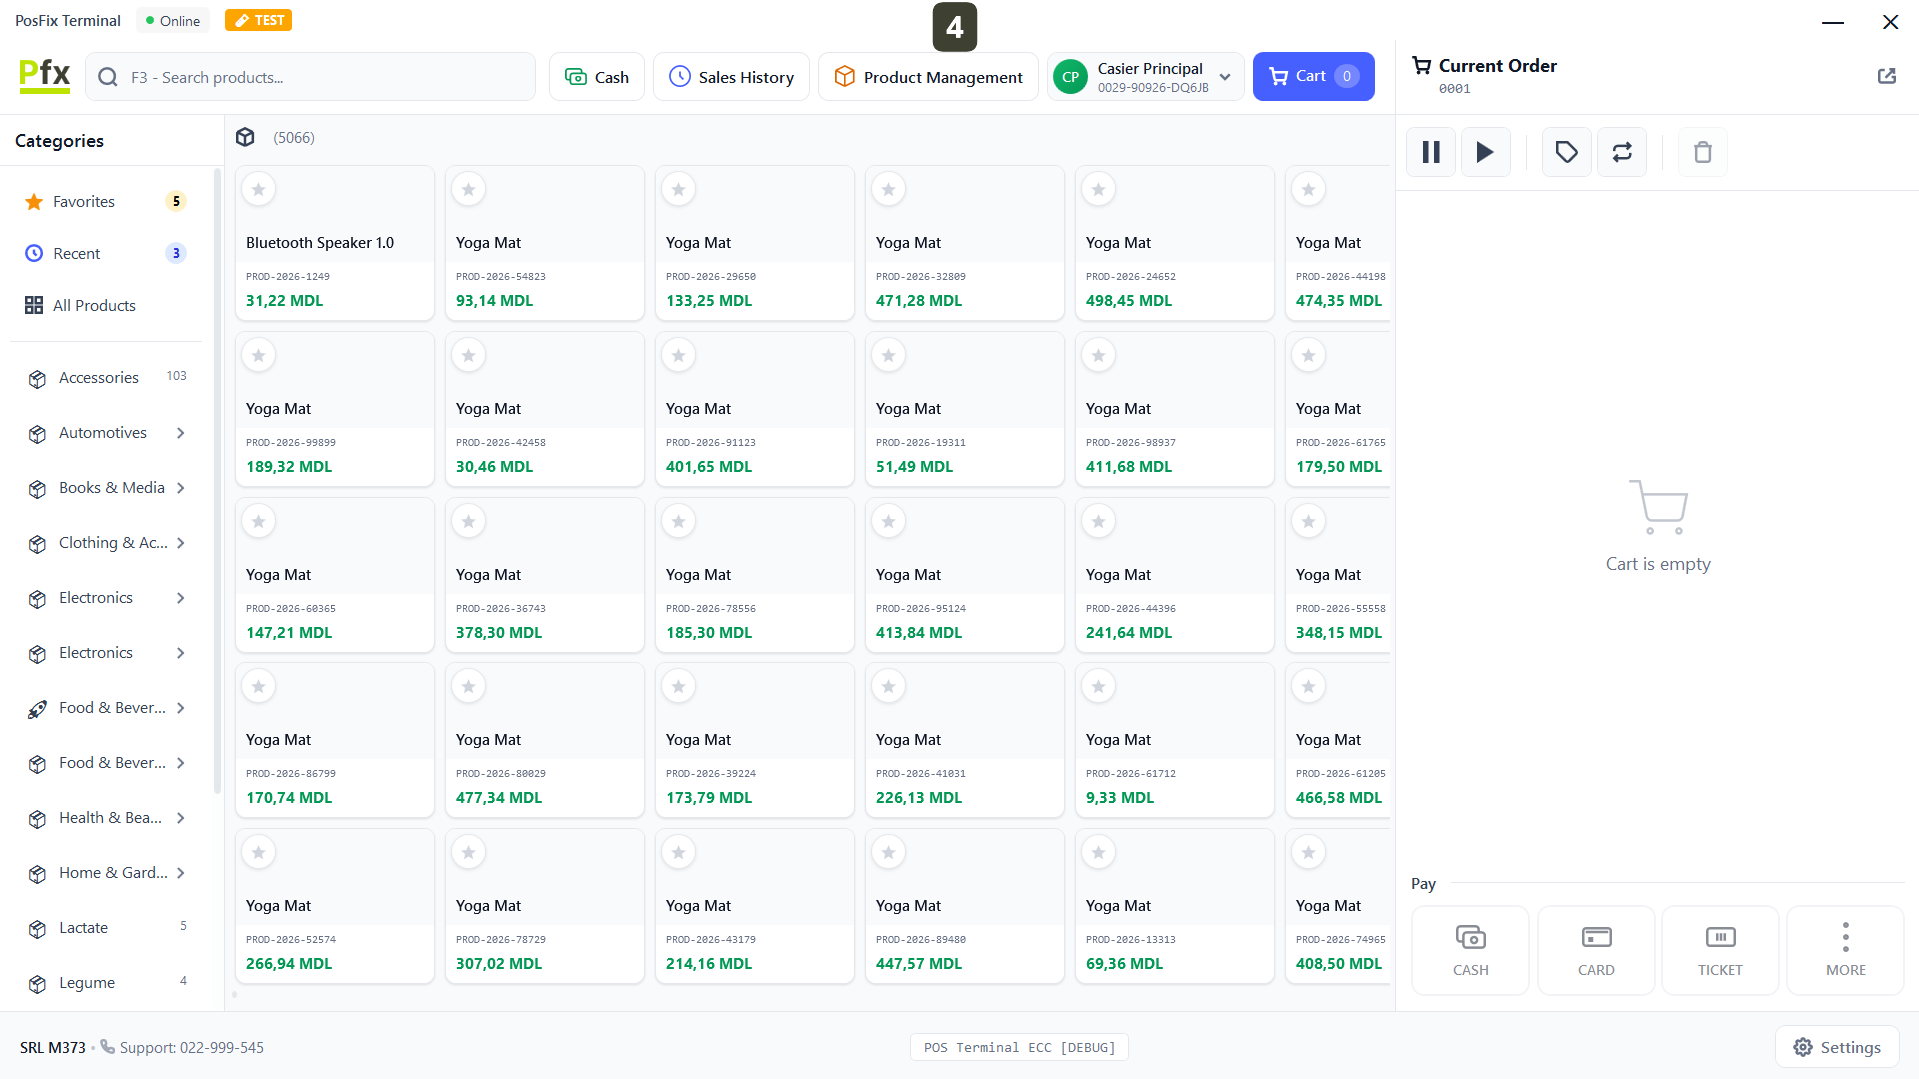
- The application will open in Manager Mode.
The Manager PIN code provides full control over the cash register. Do not disclose this code to operators (cashiers) to prevent unauthorized modifications or receipt cancellations without supervision.
Accessing Product Management
In this module you can check prices, stocks and organize the product catalog without exiting the sales application. By pressing the Product Management button in the top bar, the product management interface will open.

Product Management Interface
The Product Management module is the inventory control panel, accessible directly from the computer. It is designed to provide managers with complete autonomy over the product catalog through functionalities such as:
- Centralization: View the entire product nomenclature, structured by categories.
- Update: Ability to manually synchronize data with the server.
- Administration: Add, edit or deactivate products directly from the cash register.
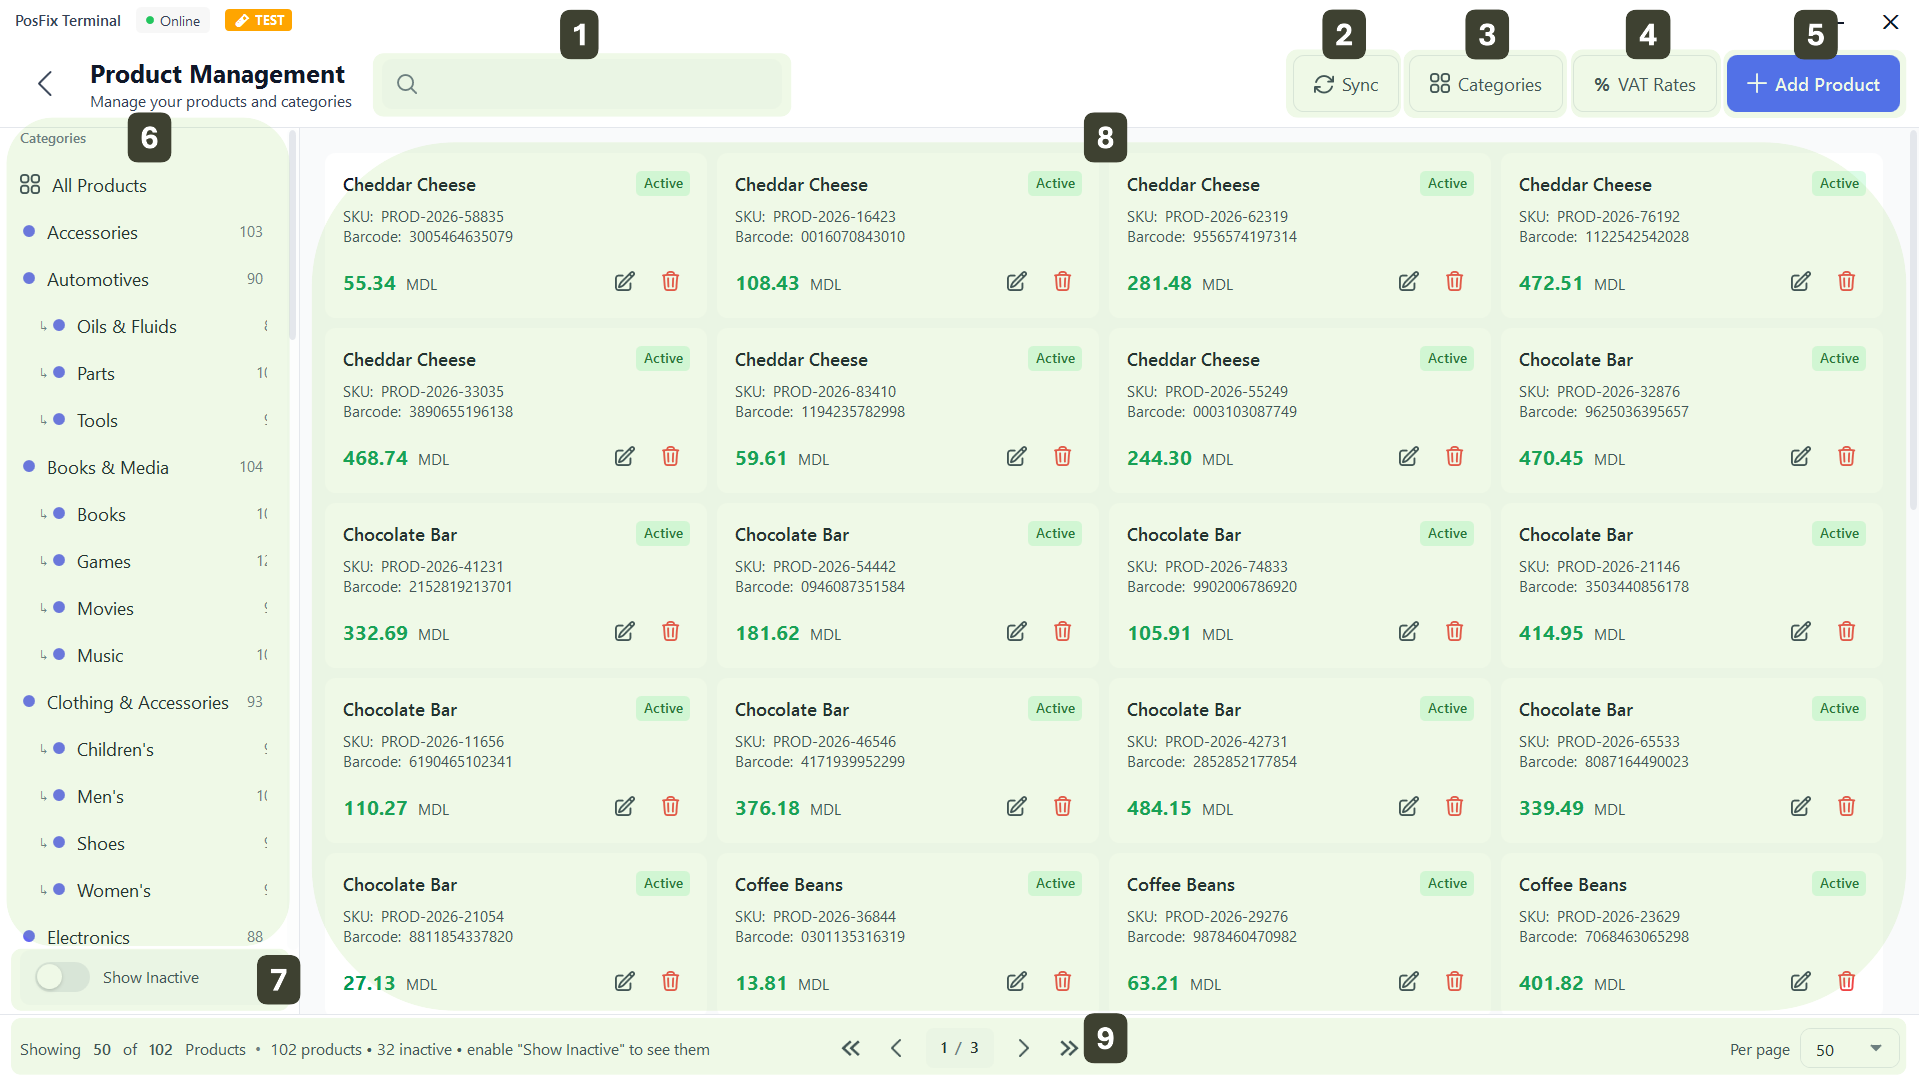
- Search Bar: Enter the product name or code to find it instantly
- Sync: Press this button to manually synchronize the latest changes from the server
- Categories: Opens the category configuration menu (allows you to create, rename or delete product groups)
- % VAT Rates: Add, edit, or modify VAT rates
- + Add Product: Add a new item to the nomenclature
- Categories: Here you can filter products by selecting a specific category or view everything by pressing All Products
- Show Inactive: Displays products that have been temporarily removed from sale
- Product Grid: Each product is displayed as a detailed card containing:
- Product name
- Internal code and Barcode
- Current price
- Status (e.g.: green "Active" label)
- Page Navigation: If you have many products, they are divided into pages. Use the bottom bar to navigate:
- Quickly see the total
- Use the < > arrows to change pages
Product Management
Adding a New Product
This feature allows you to quickly add a new item to the nomenclature.
- Press the + Add Product button
- Fill in the fields with the item's details
- Press the Save button

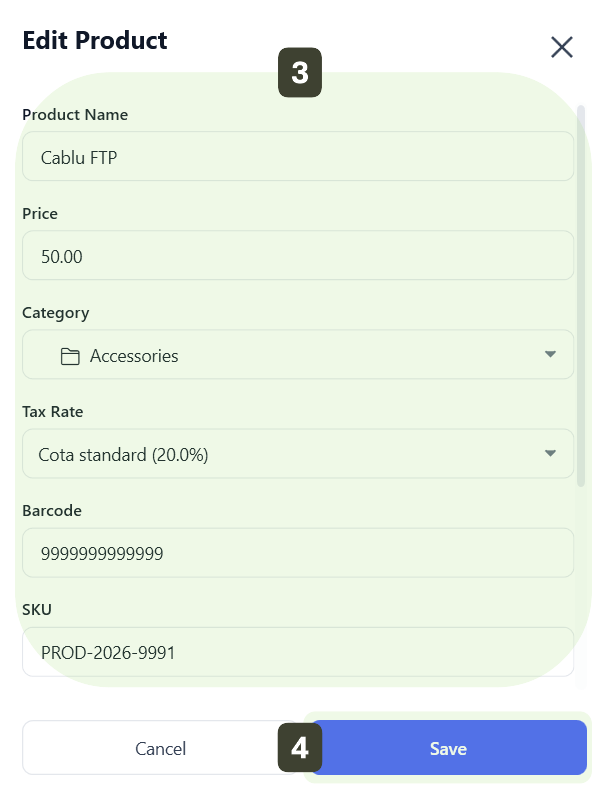
Here is the explanation of each field to ensure correct configuration:
| Field | Type | Description and Recommendations |
|---|---|---|
| Product Name | Required | The name that will appear on the receipt and in the menu |
| Price | Required | Final selling price (including VAT). Enter only numbers |
| Category | Required | The group to which the product belongs |
| VAT Rate | Required | Select the correct tax rate A (20%), B (8%), C (0%) |
| Barcode | Optional | Scan or type the EAN/UPC code for scanner sales |
| Code | Optional | Short internal code (PLU/SKU). Useful for quick manual identification |
| Description | Optional | Additional details (technical specifications, origin and manufacturer, ingredients, allergens, etc.) |
| Unit | Required | Unit of measurement for reporting (e.g.: pcs, kg, cm, mg, etc.) |
| Status | Active/Inactive | Enable or disable product availability in the cashier's list |
Make sure you always select the correct VAT Rate for each product, in accordance with current legislation. An incorrect selection here (e.g.: 8% instead of 20%) will result in erroneous fiscal receipts, which can only be corrected later through complex accounting procedures.
When filling in the Barcode field, do not type the numbers manually. Place the cursor in the field and scan the product with the barcode reader. This eliminates the risk of mistyping a digit and ensures the product will be recognized instantly at checkout.
Modifying a Product (Editing)
Use this feature to update prices, correct names or change the category of an existing product.
- Identify the product in the list that you want to modify
- Press Edit
- Modify the desired fields
- Press the Save button to apply the modification
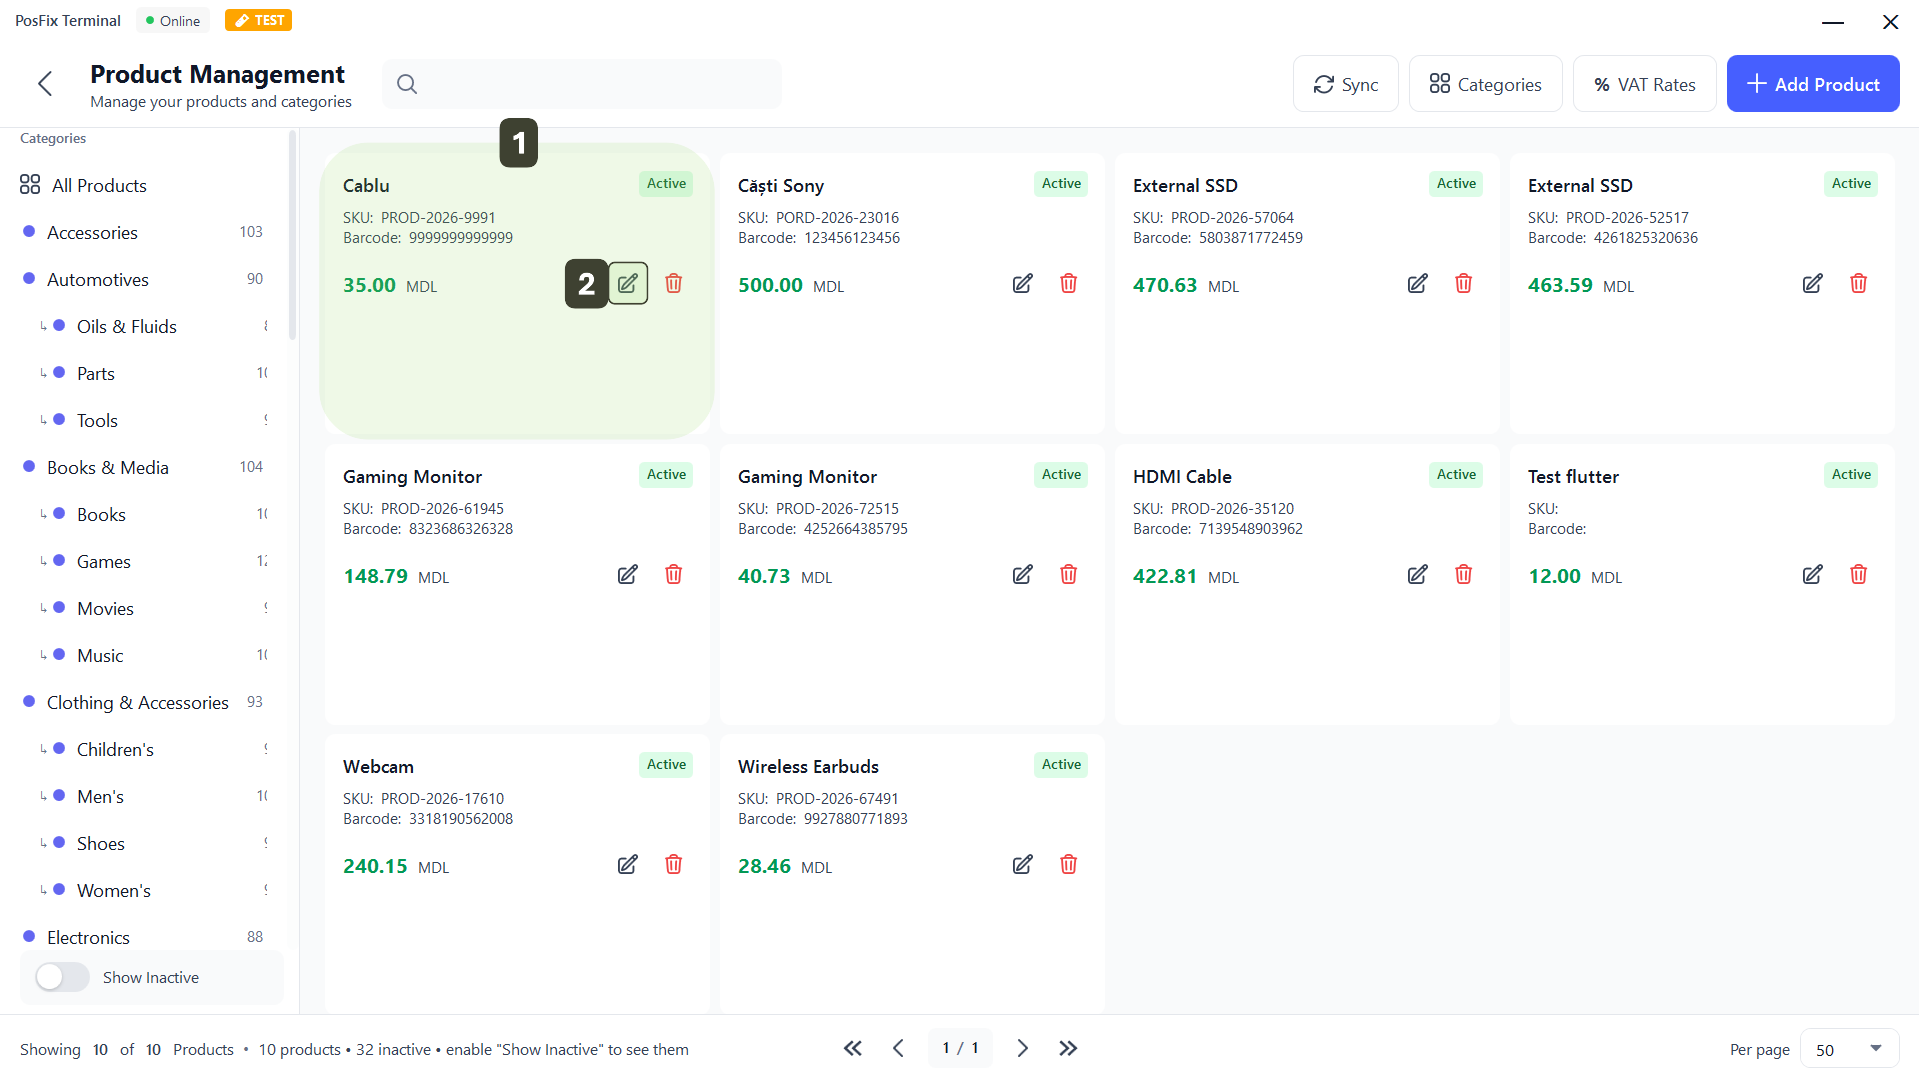

Price changes are applied immediately for new sales. Already issued receipts keep the original price.
Use the top search bar to identify the product.
Product Deactivation
Use this function to temporarily hide a product from sale (e.g.: seasonal products or out of stock), while keeping it in the database for the future.
- Identify the product in the list that you want to deactivate
- Press Edit
- In the window that opens, scroll down to the bottom of the form. Press the Active toggle to deactivate it
- Press the Save button to apply the modification

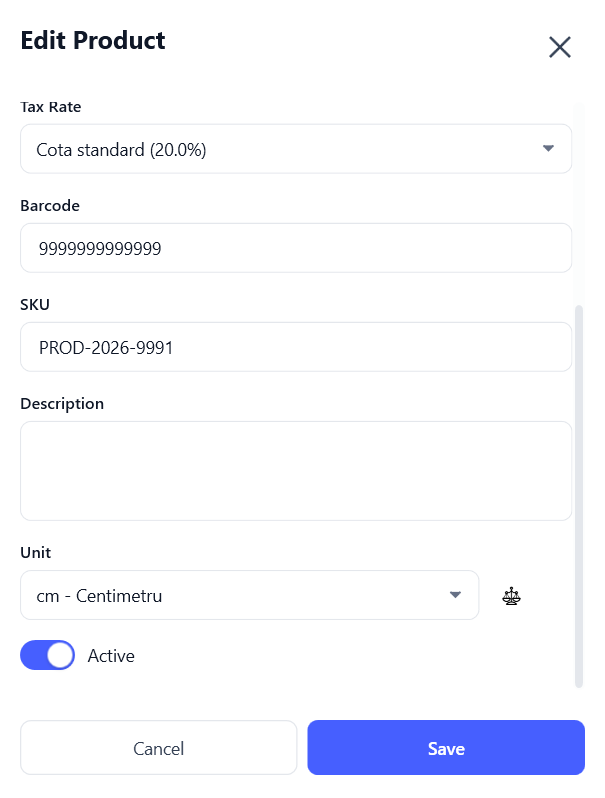
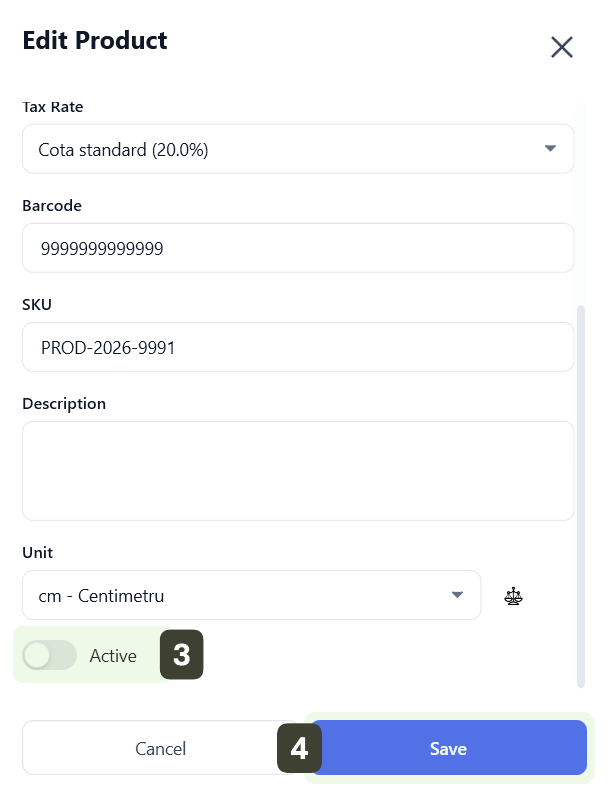
Once deactivated, the product will disappear from the main list. To see it again, you need to enable the Show Inactive option.
Deleting a Product
Use this option only for products created by mistake or those that will never be sold again.
- Identify the product in the list that you want to delete
- Press Trash Can
- The system will request confirmation to prevent accidental deletions.
- Press the YES button to apply the modification
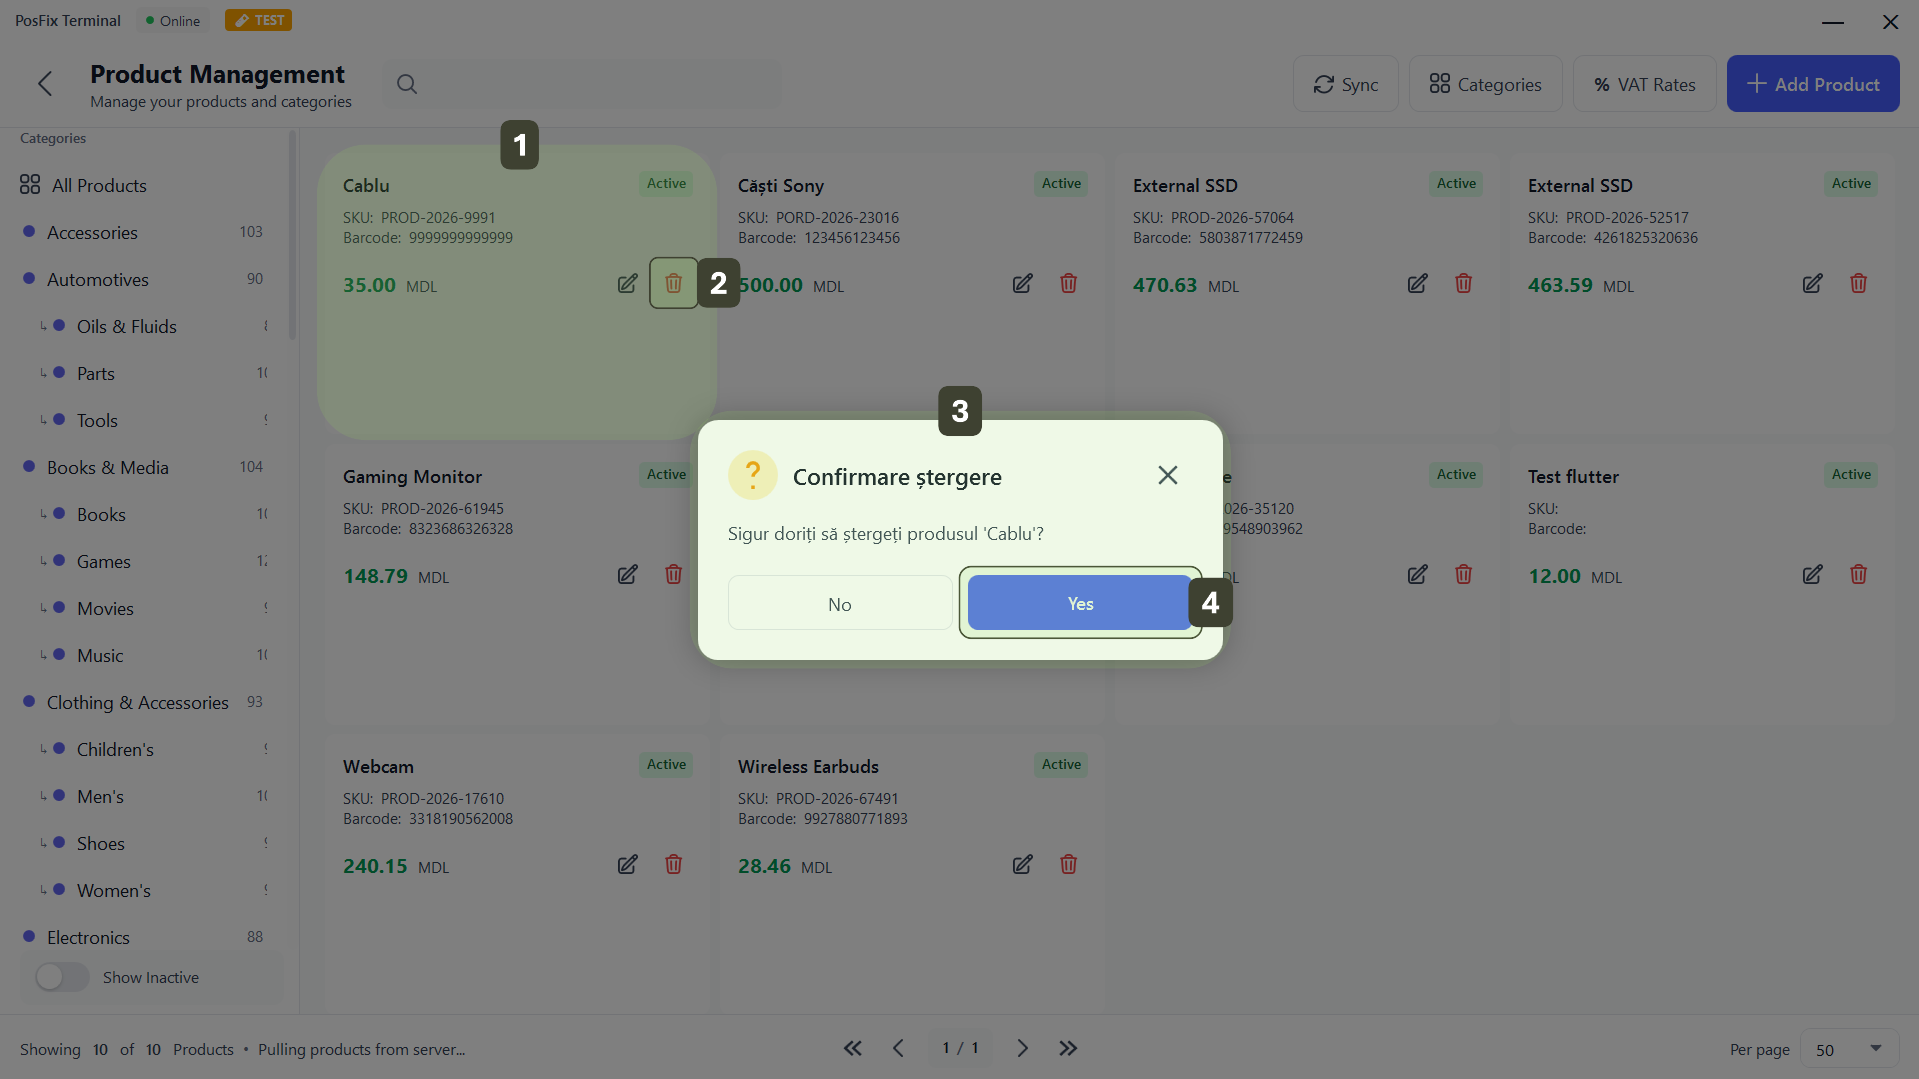
Locally Irreversible Action: Once confirmed, the deletion removes the product from the application interface.
The deleted product remains archived in the control panel (Dashboard) on the server, even if it is no longer visible in the application. In case a product needs to be restored to the catalog, this operation can be performed only by an Administrator from the web management interface.
Category Management
This module allows you to create the store's organizational structure (e.g.: departments, product lines) and define hierarchies (Main Categories and Subcategories).
Adding a Category/Subcategory
- Press the Categories button
- In the Manage Categories window, use the form to define a new group:
- Category Name: Enter the name that will appear on the screen
- Icon: Select a representative icon (optional)
- Color: Choose a background color for the category button (optional)
- Parent Category: Leave this field empty if you are creating a main category
- Adding a Subcategory
- Fill in the name and visual details as above
- In the Parent Category field, open the list and select the "parent" category
- Press Add
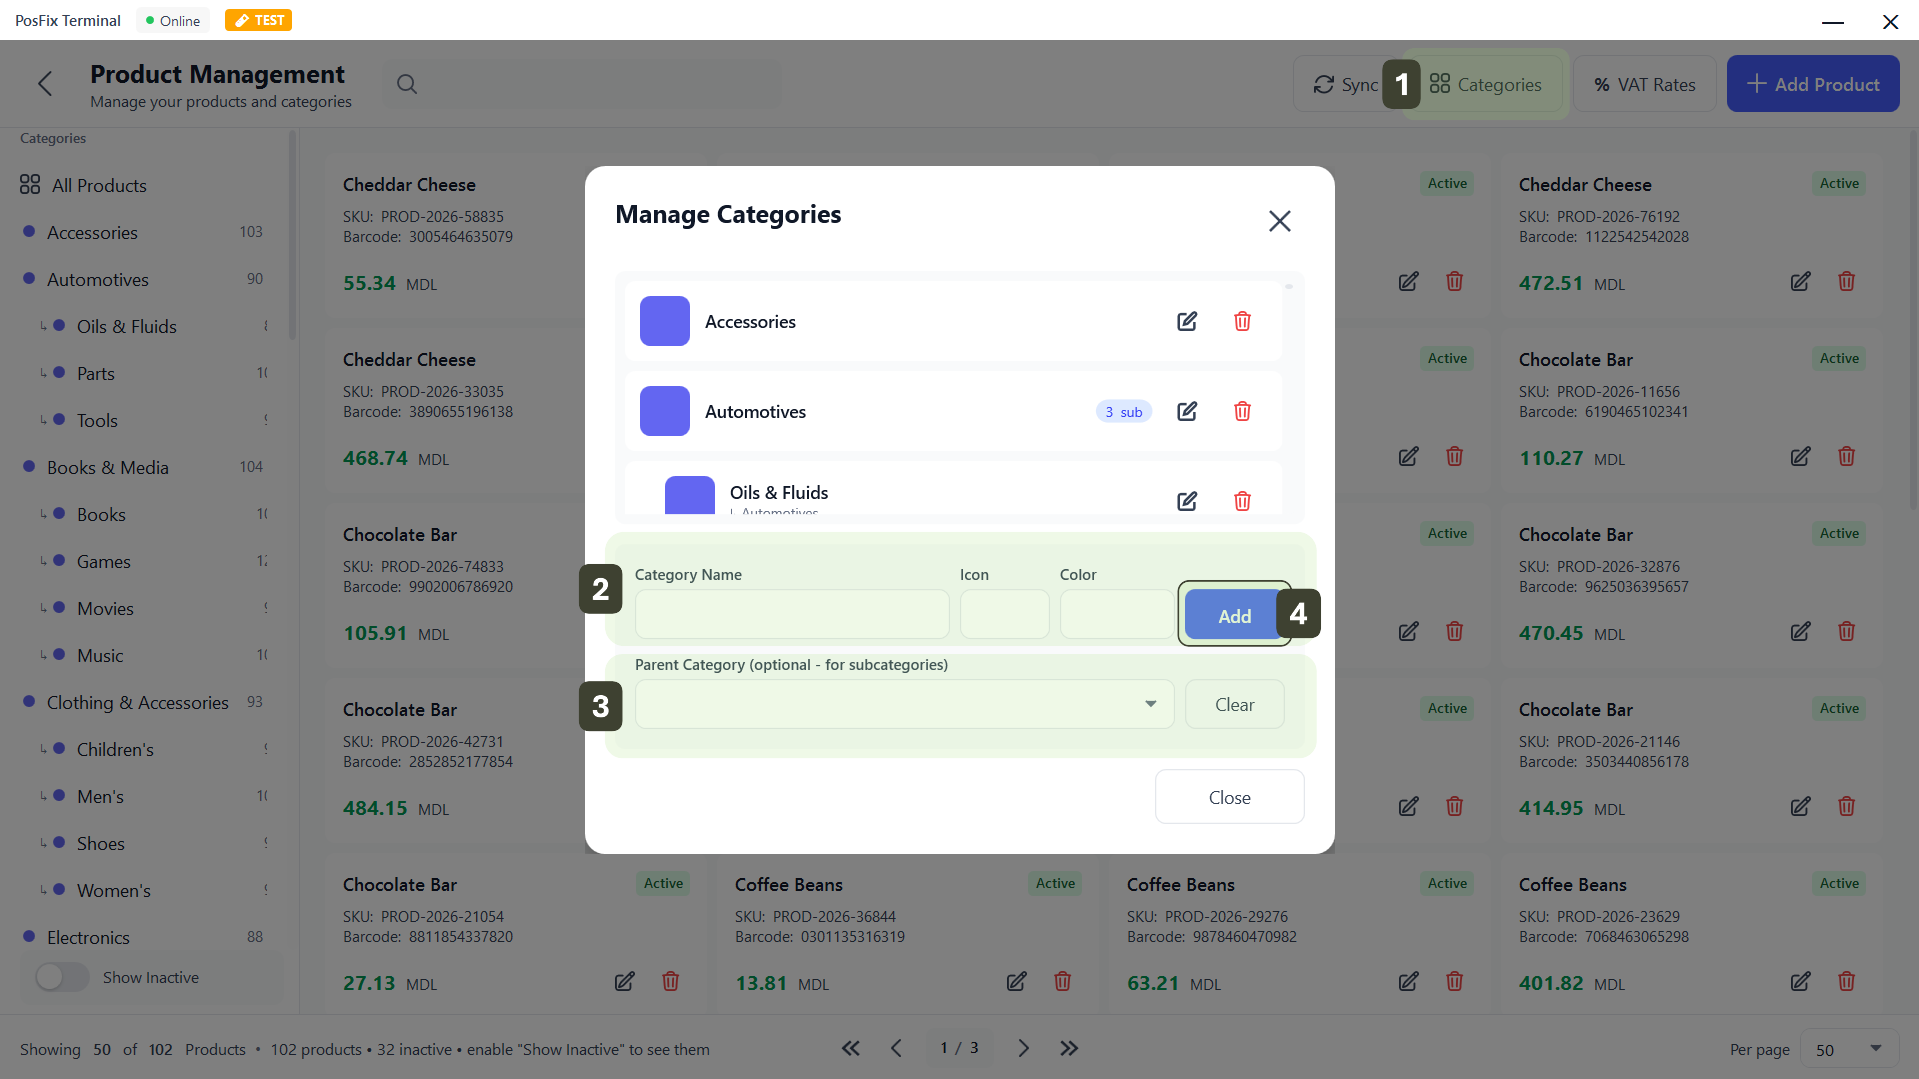
Next to parent categories, you can see a label (e.g.: 3 sub) indicating the number of subcategories contained.
Modifying and Deleting a Category/Subcategory
In the list at the top of the window, you have administrative options for each existing line:
- Edit: Allows you to edit (name, icon, color, etc.)
- Delete: Allows you to remove a category or subcategory
- The system will request confirmation to prevent accidental deletions.
- Press the YES button to apply the modification
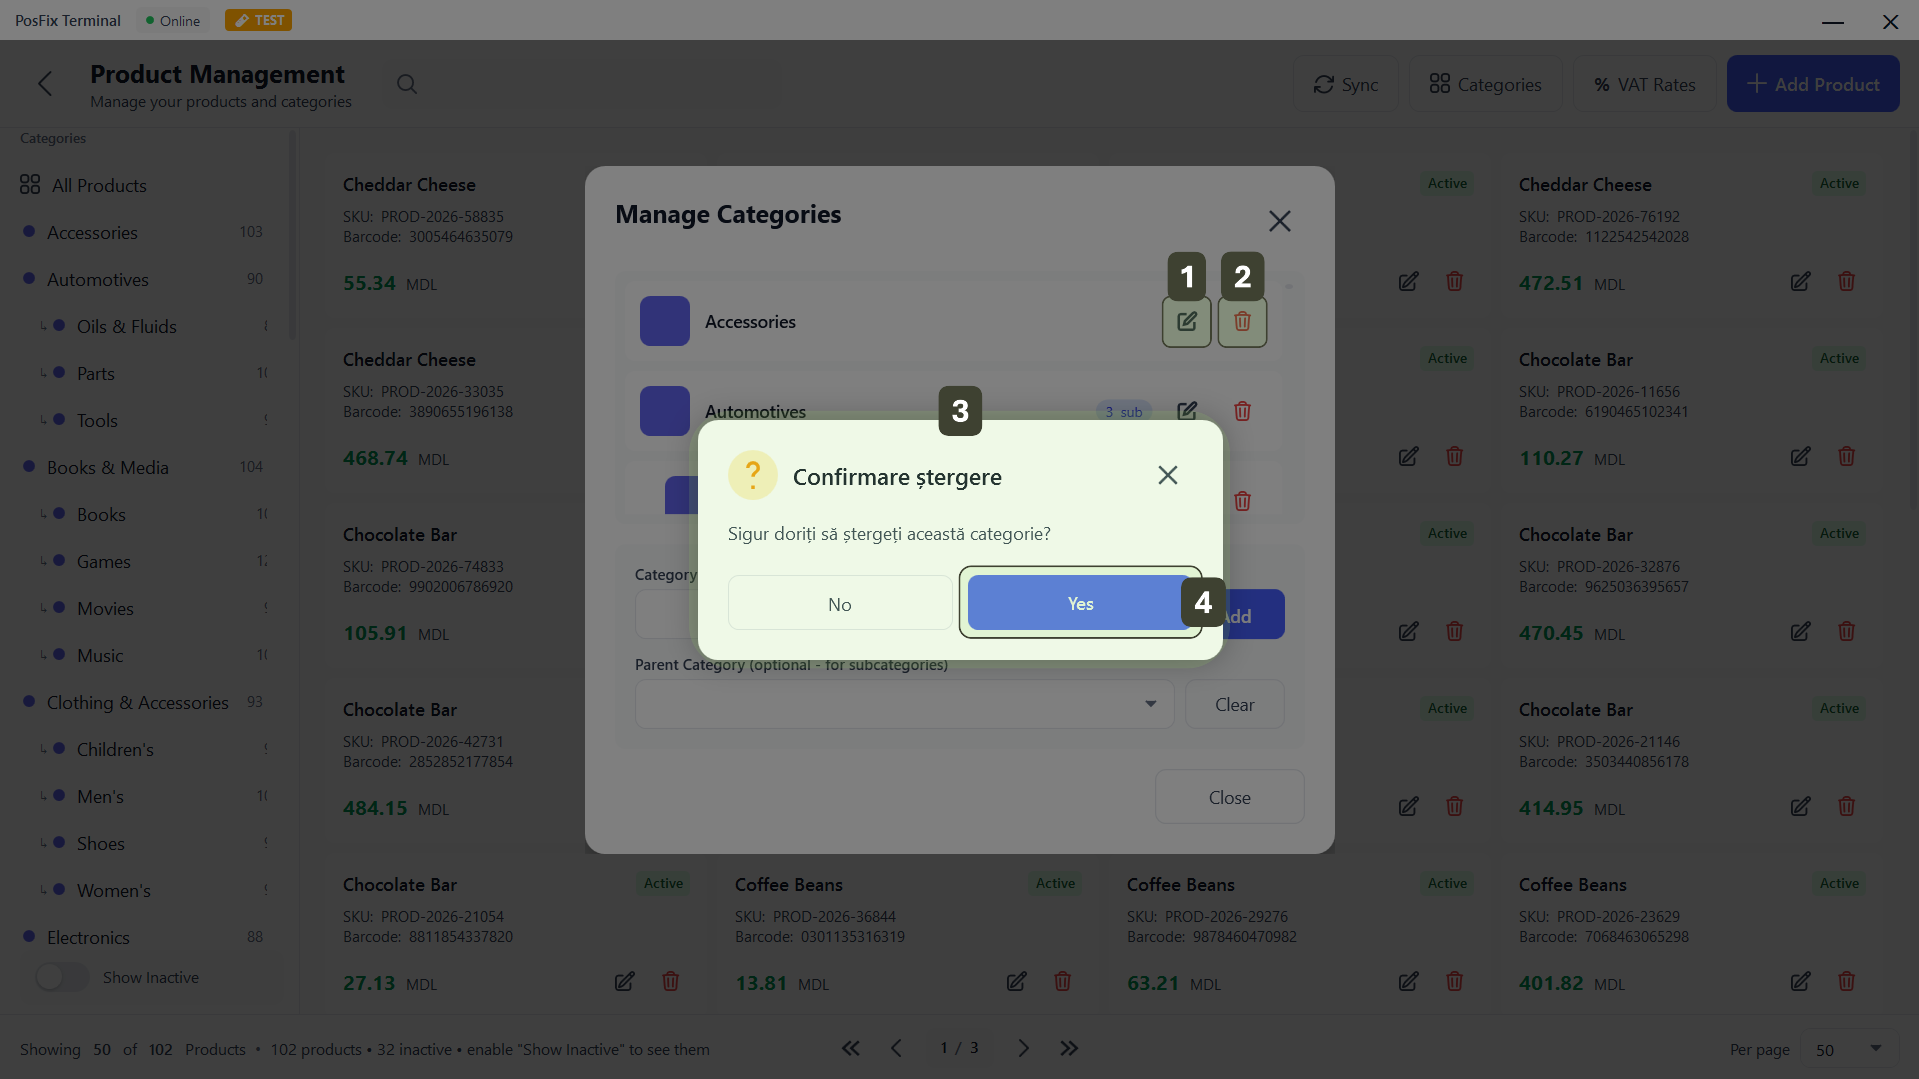
Before pressing the delete button, go to the product list and move the items to other categories, leaving the old category empty, if necessary.
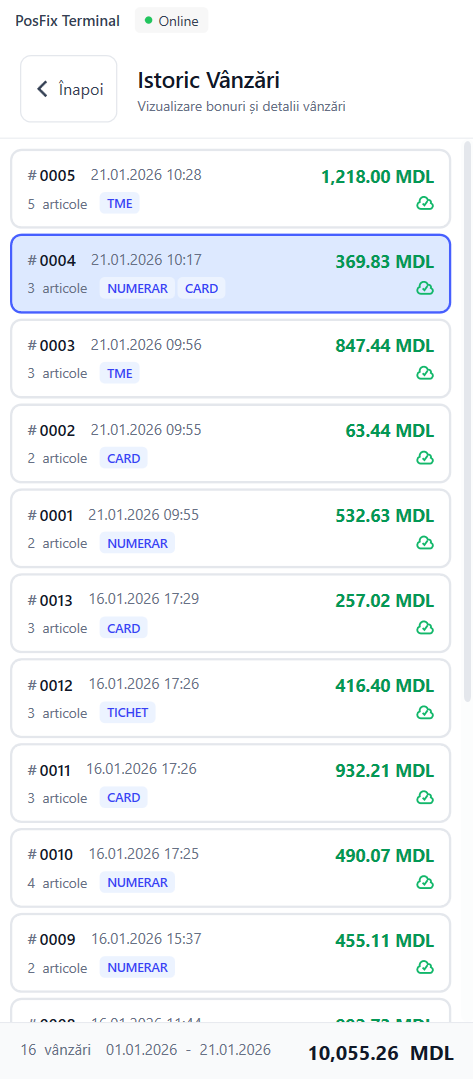
Sales History
This section functions as a digital archive of all transactions made through the terminal. Here you can search for old receipts, check amounts collected in a certain period and issue duplicates.
Accessing History
From the main sales screen, press the Sales History button

Sales History Interface
The screen is intuitively organized into four functional zones, allowing quick identification of transactions and management of fiscal documents.
- Period Filter This zone allows you to narrow down the list of results
- Transaction List The left column displays the summary of sales for the selected period
- Detailed View The central zone displays the digital copy of the selected fiscal receipt
- Receipt Options Provides tools for interacting with the selected receipt
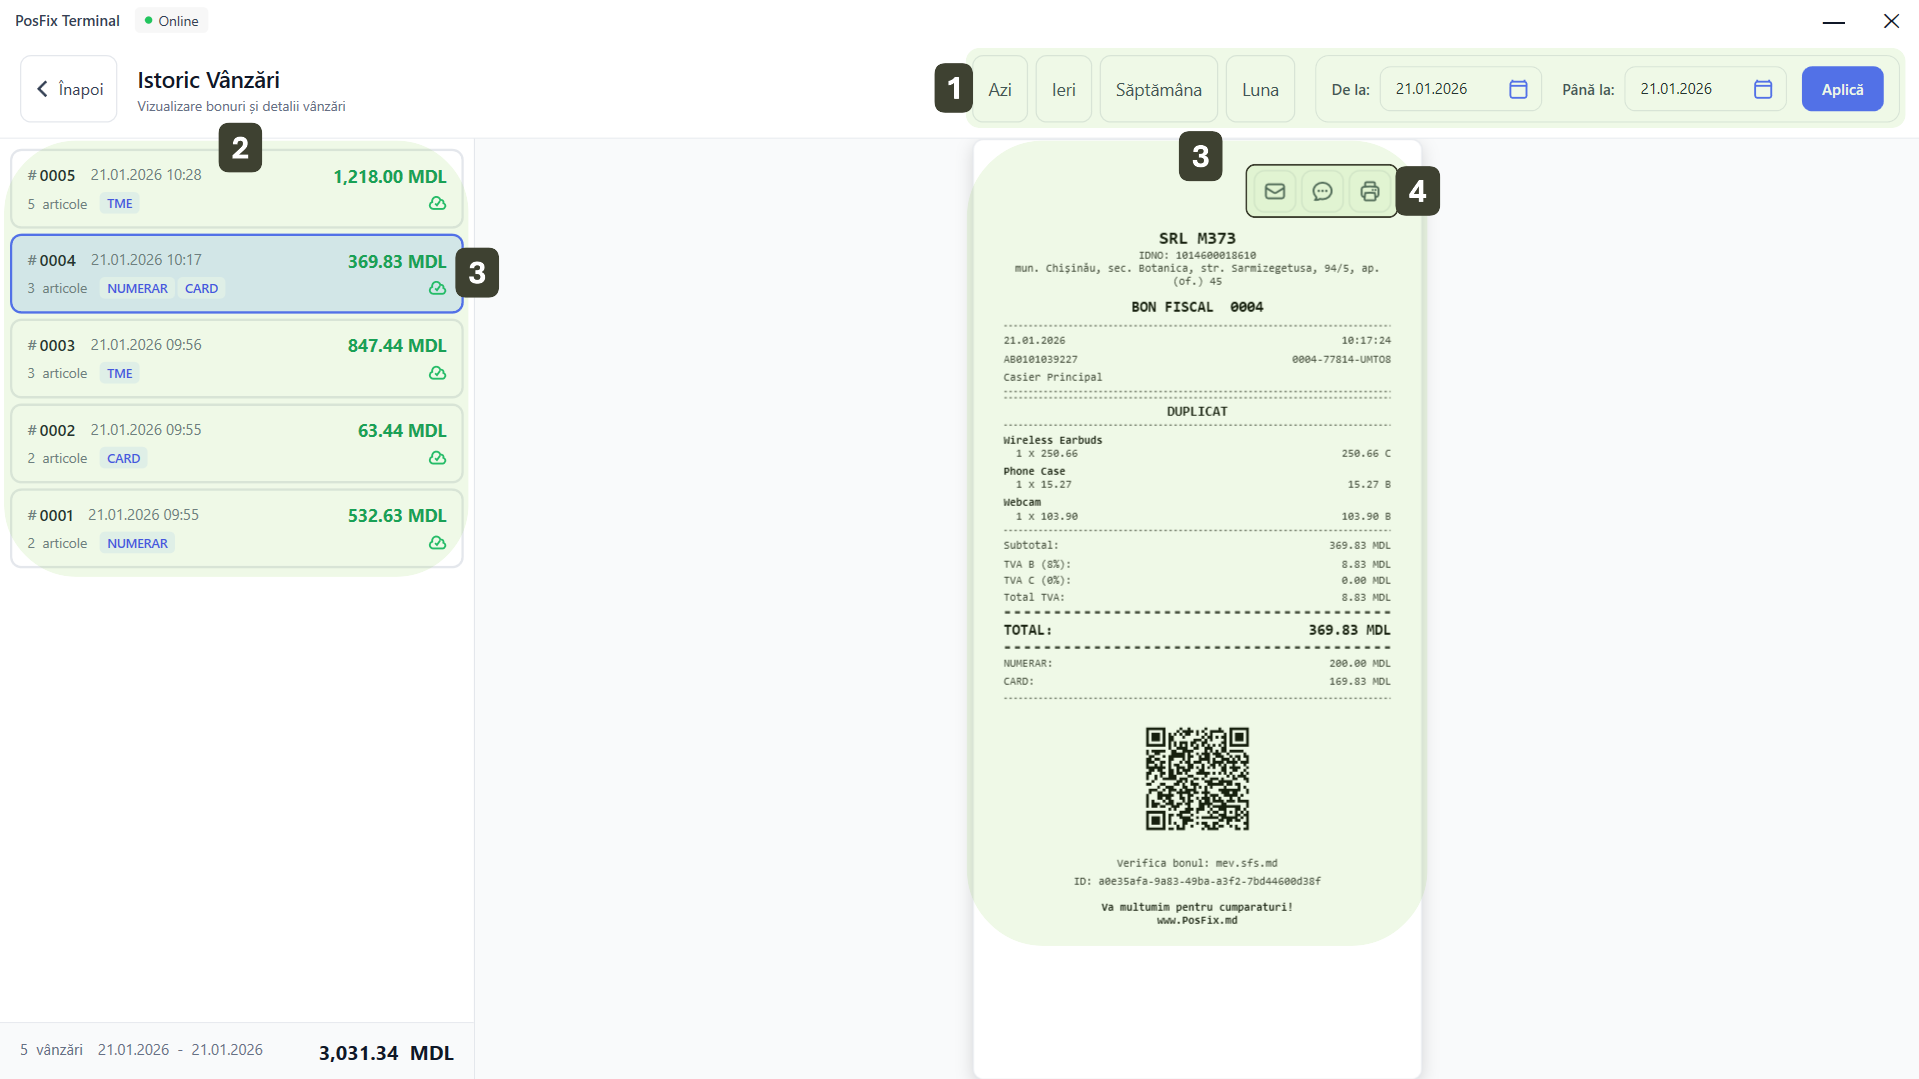
In the bottom left corner of the screen, you can quickly see the Total Sales for the selected period
Period Filtering
At the top of the window, you have tools to select the desired time interval:
- Quick Filters: Buttons for Today, Yesterday, Week current or Month
- Custom Interval: Manually select dates in the From and To fields
- Activation: After selecting the period, press the Apply button to update the list
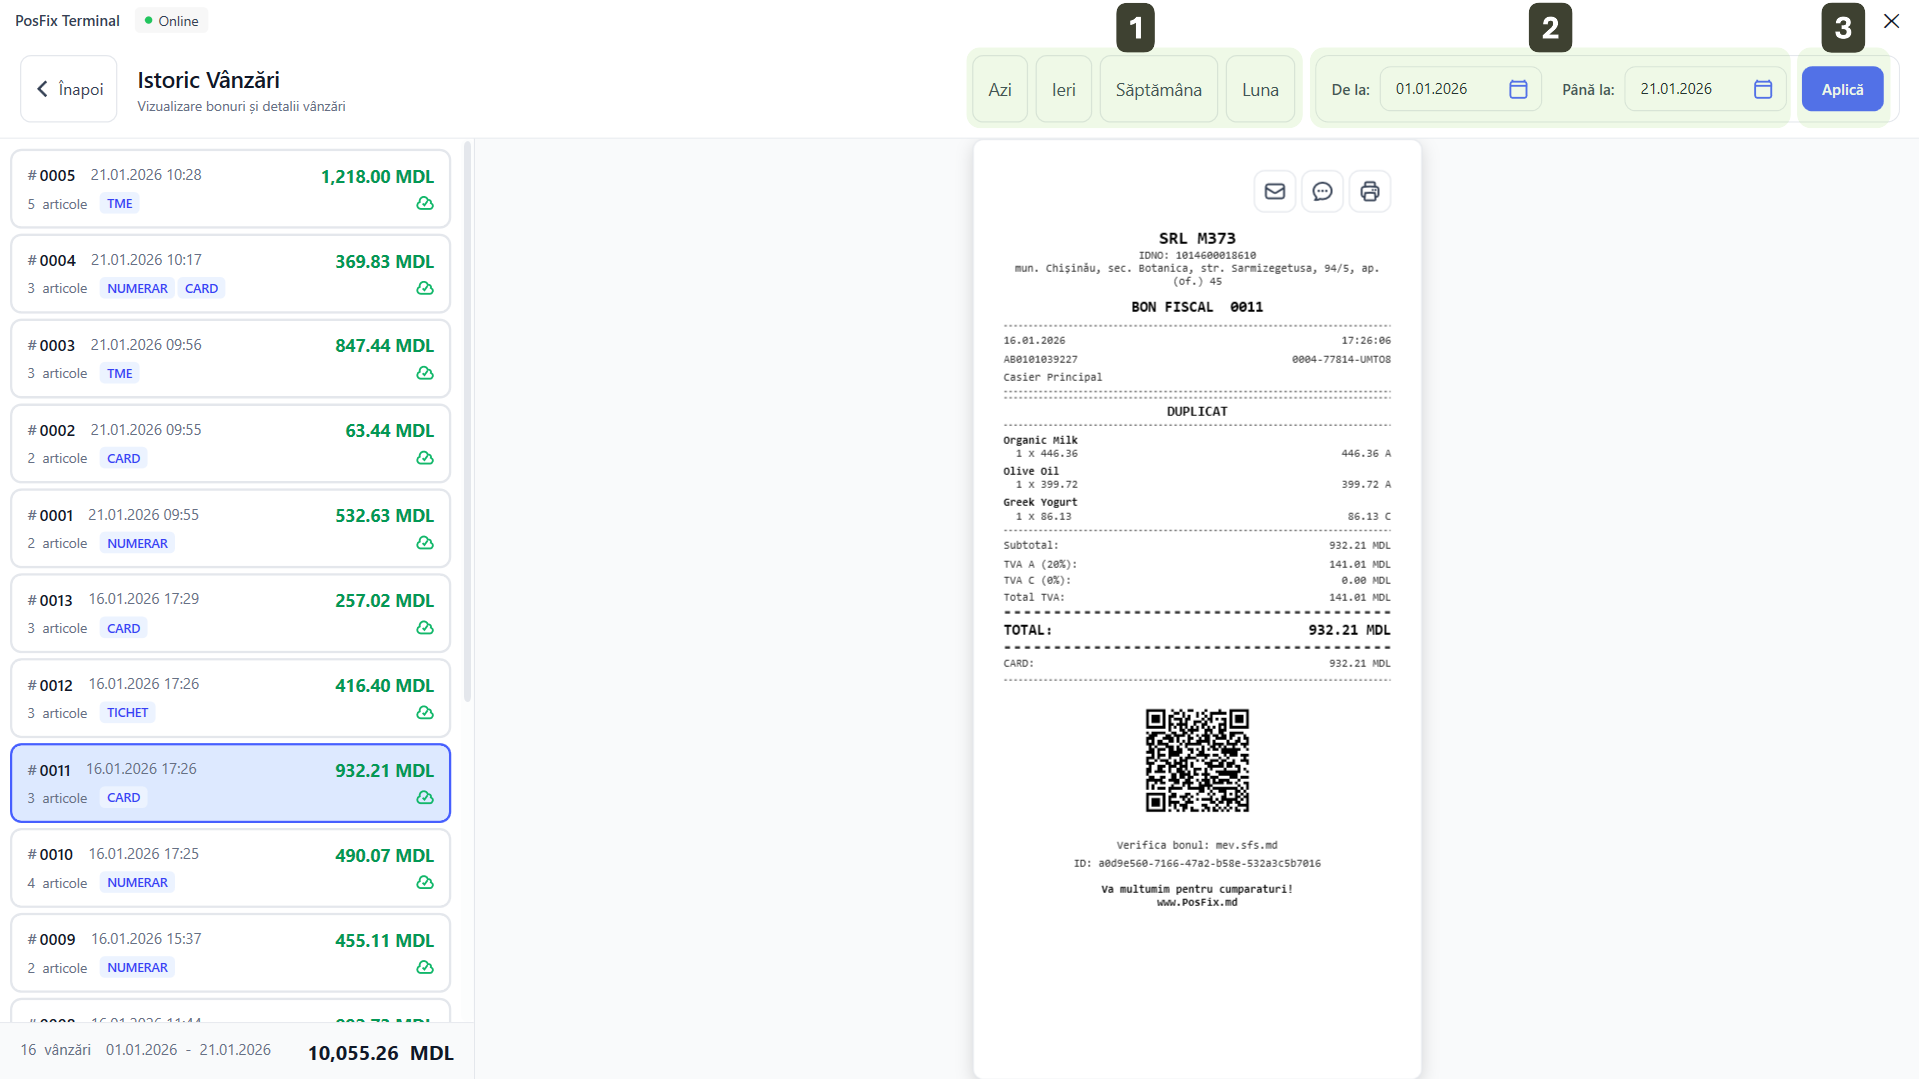
Transaction List
In the left column, all receipts from the selected period are displayed, sorted chronologically (most recent at top). Each transaction card quickly displays:
- Receipt number (e.g.: #0004) and Date/Time
- Number of items and Payment method (labels: CASH, CARD, TME)
- Total value
- Sync Status a small icon (cloud) indicates whether the receipt has been saved to the server

Detailed View
By selecting a transaction from the left, the preview of the digital fiscal receipt will be displayed in the central area. It contains all legal fiscal elements:
- Company header and IDNO (Tax ID)
- List of sold products and VAT rates
- Payment breakdown (e.g.: Cash: 200.00, Card: 169.83)
- QR code and verification link for SFS (State Fiscal Service)
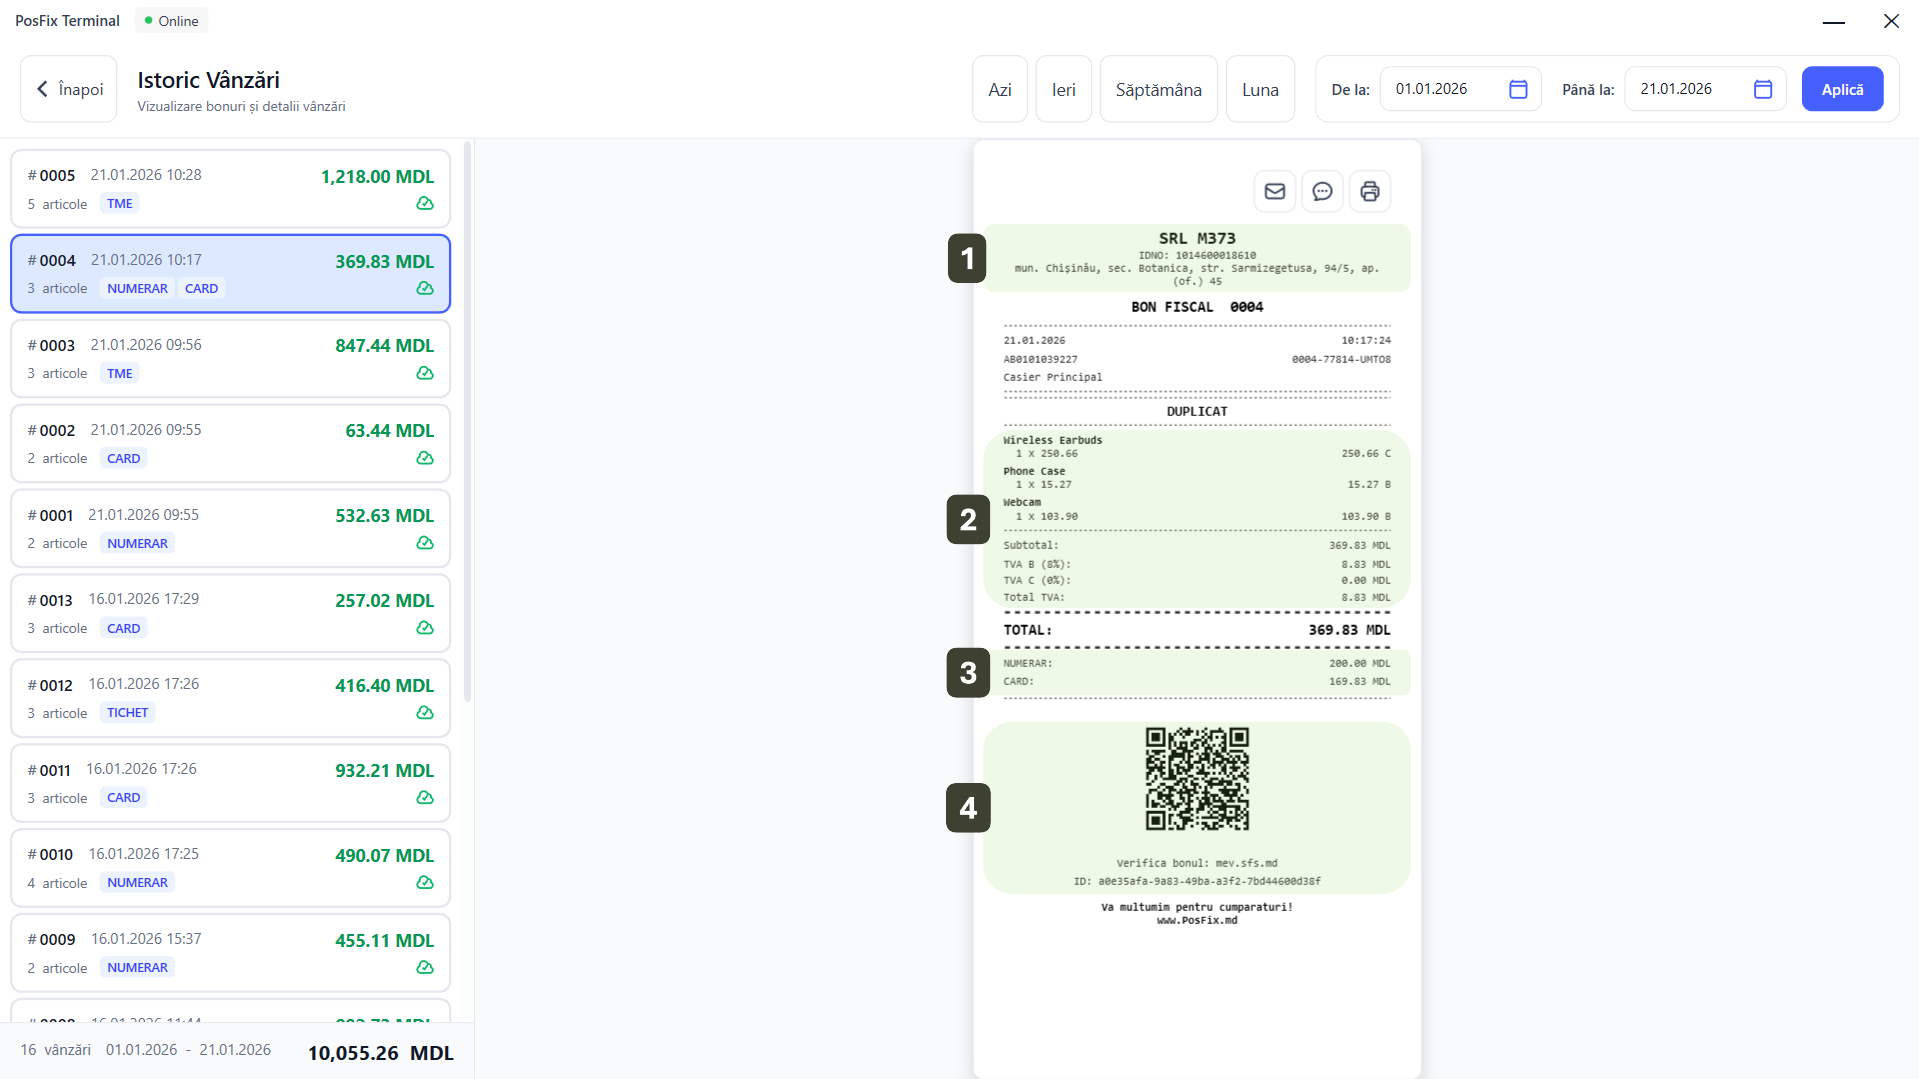
Receipt Options (Send and Print)
Above the receipt preview, in the top right corner, you have three buttons dedicated to managing the selected document:
- Send Email: Opens the window for entering the customer's email address, where the digital receipt will be sent
- Send SMS: Allows entering the phone number to send the customer a link to the fiscal receipt (eco-friendly solution)
- Print: Instantly prints a physical copy of the receipt to the printer
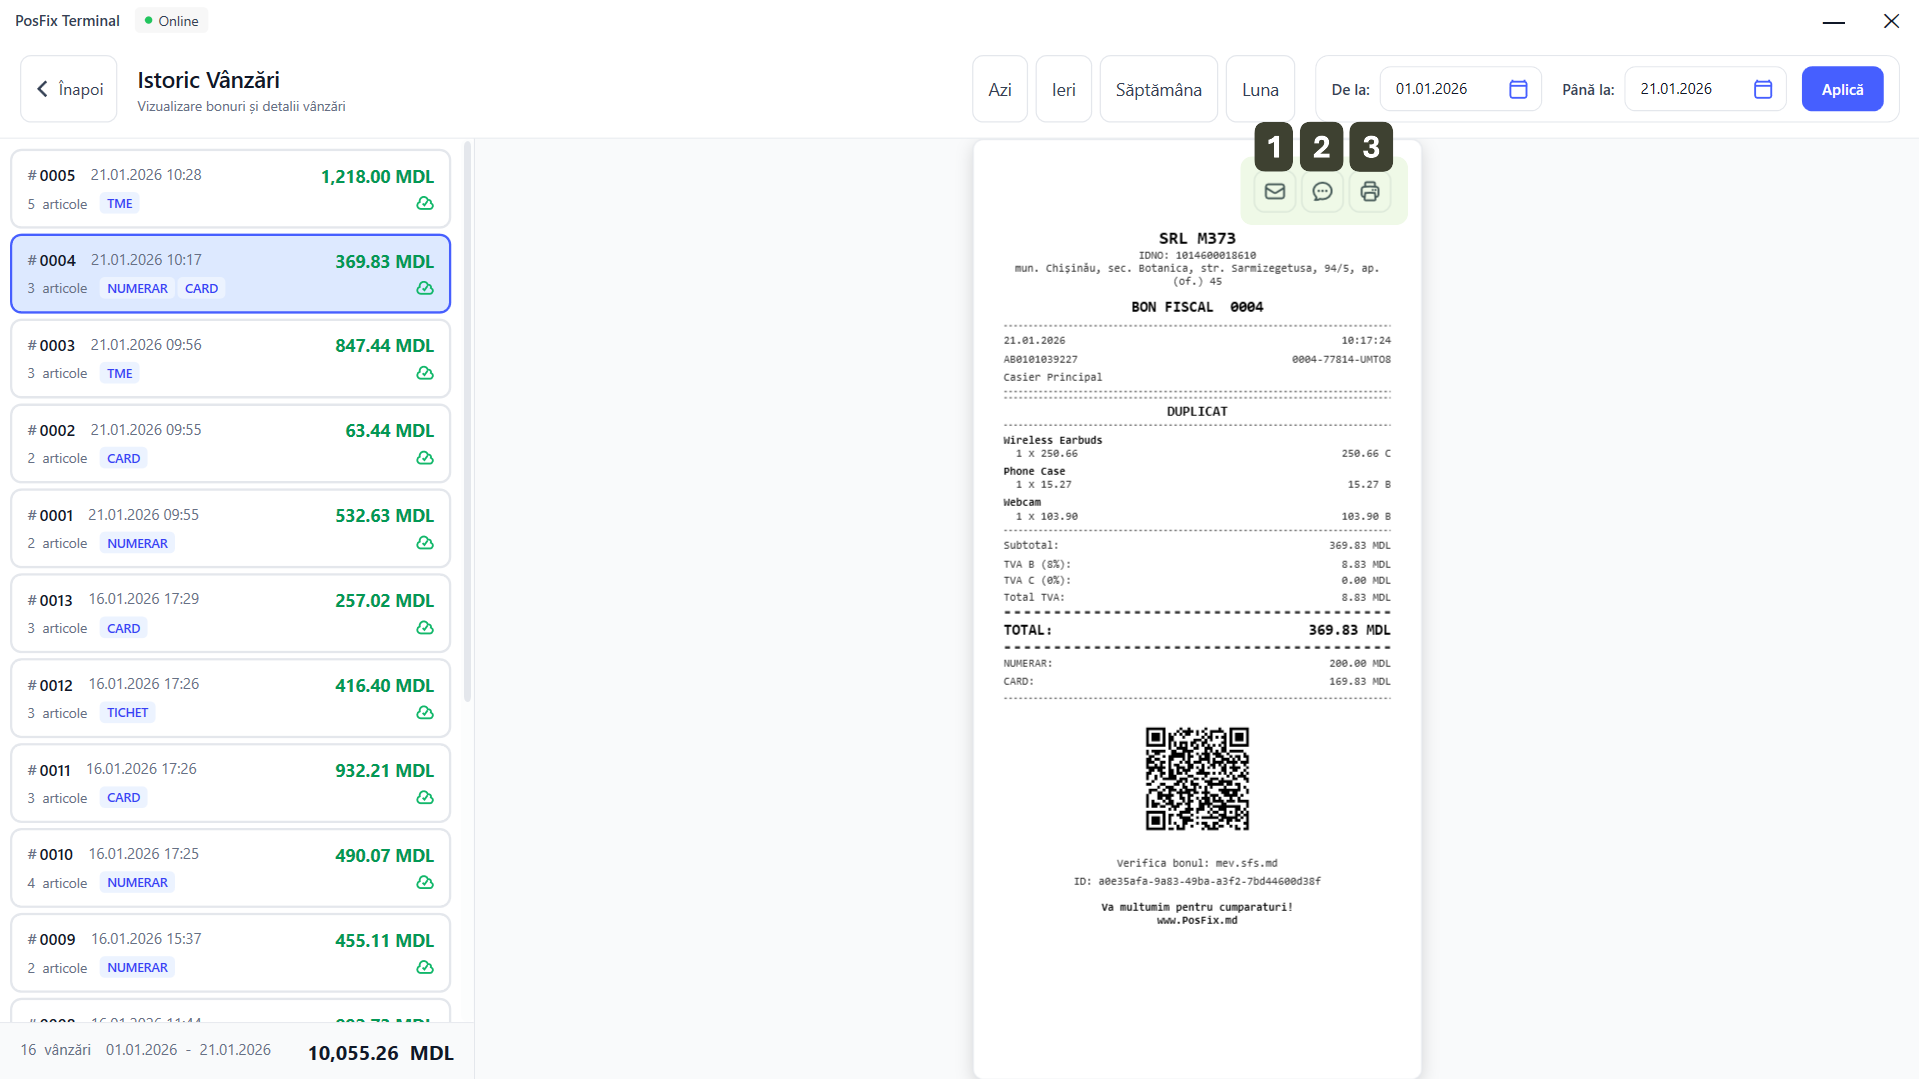
Note that the Print function from history generates a Duplicate, not an original fiscal receipt. The paper will visibly show DUPLICATE. This is valid for records, but the customer should be informed that it is not the primary receipt.
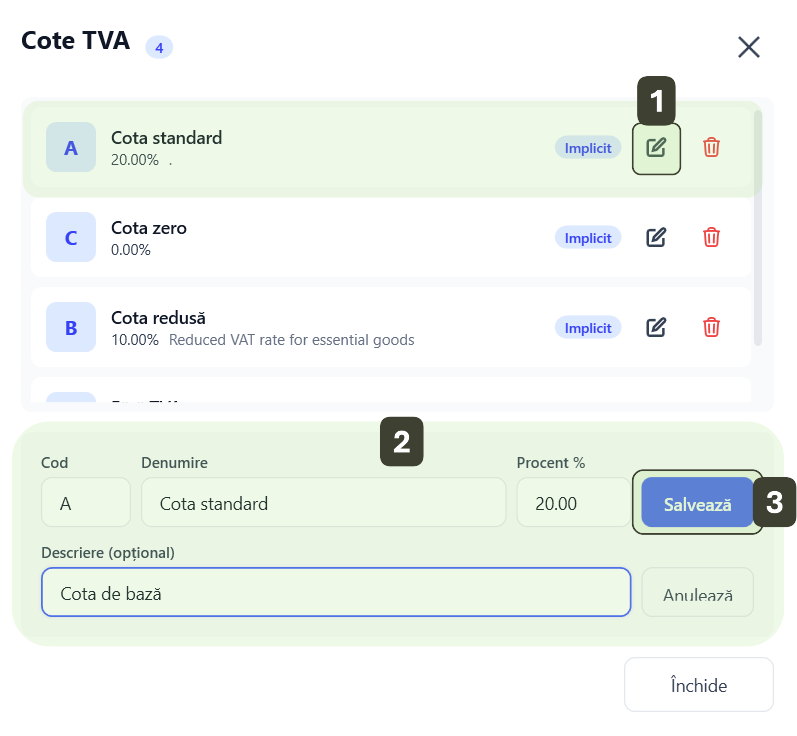
VAT Rates Management
The VAT rates management module allows for the configuration and administration of fiscal taxes applied to products, ensuring their synchronization across all sales terminals.
Accessing VAT Rates
From the Product Management panel, in the top bar, press the % VAT Rates button.
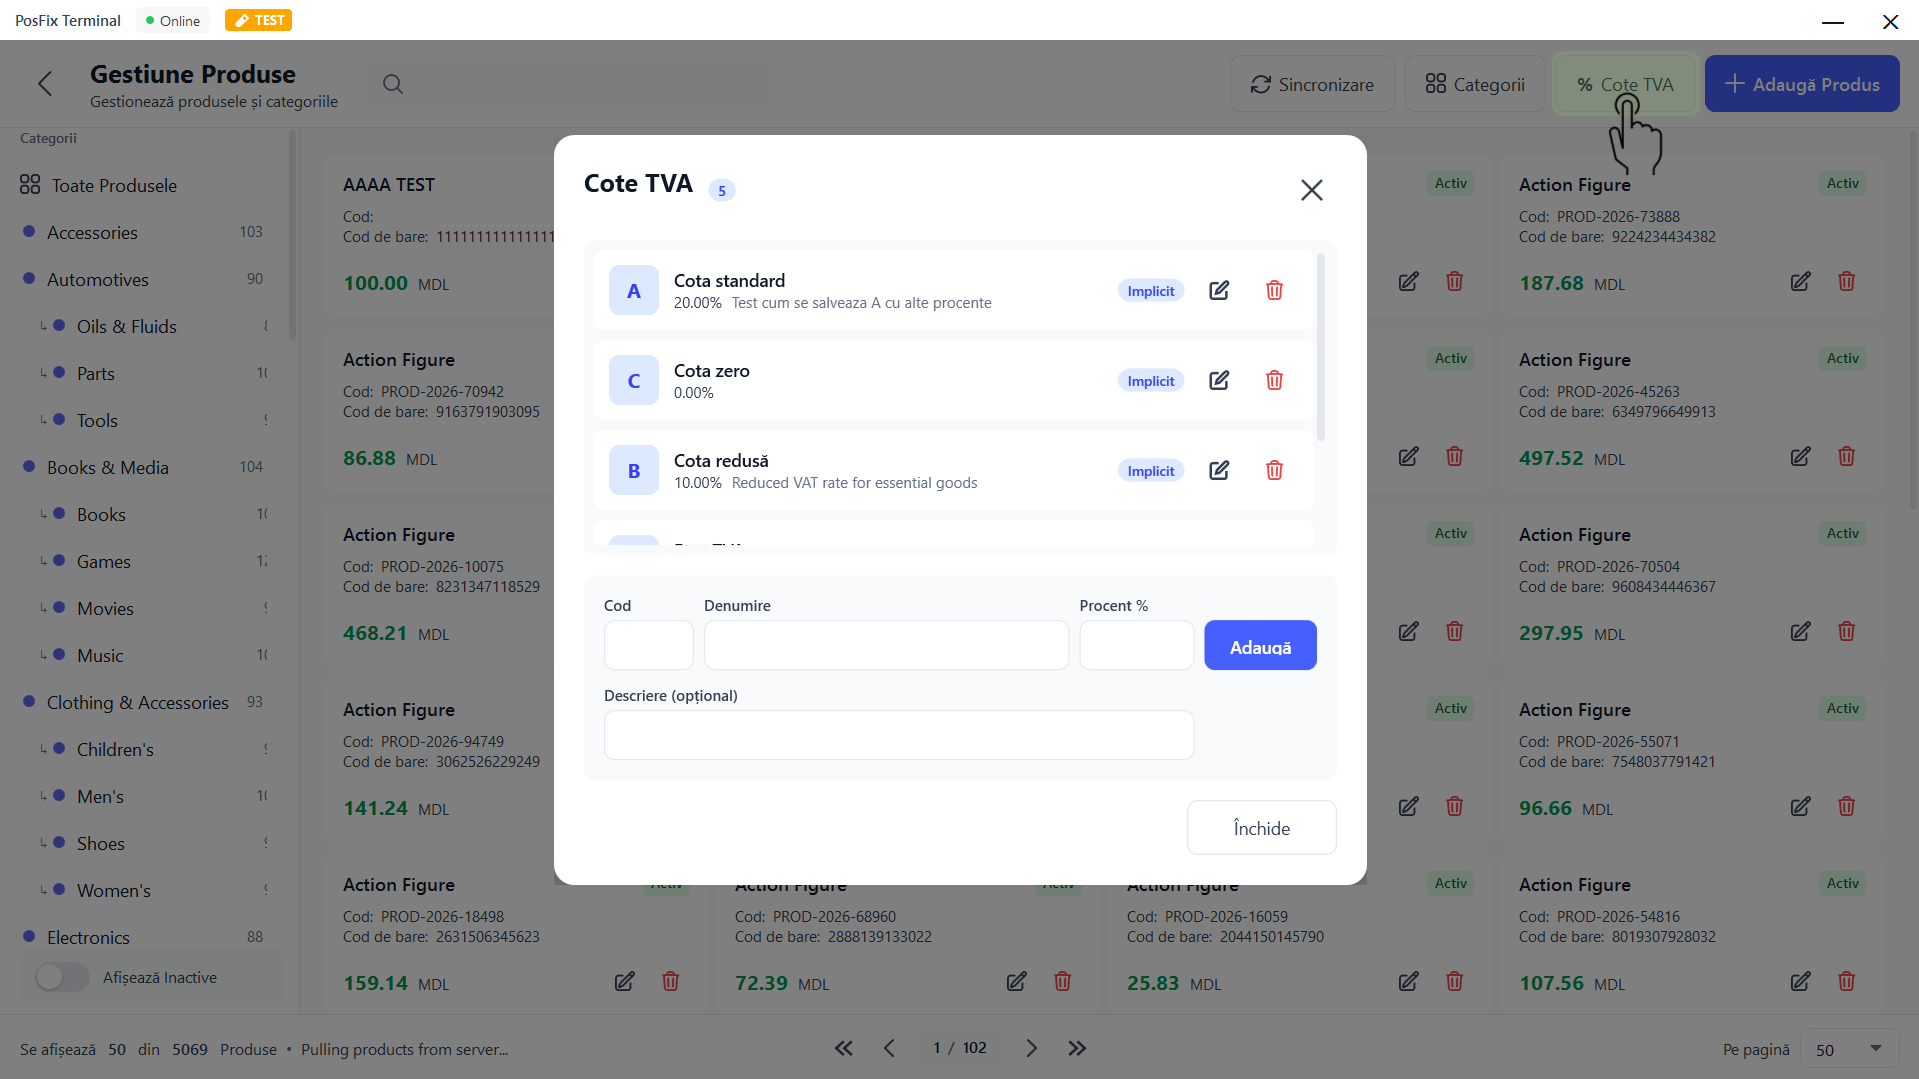
Viewing VAT Rates
The VAT Rates window displays a list of all available taxes:
- Identifier (Code): The letter assigned to the rate (e.g., A, C, B).
- Details: The name of the rate and the applied percentage.
- "Default" Label: Indicates the system's standard rates (e.g., Standard rate 20% or Zero rate 0%).
- Actions: Icons for editing and deleting.
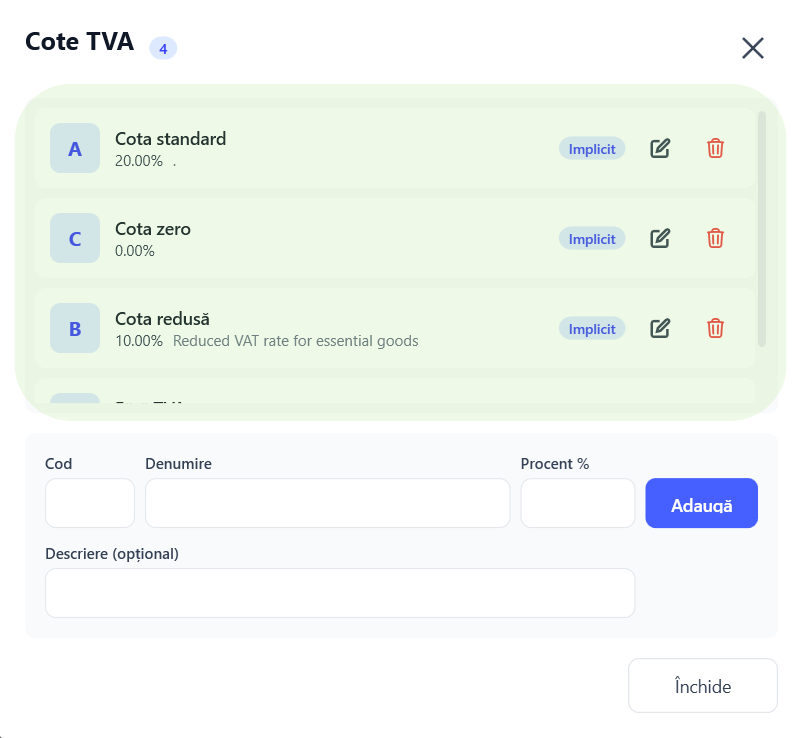
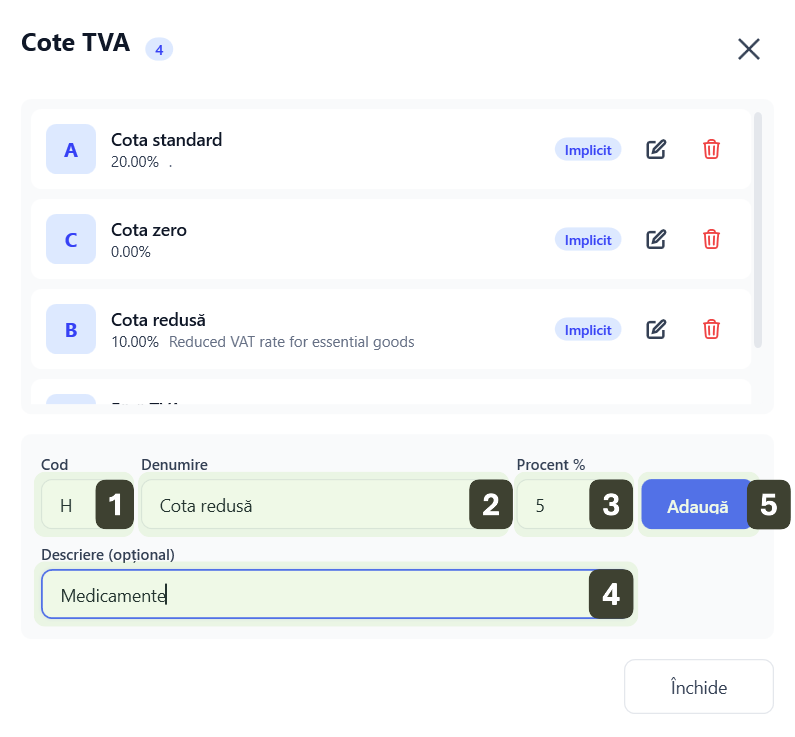
Adding a VAT Rate
The add form is integrated at the bottom of the list:
- Code: Enter the identifier letter
- Name: Enter the tax name
- Percentage %: Enter the value
- Description: Add optional details about its use
- Completion: Press the Add button
Editing a VAT Rate
- Press the Edit button next to a rate
The data will be loaded into the fields at the bottom. - Modify the desired values
- Press the Save button
Deleting a VAT Rate
- Press the Delete button (trash bin)
- The system will display a Delete Confirmation window
- Press the Yes button to finalize the action
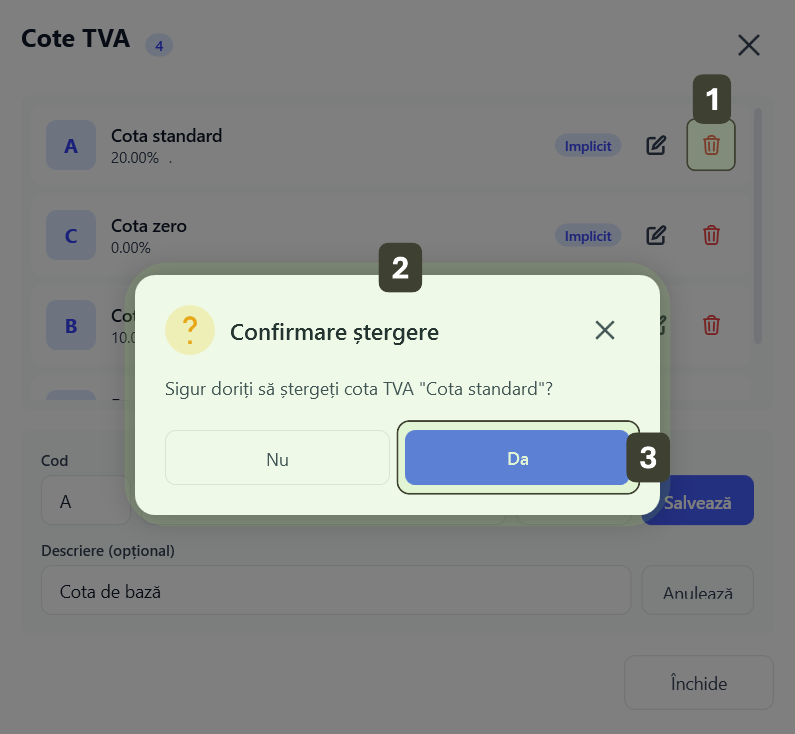
The rate code (letter) cannot be modified later because it is linked to the transaction history.
Synchronization and Permissions
- Synchronization: Any modification (Add/Edit/Delete) is marked locally and automatically transmitted to the server to be visible on all terminals.
- Permissions: Only users with an Administrator profile can make changes in this module.